Sales
How to create Sale Invoices
Step 1: Click on "Sales Invoices" button under sales module located at the top left of the window & further click on "Create Sales Invoice" button located at the top right of the window to add details of a new sales invoice
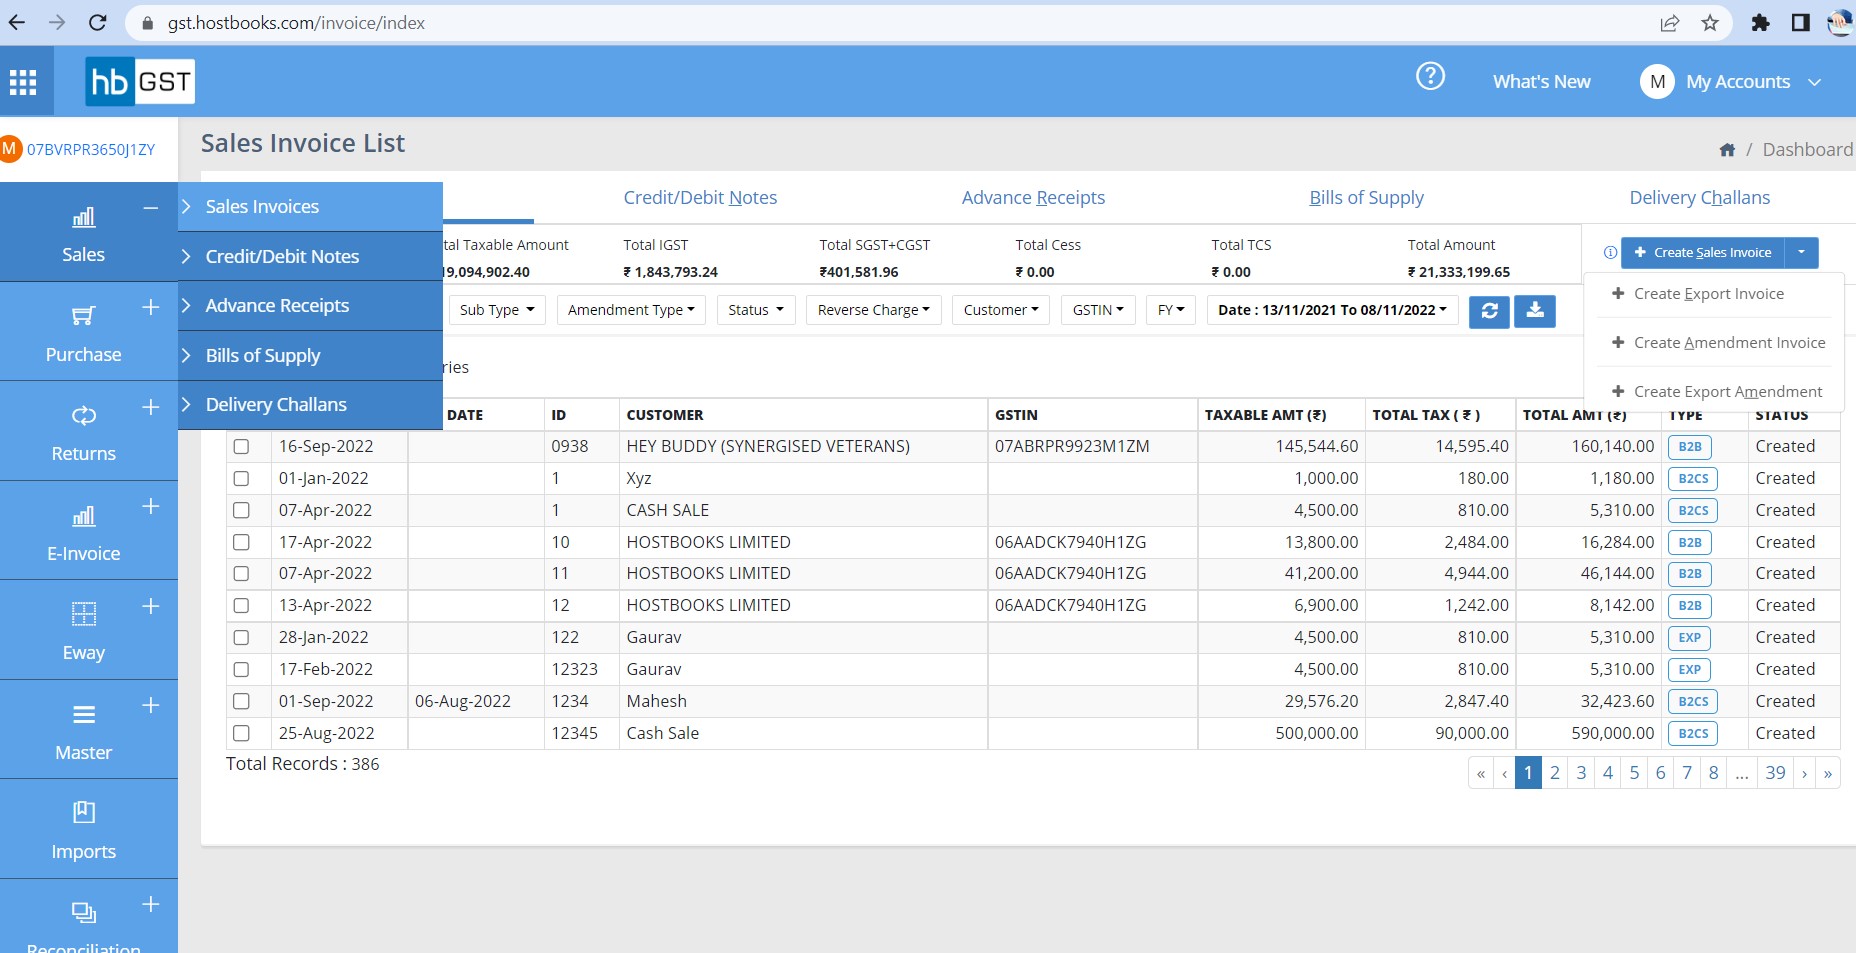
Step 2: At Sales invoice creation page, add all the details of sales invoice and then click on"save"button to save the"Sales Invoice"
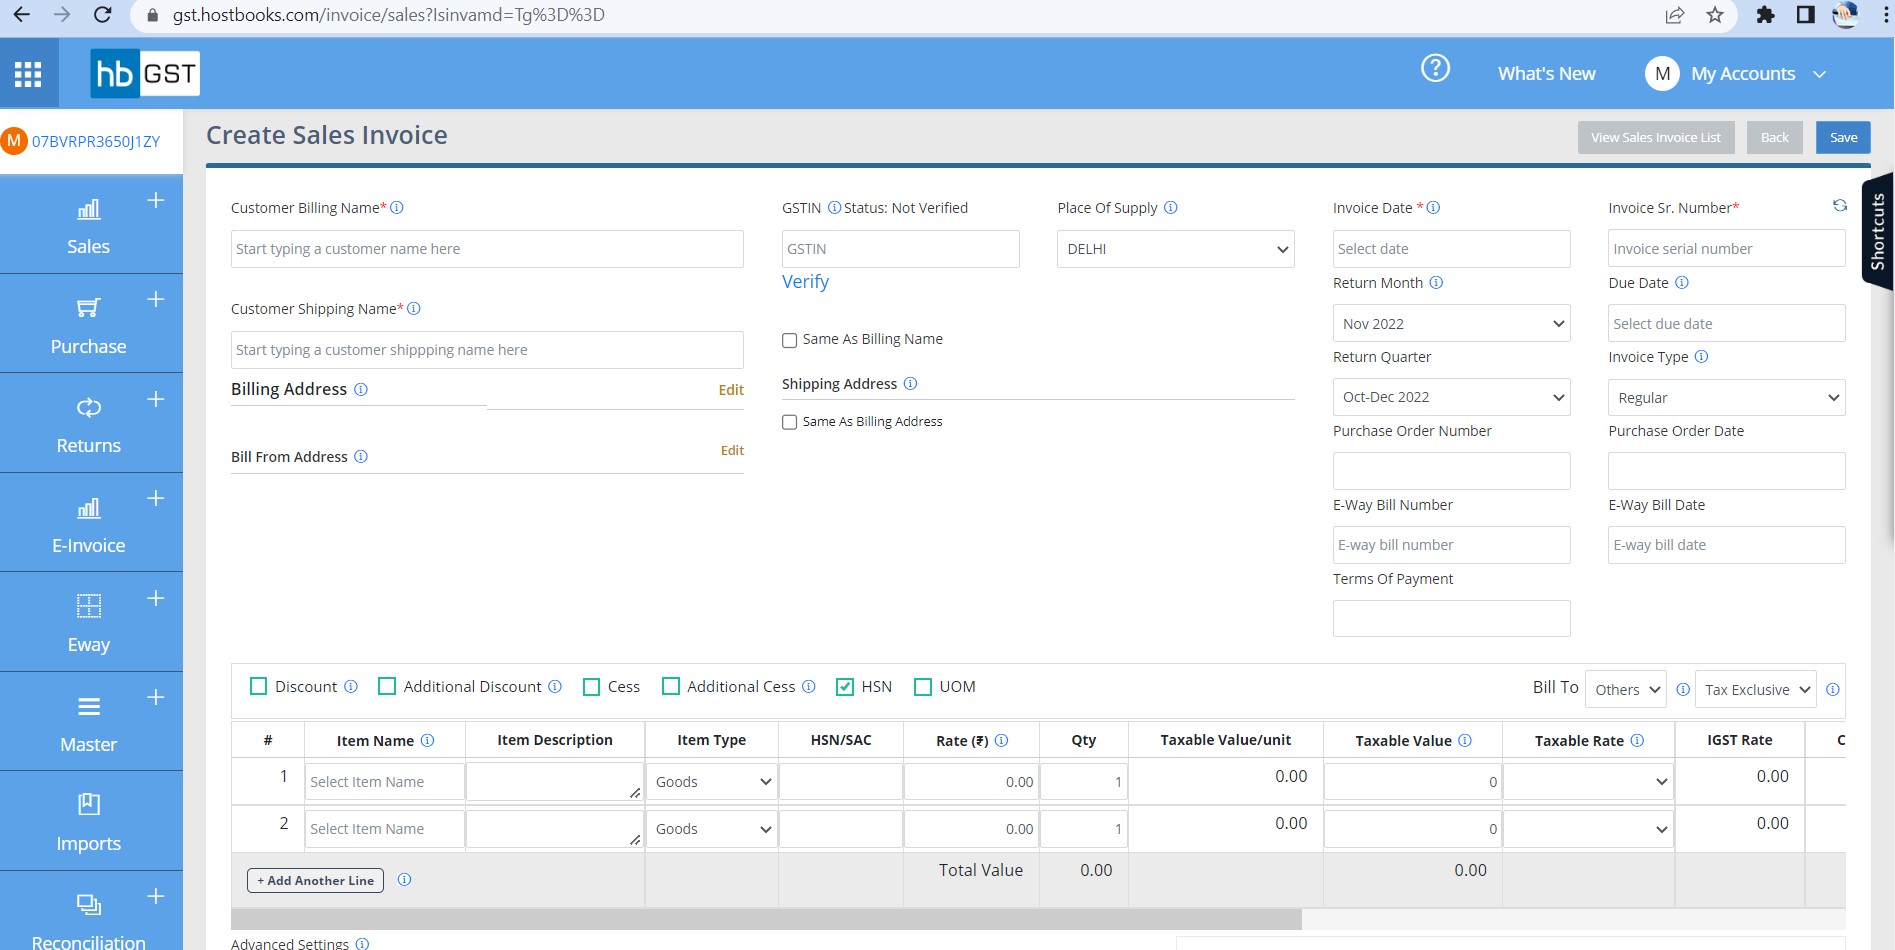
Step 3: Following details are required to be filled to create Sales Invoice:
Step 3A: Invoice Level Details:
- Customer Name
- GSTIN (PAN based 15-character Goods & Services Tax Provider Identification Number)
- Place of supply (The place where the product or service is received)
- Customer Address Edit
- Billing Address Edit
- Shipping Address
- Same As Billing Address
- Warehouse Address Edit
- Invoice Sr. Number
- Invoice Date
- Return Month
- Due Date
- Return Quarter
- Invoice Type
- Round off Total
- Grand Total
- Advance setting
Some fields are available for auto-fill functionality for reduce the time to create the invoice:
- For auto- fill invoice number, save the invoice series in setting. Please refer document series settings.
- For auto fill Client/Customer details & Customer Address Save the Client/vendors in Master=>Clients. Please refer Master client save.
- For auto fill Items details, Save the Items in Master=> Items. Please refer Master Items save.
- For auto fill Bank details, save the Bank details in Settings=> Bank setting. Please refer Setting bank details save.
- For auto fill Terms & Conditions, save the terms & Conditions in Settings=> Terms & Conditions settings. Please refer Setting Terms & Conditions.
- For auto fill Clients/vendors name with item mapped details, first save the Clients & Items mapping in Settings=> General settings => save clients & Items Mapping setting then Save in Master=> Clients. Please refer Master Client settings.
Step 3B: Item Details:
- Item Name
- Item Description
- Item Type (Goods / Service)
- HSN/SAC (HSN is an 8-digit code assigned to goods and SAC is a code assigned to services)
- UOM (Unit of measurements)
- Rate (₹)
- Discount %/ (₹)
- Additional Discount %/ (₹)
- Qty
- Taxable Value/unit
- Total Discount
- Taxable Value
- Taxable Rate
- Tax Rate (IGST or CGST/SGST)
- Tax Amount (IGST or CGST/SGST)
- Cess (%)
- Cess (Rs.)
- Cess (Rs.)
- Gross Amt
Step 3C: Bank Details
The details of the bank account in which payment to be received from customer. This can be auto-fetched if bank details already saved under settings. [Refer Bank Save setting]
Following details need to be filled under Bank Details
- Bank Name
- Account Number
- Branch Name
- IFSC Code
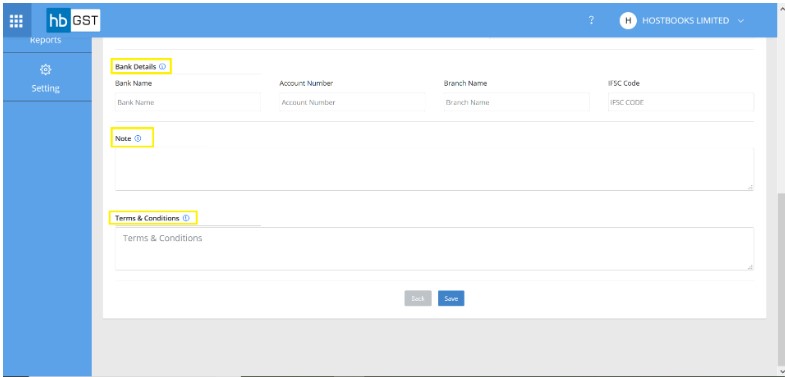
Step 3D: Enter Customer notes and terms and conditions for the invoice. However customer notes can be fetched if already updated in Client Master and terms and conditions can be auto-fetched from Terms and conditions settings.
- Customer Notes (Additional information other than the required fields)
- Terms and Conditions (The terms and conditions laid down by the seller with respect to all the transactions)
Step 4: On click of 'Save' button, view page of Invoice can be viewed where all the details entered can be reviewed
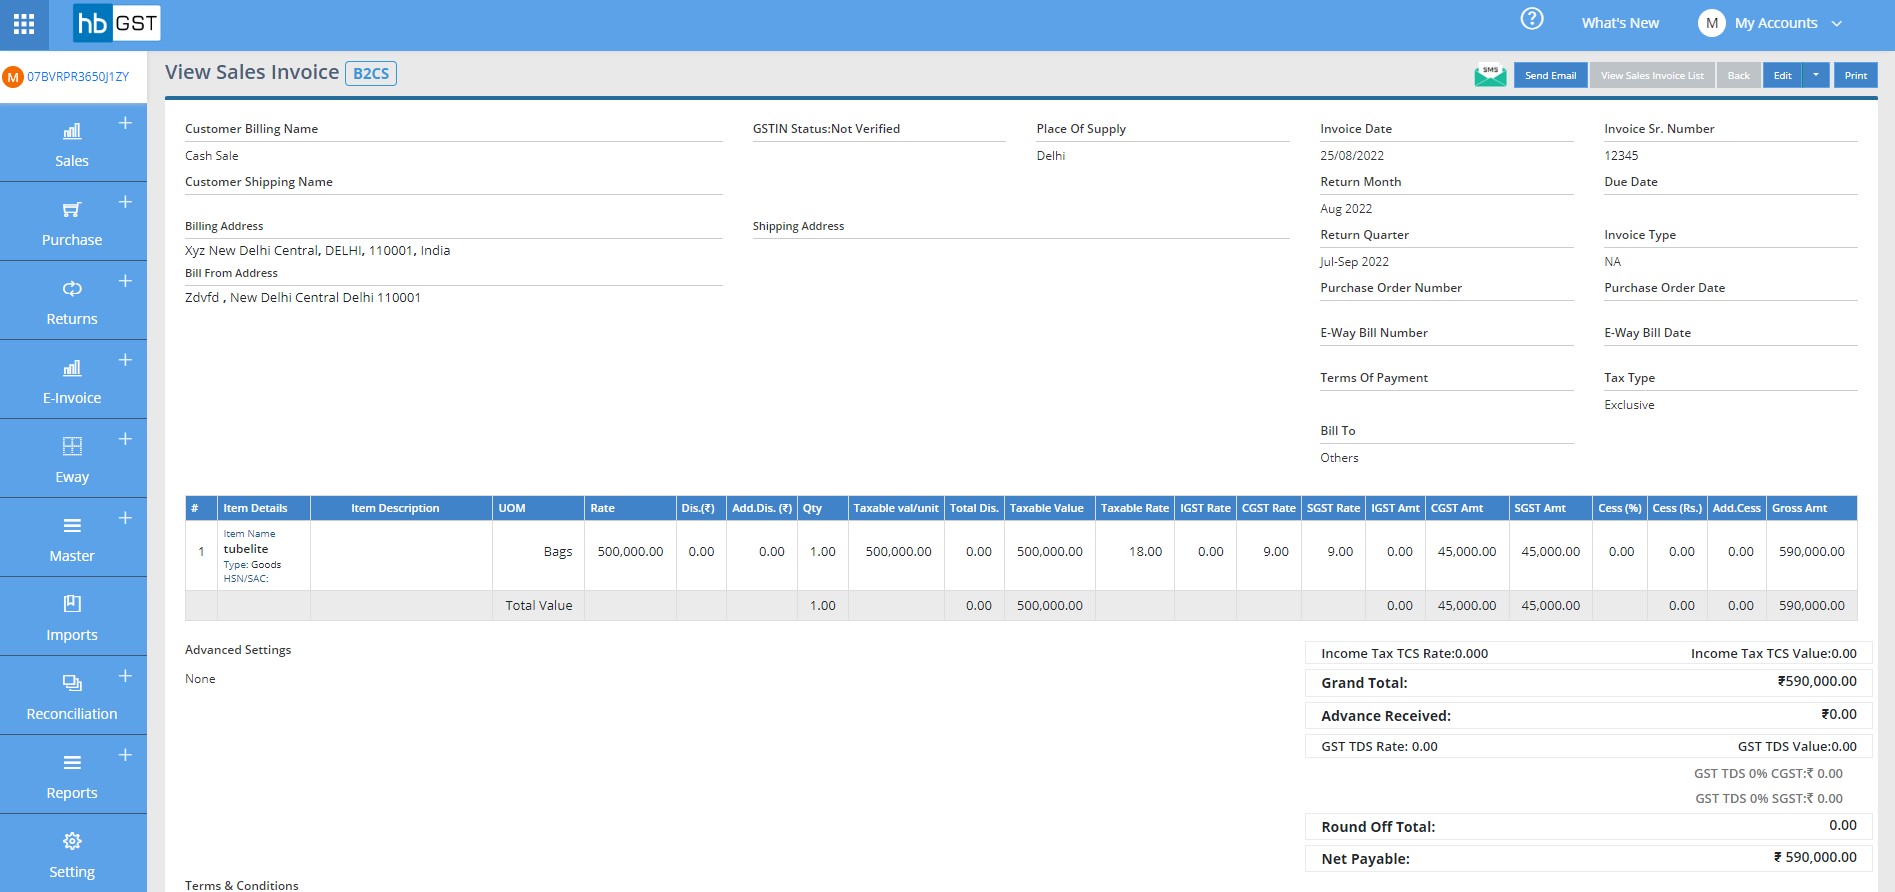
Or it can be accessed from sales listing page just by clicking on the invoice.

How to create Export Invoices
Step 1: Click on "Sales Invoices" button under sales module located at the top left of the window & further click on dropdown button besides create sale invoice option and then click on "Create Export Invoice" to add details of a new export invoice
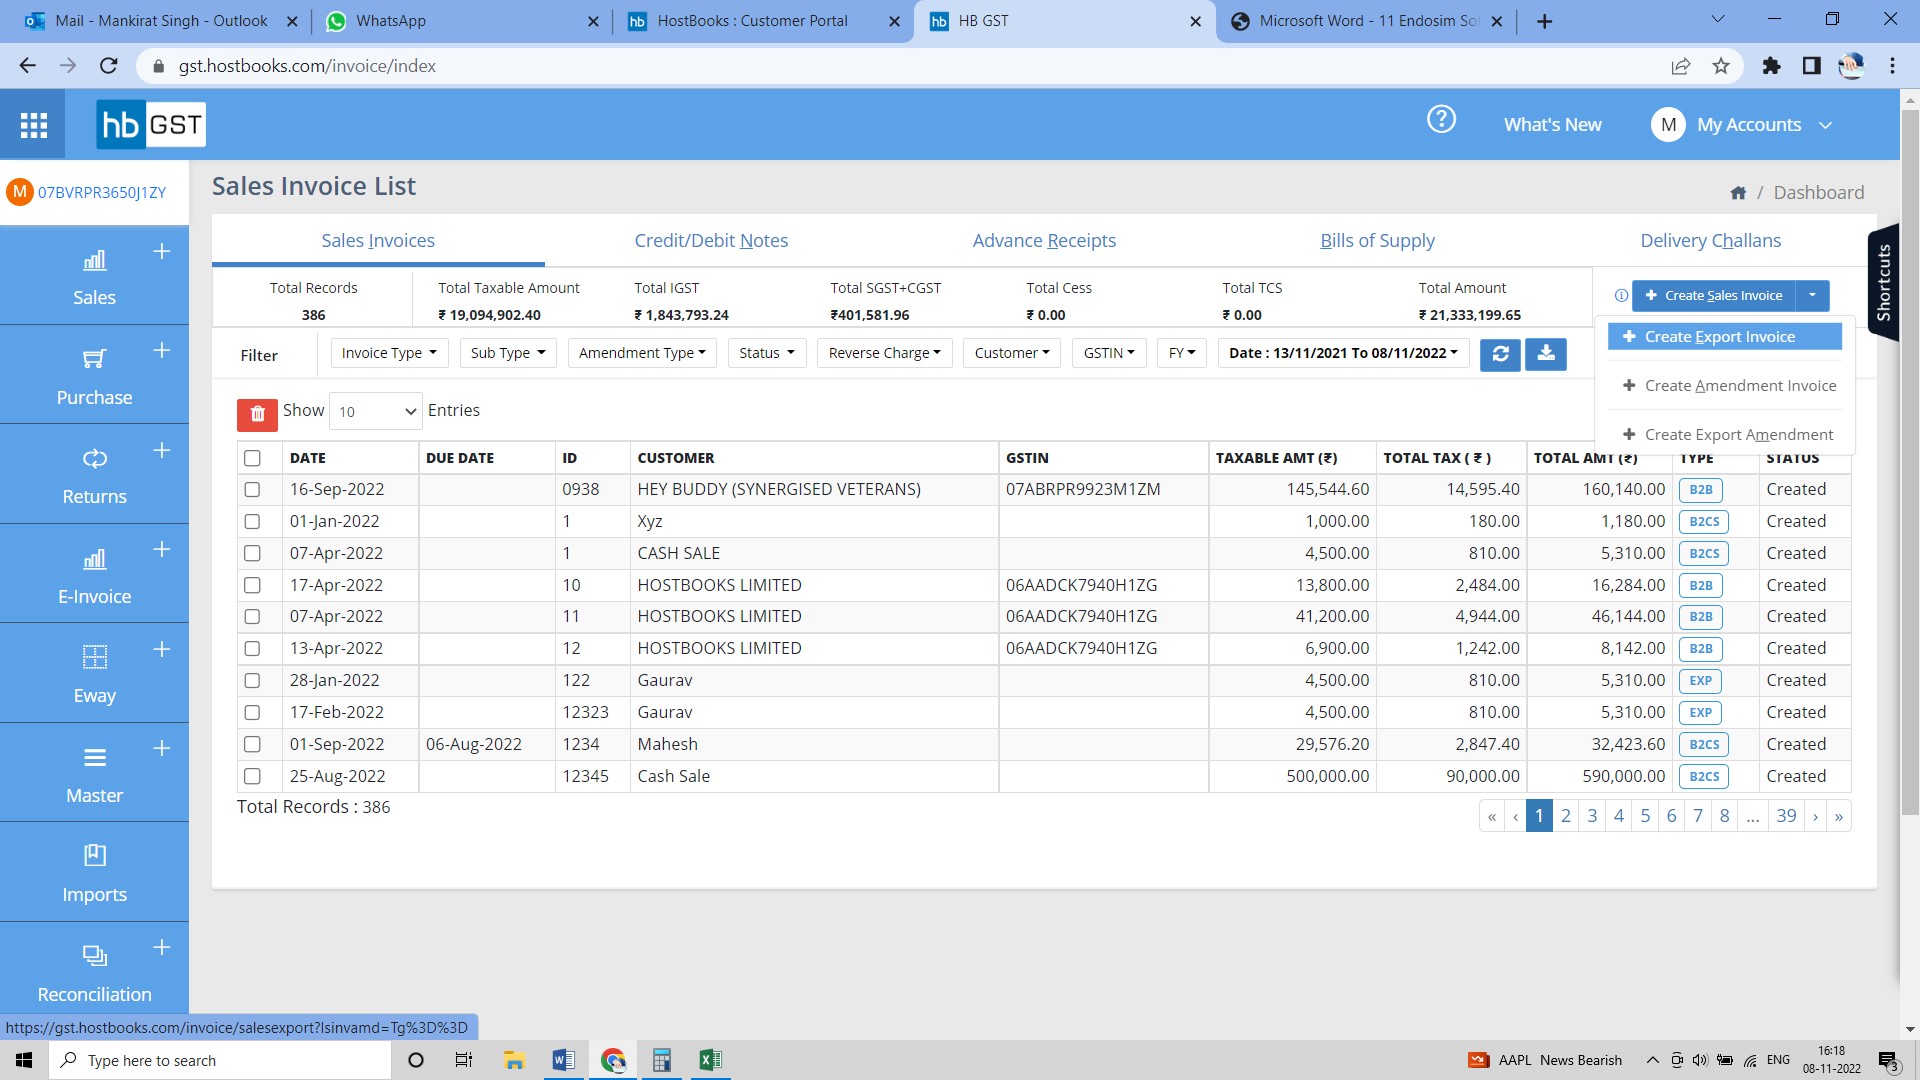
Step 2: At Export invoice creation page, add all the details of export invoice and then click on "save" button to save the "Export Invoice"
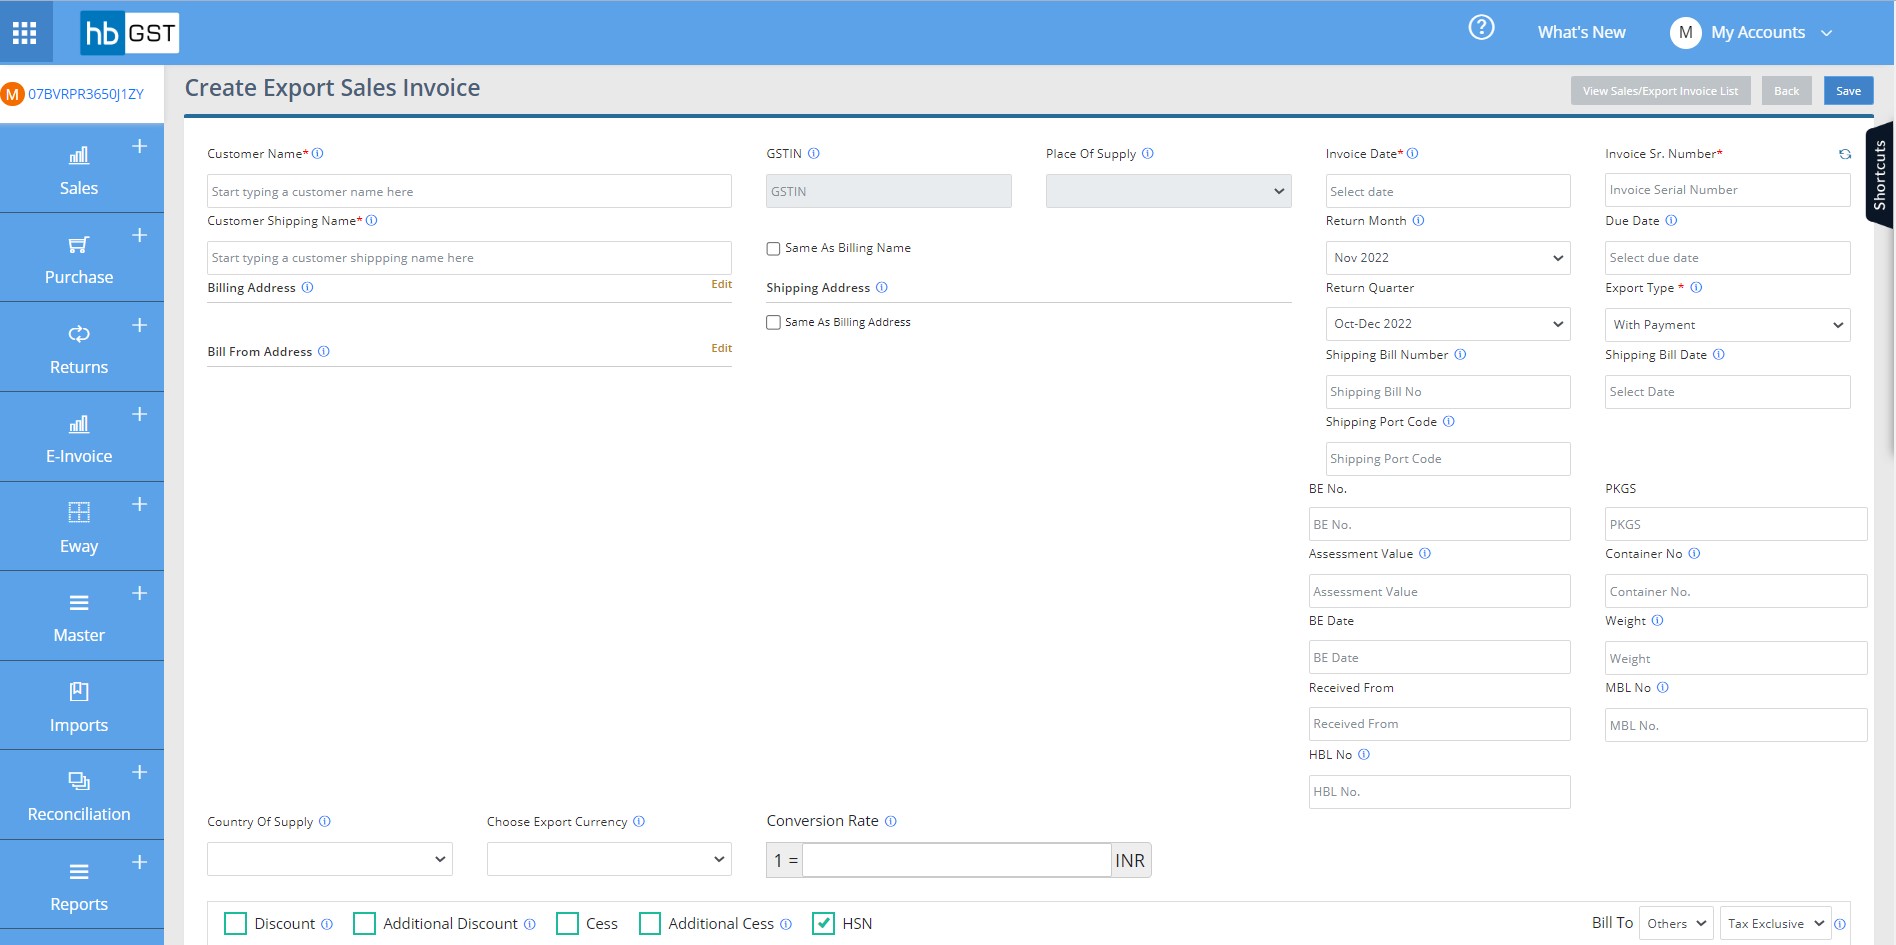
Step 3: Following details are required to be filled to create Export Invoice:
Step 3A: Invoice Level Details:
- Customer Name
- GSTIN (PAN based 15-character Goods & Services Tax Provider Identification Number)
- Place of supply (The place where the product or service is received)
- Customer Address Edit
- Billing Address Edit
- Shipping Address
- Same As Billing Address
- Warehouse Address Edit
- Invoice Sr. Number
- Invoice Date
- Return Month
- Due Date
- Return Quarter
- Invoice Type
- Round off Total
- Grand Total
- Advance setting
Some fields are available for auto-fill functionality for reduce the time to create the invoice:
- For auto- fill invoice number, save the invoice series in setting. Please refer document series settings.
- For auto fill Client/Customer details & Customer Address Save the Client/vendors in Master=>Clients. Please refer Master client save.
- For auto fill Items details, Save the Items in Master=> Items. Please refer Master Items save.
- For auto fill Bank details, save the Bank details in Settings=> Bank setting. Please refer Setting bank details save.
- For auto fill Terms & Conditions, Save the terms & Conditions in Settings=> Terms & Conditions settings. Please refer Setting Terms & Conditions.
- For auto fill Clients/vendors name with item mapped details, first save the Clients & Items mapping in Settings=> General settings => save clients & Items Mapping setting then Save in Master=> Clients. Please refer Master Client settings.
Step 3B: Item Details:
- Item Name
- Item Description
- Item Type (Goods / Service)
- HSN/SAC (HSN is an 8 digit code assigned to goods and SAC is a code assigned to services)
- UOM (Unit of measurements)
- Rate (₹)
- Discount %/ (₹)
- Additional Discount %/ (₹)
- Qty
- Taxable Value/unit
- Total Discount
- Taxable Value
- Taxable Rate
- Tax Rate (IGST or CGST/SGST)
- Tax Amount (IGST or CGST/SGST)
- Cess (%)
- Cess (Rs.)
- Cess
- Gross Amt
Step 3C: Bank Details
The details of the bank account in which payment to be received from customer. This can be auto-fetched if bank details already saved under settings. [Refer Bank Save setting]
Following details need to be filled under Bank Details
- Bank Name
- Account Number
- Branch Name
- IFSC Code

Step 3D: Enter Customer notes and terms and conditions for the invoice. However customer notes can be fetched if already updated in Client Master and terms and conditions can be auto-fetched from Terms and conditions settings.
- Customer Notes (Additional information other than the required fields)
- Terms and Conditions (The terms and conditions laid down by the seller with respect to all the transactions)
Step 4: On click of 'Save' button, view page of export Invoice can be viewed where all the details entered can be reviewed
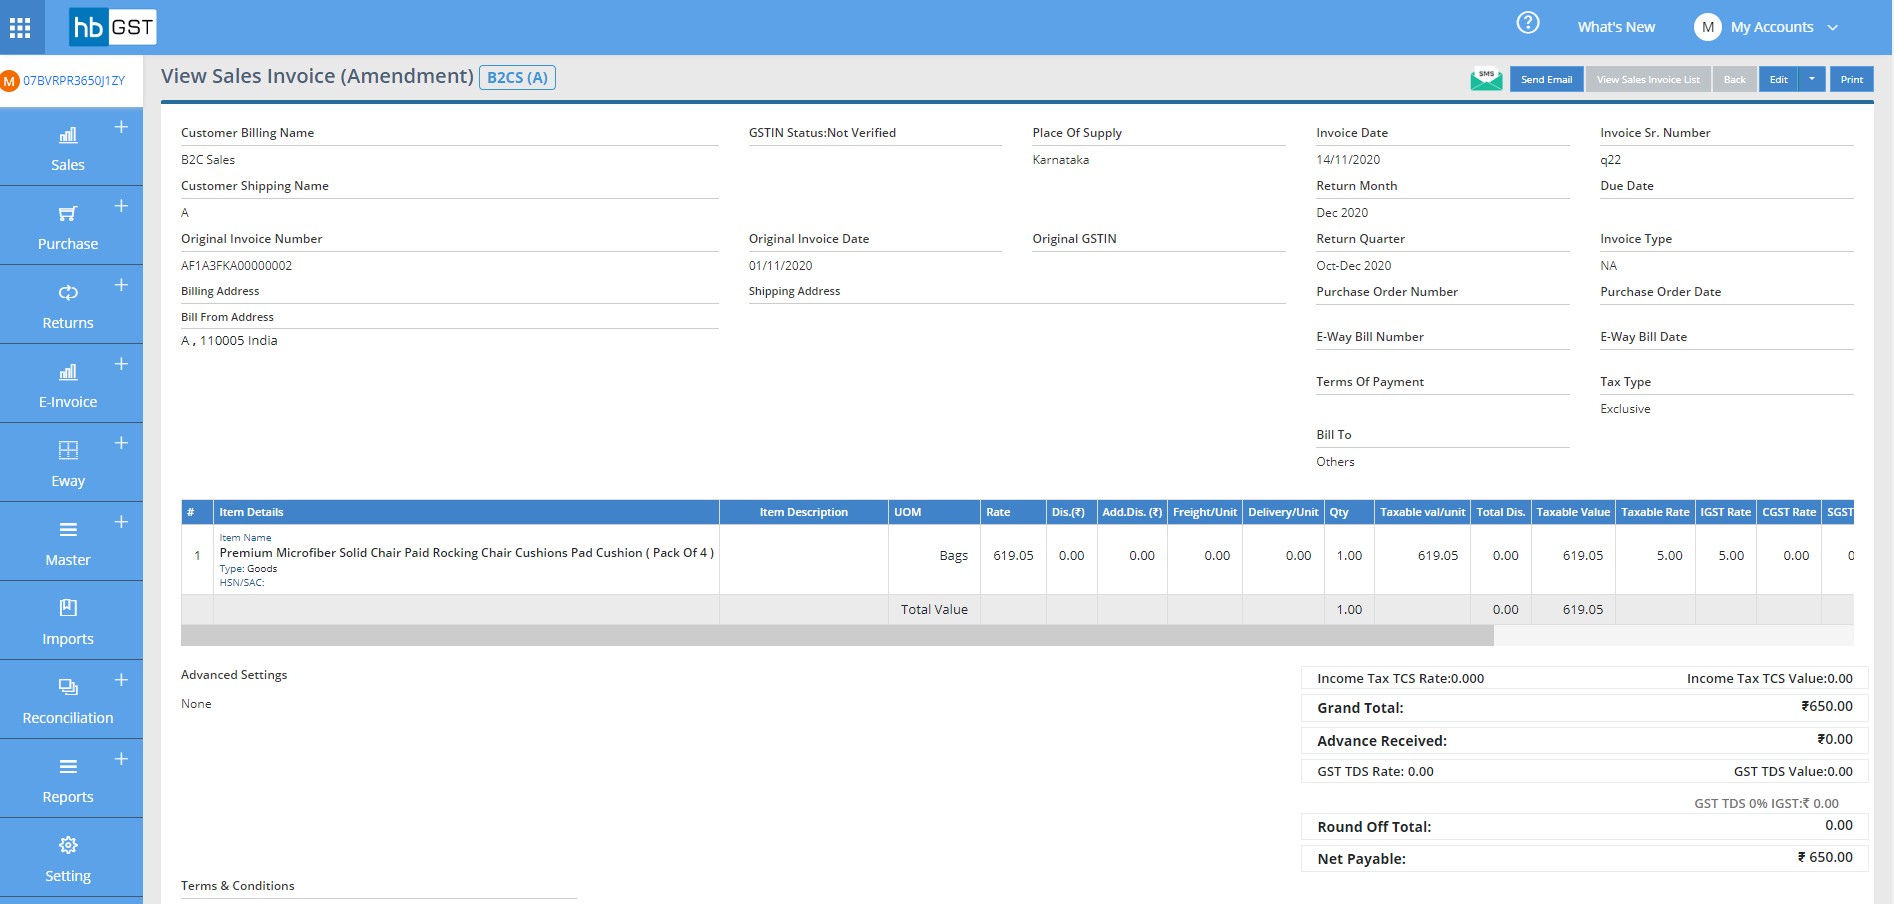
Or it can be accessed from sales listing page just by clicking on the invoice.

How to Create Amendment Invoice
Step 1: Click on "Sales Invoices" button under sales module located at the top left of the window & further click on dropdown button besides create sale invoice option and then click on "Create Amendment Invoice" to add details of a new amendment invoice
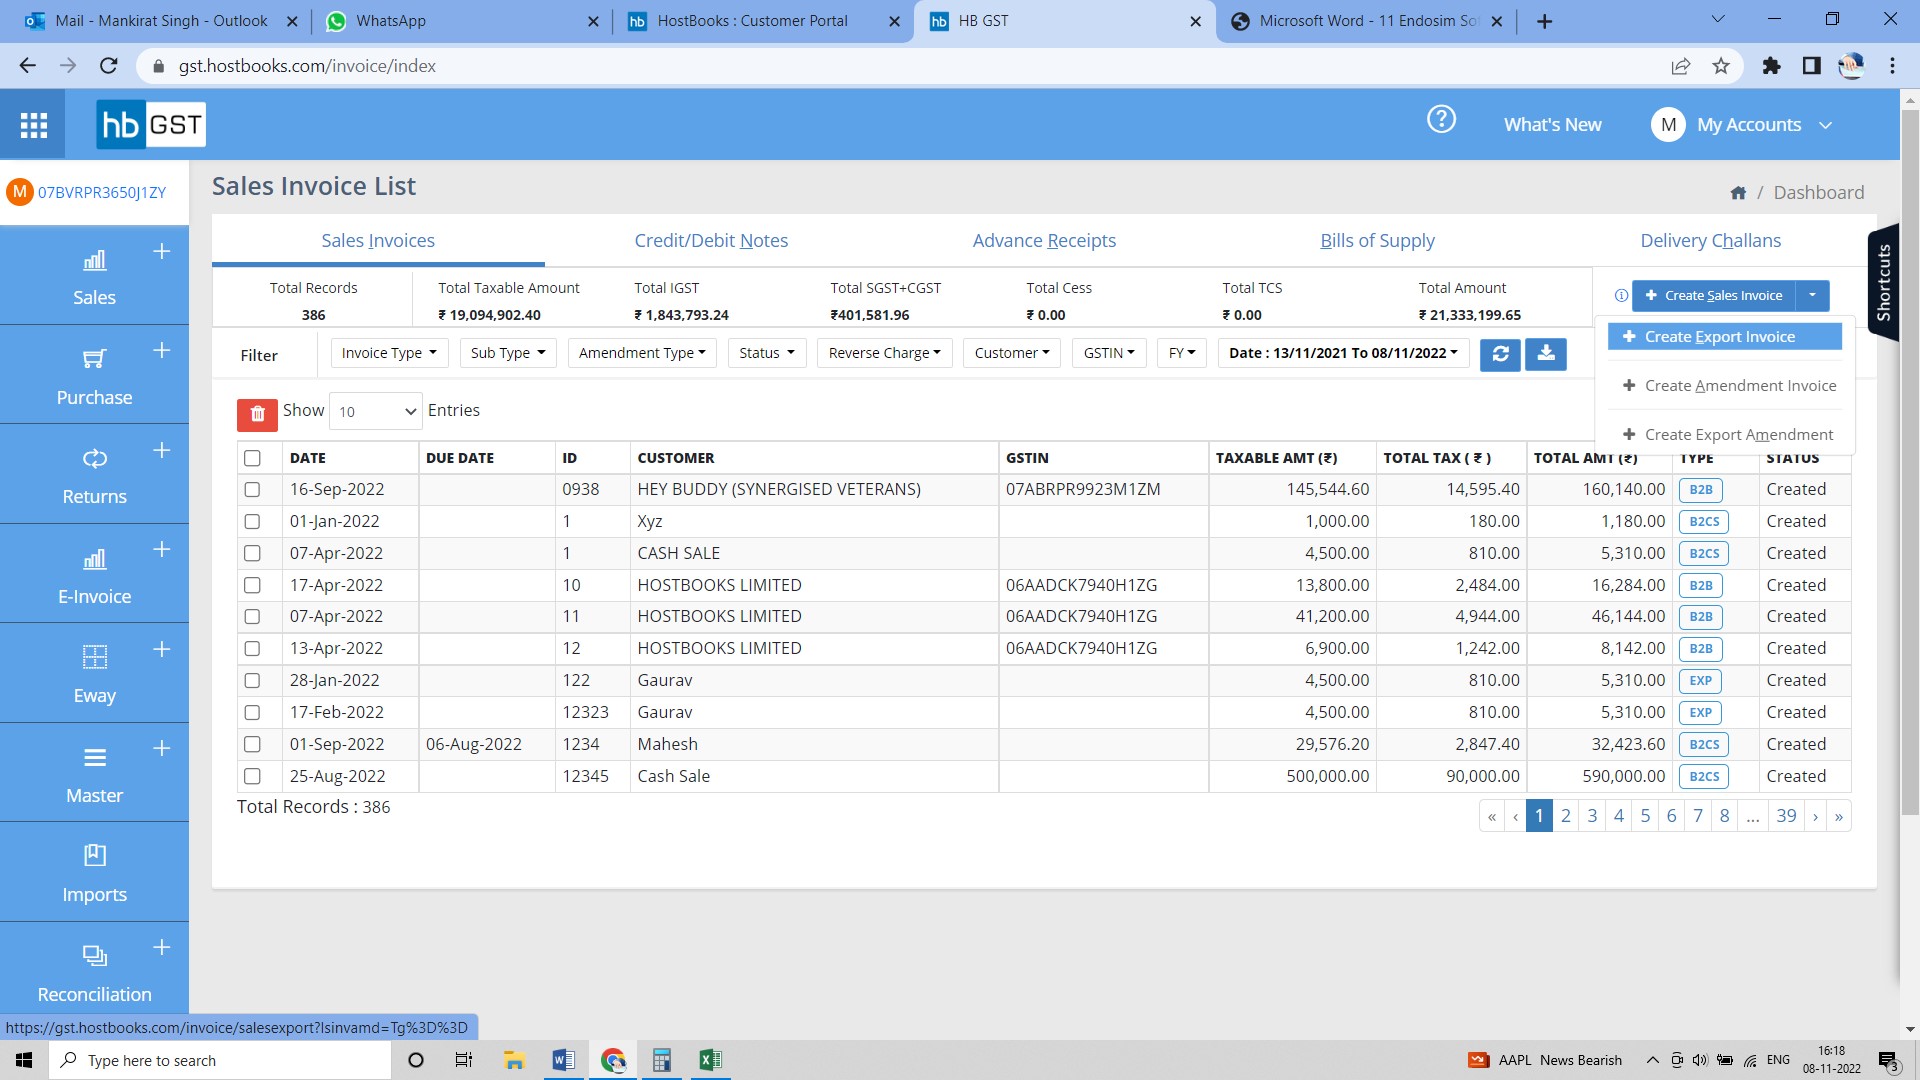
Step 2: You can create Sales invoice Amendment with unique identification number with the reference of Original sales Invoice numbers for every sales. At Sales Invoice Amendment creation page, enter the "Original Invoice number". All the details of original invoice shall get auto-populated just by entering Original Invoice number user just need to make necessary correction.
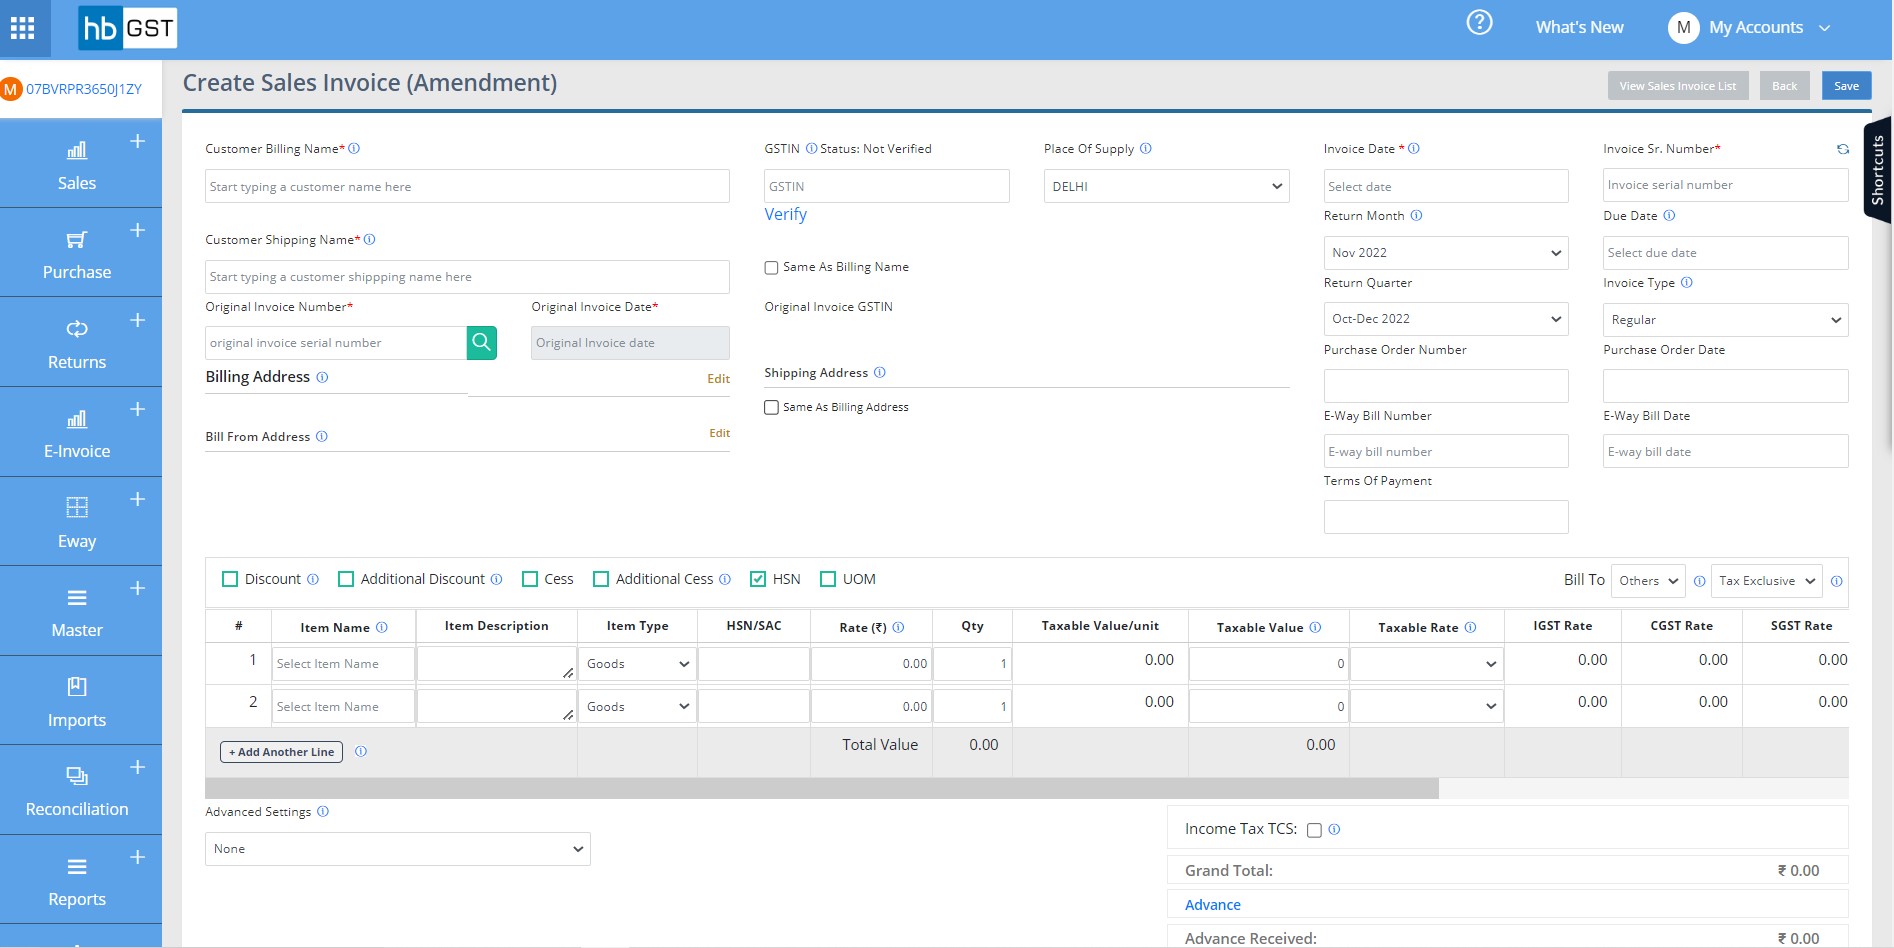
Step 3: Following details are required to be filled to create Amendment Sales Invoice:
Step 3A: Invoice Level Details:
- Original Invoice Number
- Original Invoice Dat
- Customer Name
- GSTIN (PAN based 15-character Goods & Services Tax Provider Identification Number)
- Place of supply (The place where the product or service is received)
- Customer Address Edit
- Billing Address Edit
- Shipping Address
- Same As Billing Address
- Warehouse Address Edit
- Invoice Sr. Number
- Invoice Date
- Return Month
- Due Date
- Return Quarter
- Invoice Type
- Round off Total
- Grand Total
- Advance setting
Step 3B: Item Details:
- Item Name
- Item Description
- Item Type (Goods / Service)
- HSN/SAC (HSN is an 8 digit code assigned to goods and SAC is a code assigned to services)
- UOM (Unit of measurements)
- Rate (₹)
- Discount %/ (₹)
- Additional Discount %/ (₹)
- Qty
- Taxable Value/unit
- Total Discount
- Taxable Value
- Taxable Rate
- Tax Rate (IGST or CGST/SGST)
- Tax Amount (IGST or CGST/SGST)
- Cess (%)
- Cess (Rs.)
- Cess
- Gross Amt
Step 3C: Bank Details
The details of the bank account in which payment to be received from customer. This can be auto-fetched if bank details already saved under settings. [Refer Bank Save setting]
Following details need to be filled under Bank Details
- Bank Name
- Account Number
- Branch Name
- IFSC Code
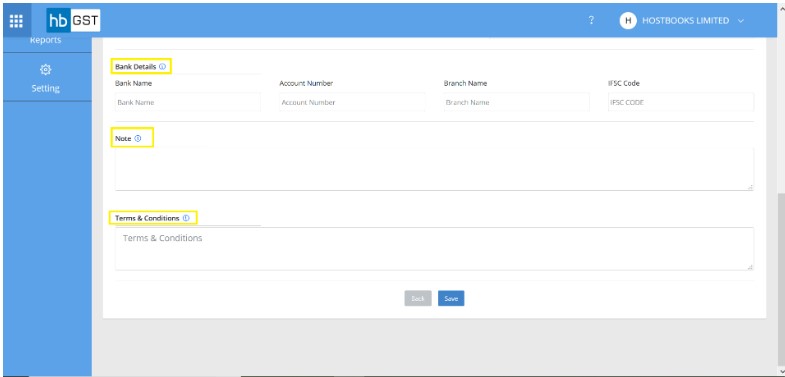
Step 3D: Enter Customer notes and terms and conditions for the amendment invoice. However customer notes can be fetched if already updated in Client Master and terms and conditions can be auto-fetched from Terms and conditions settings.
- Customer Notes (Additional information other than the required fields)
- Terms and Conditions (The terms and conditions laid down by the seller with respect to all the transactions)
Step 4: On click of 'Save' button, view page of amendment Invoice can be viewed where all the details entered can be reviewed.

How to Create Export Amendment
Step 1: Click on "Sales Invoices" button under sales module located at the top left of the window & further click on dropdown button besides create sale invoice option and then click on "Create Export Amendment" to add details of a new export amendment
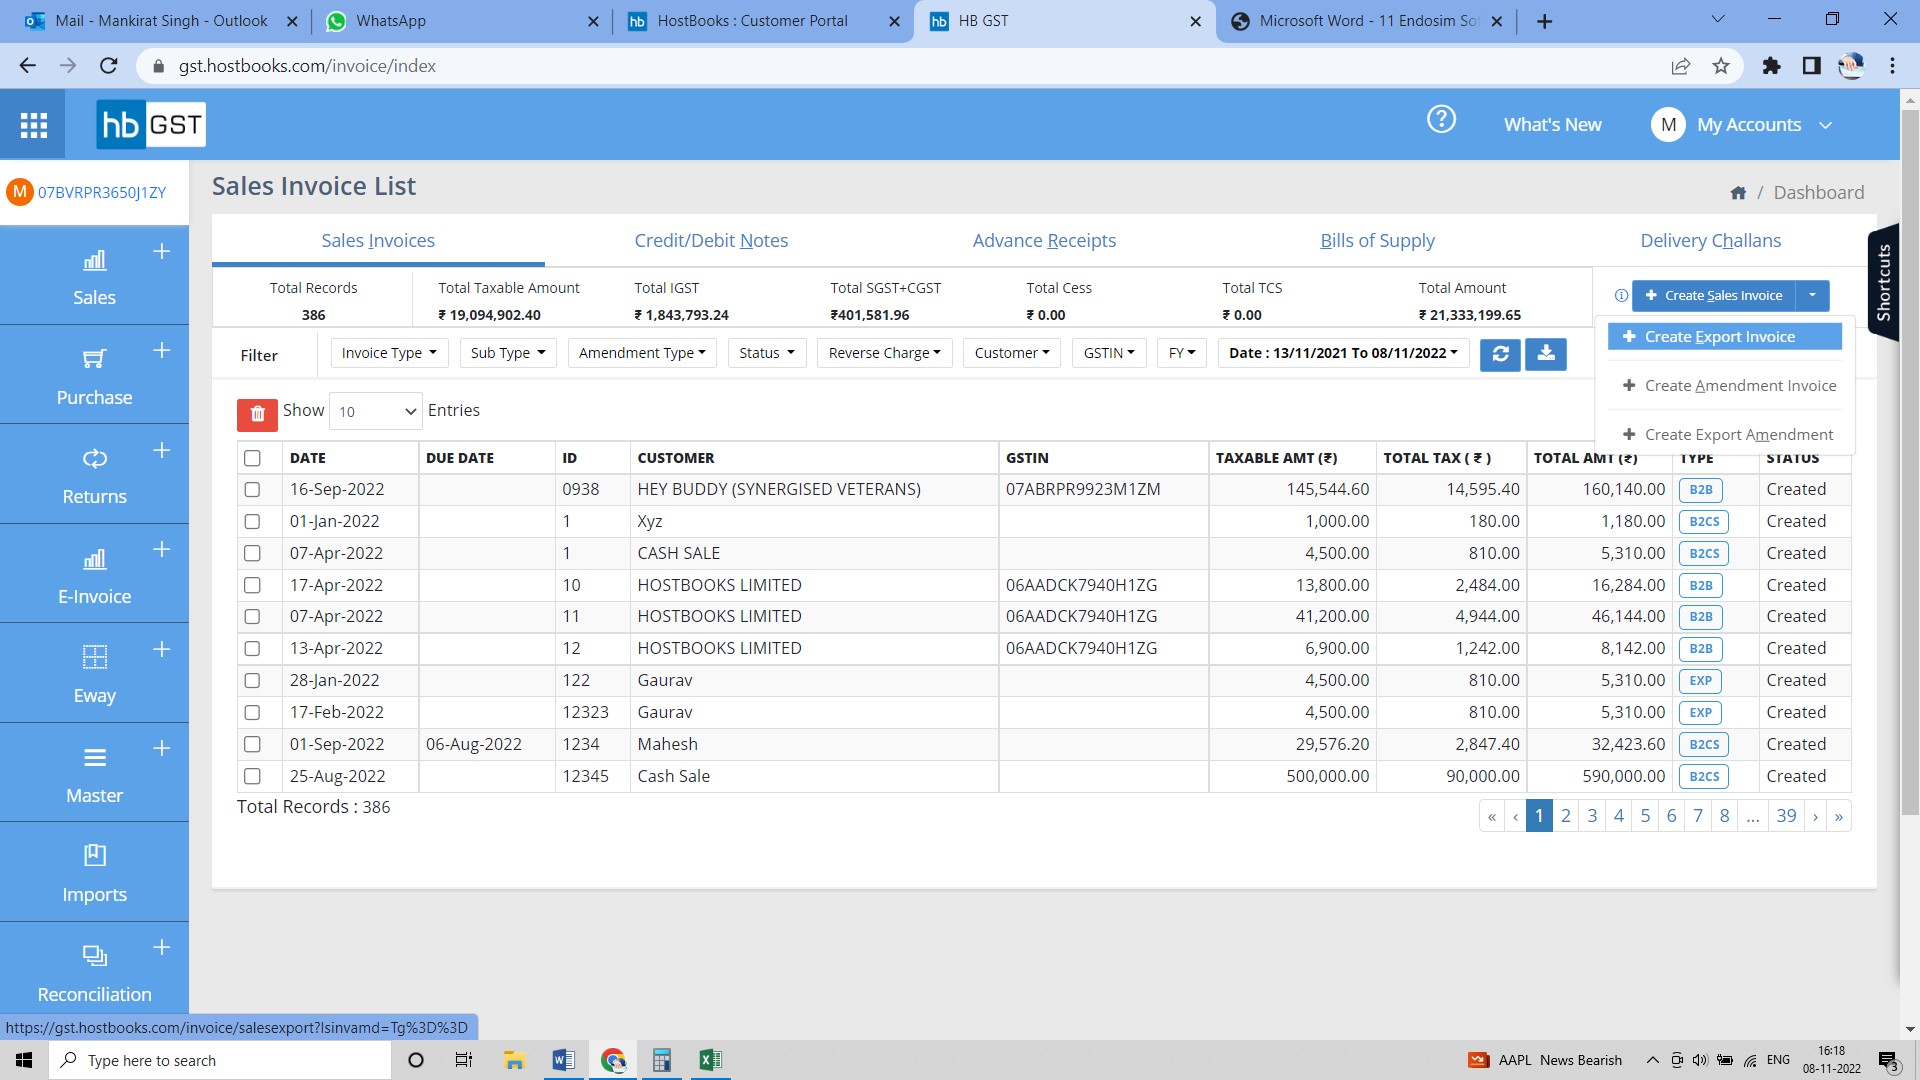
Step 2: You can create Export invoice Amendment with unique identification number with the reference of Original Export Invoice numbers for every sales. At Sales Invoice Amendment creation page, enter the "Original Invoice number". All the details of original invoice shall get auto-populated just by entering Original Invoice number user just need to make necessary correction
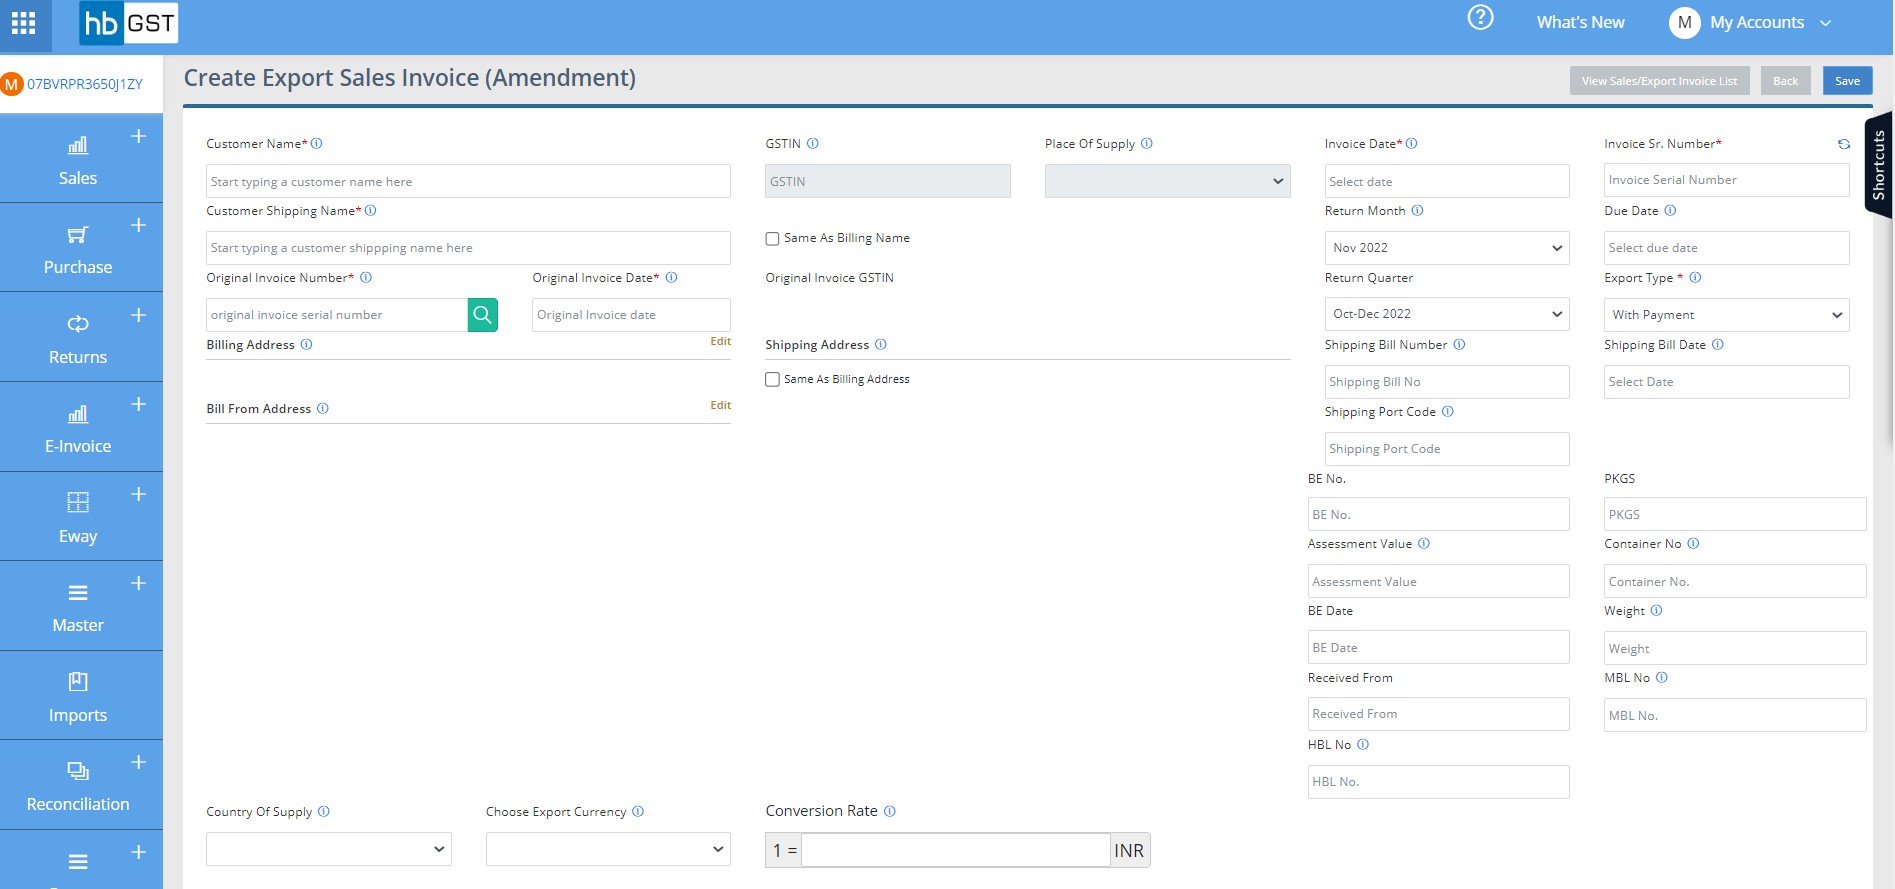
Step 3: Following details are required to be filled to create export amendment invoice:
Step 3A: Invoice Level Details:
- Original Invoice Number
- Original Invoice Date
- Customer Name
- GSTIN (PAN based 15-character Goods & Services Tax Provider Identification Number)
- Place of supply (The place where the product or service is received)
- Customer Address Edit
- Billing Address Edit
- Shipping Address
- Same As Billing Address
- Warehouse Address Edit
- Invoice Sr. Number
- Invoice Date
- Return Month
- Due Date
- Return Quarter
- Invoice Type
- Round off Total
- Grand Total
- Advance setting
Step 3B: Item Details:
- Item Name
- Item Description
- Item Type (Goods / Service)
- HSN/SAC (HSN is an 8 digit code assigned to goods and SAC is a code assigned to services)
- UOM (Unit of measurements)
- Rate (₹)
- Discount %/ (₹)
- Additional Discount %/ (₹)
- Qty
- Taxable Value/unit
- Total Discount
- Taxable Value
- Taxable Rate
- Tax Rate (IGST or CGST/SGST)
- Tax Amount (IGST or CGST/SGST)
- Cess (%)
- Cess (Rs.)
- Cess
- Gross Amt
Step 3C: Bank Details
The details of the bank account in which payment to be received from customer. This can be auto-fetched if bank details already saved under settings. [Refer Bank Save setting]
Following details need to be filled under Bank Details
- Bank Name
- Account Number
- Branch Name
- IFSC Code

Step 3D: Enter Customer notes and terms and conditions for the invoice. However customer notes can be fetched if already updated in Client Master and terms and conditions can be auto-fetched from Terms and conditions settings.
- Customer Notes (Additional information other than the required fields)
- Terms and Conditions (The terms and conditions laid down by the seller with respect to all the transactions)
Step 4: On click of 'Save' button, view page of Export Amendment Invoice can be viewed where all the details entered can be reviewed.
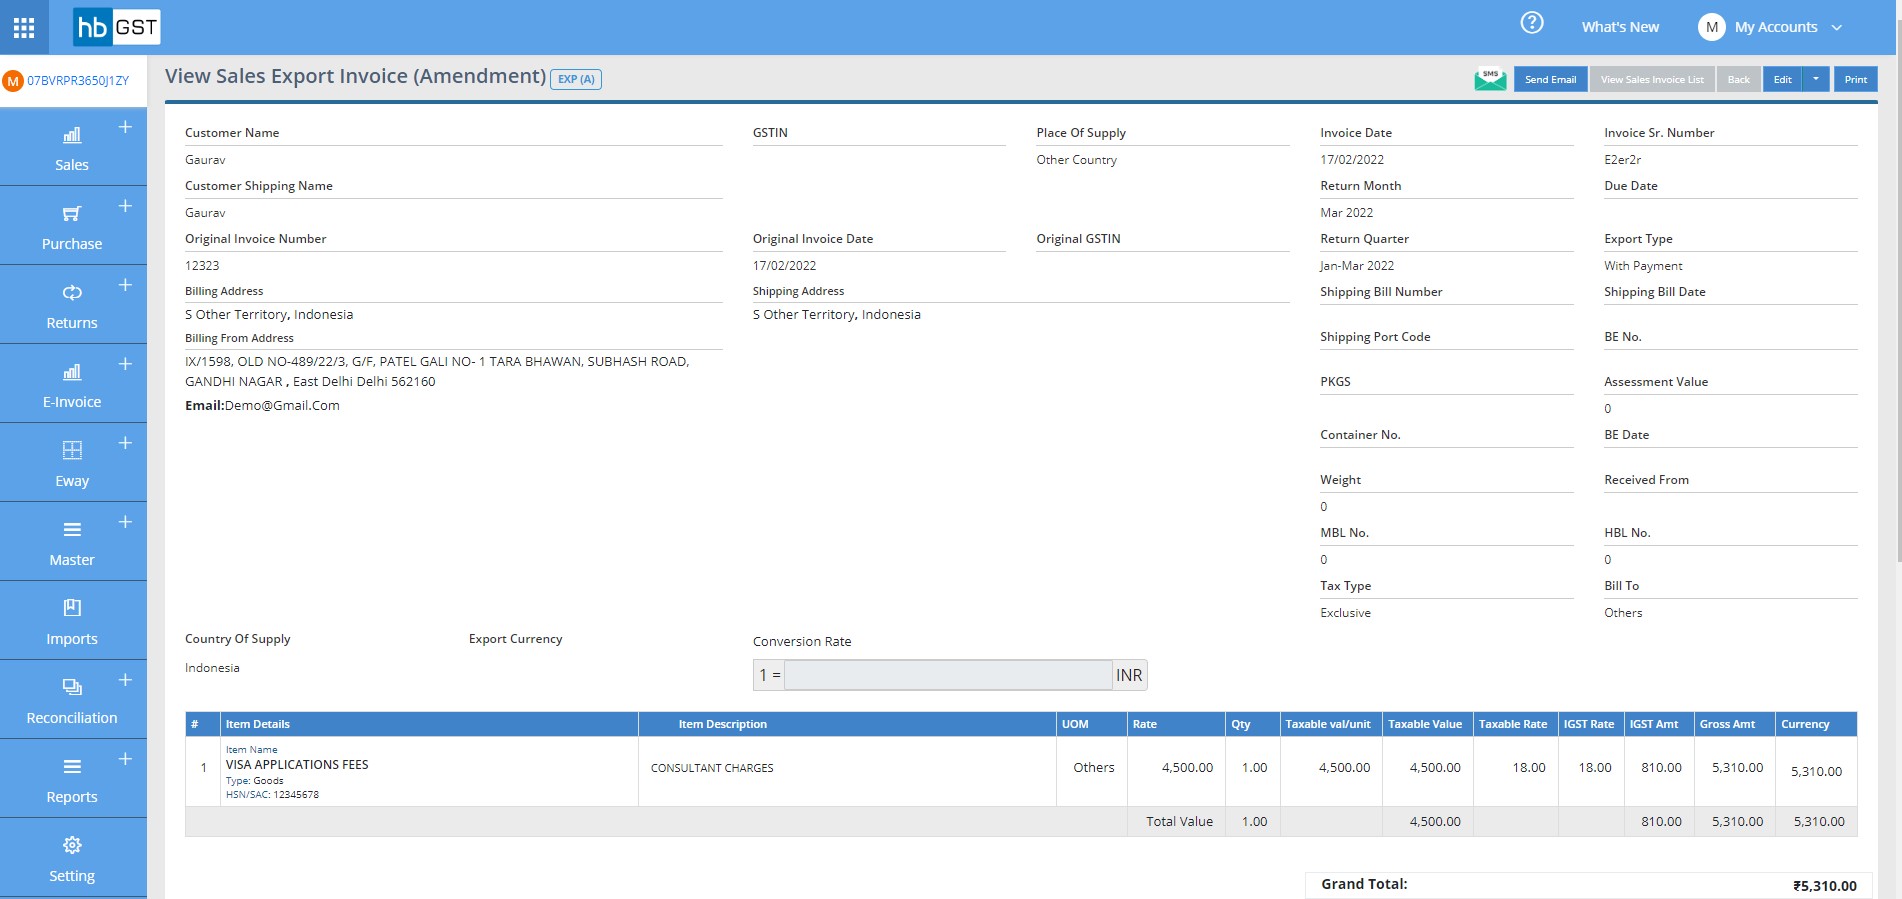
Or it can be accessed from sales listing page just by clicking on the export amendment invoice.

How to create Credit/Debit Notes
Step 1: Click on "Credit/Debit Notes" button under sales module located at the top left of the window & further click on "Create Cr/Dr Note" button located at top right of window to add details of a new credit/debit note
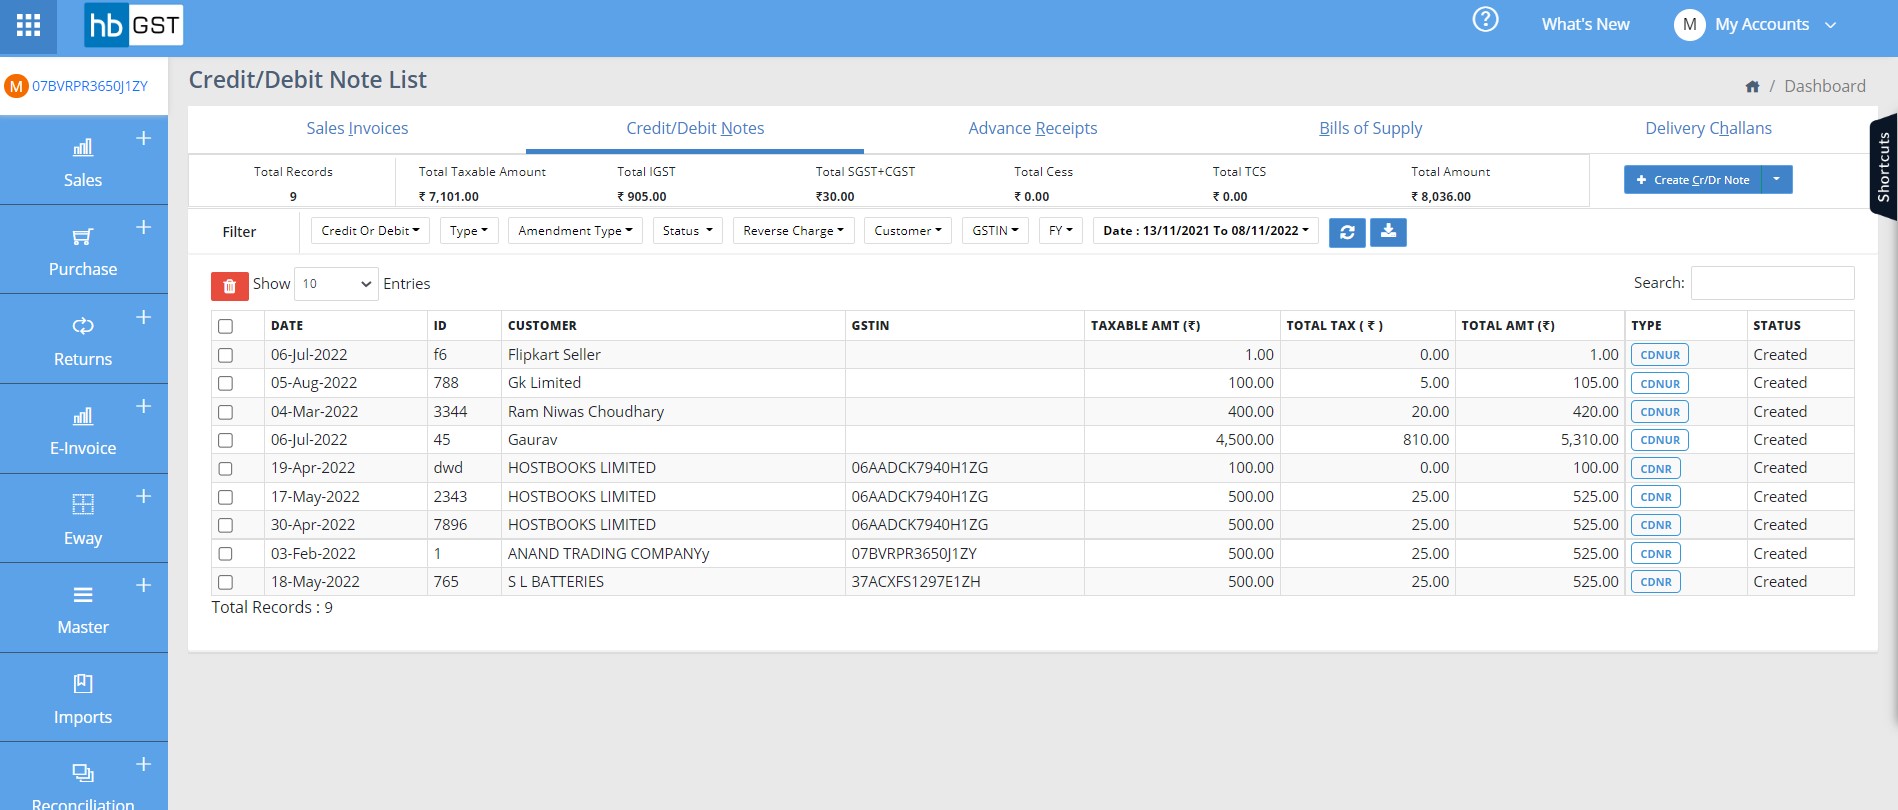
Step 2: You can create Debit Credit Note with unique identification number with the reference of Original sales Invoice numbers for every sales. All the details of original invoice shall get auto-populated just by entering Original Invoice number user just need to make necessary correction.
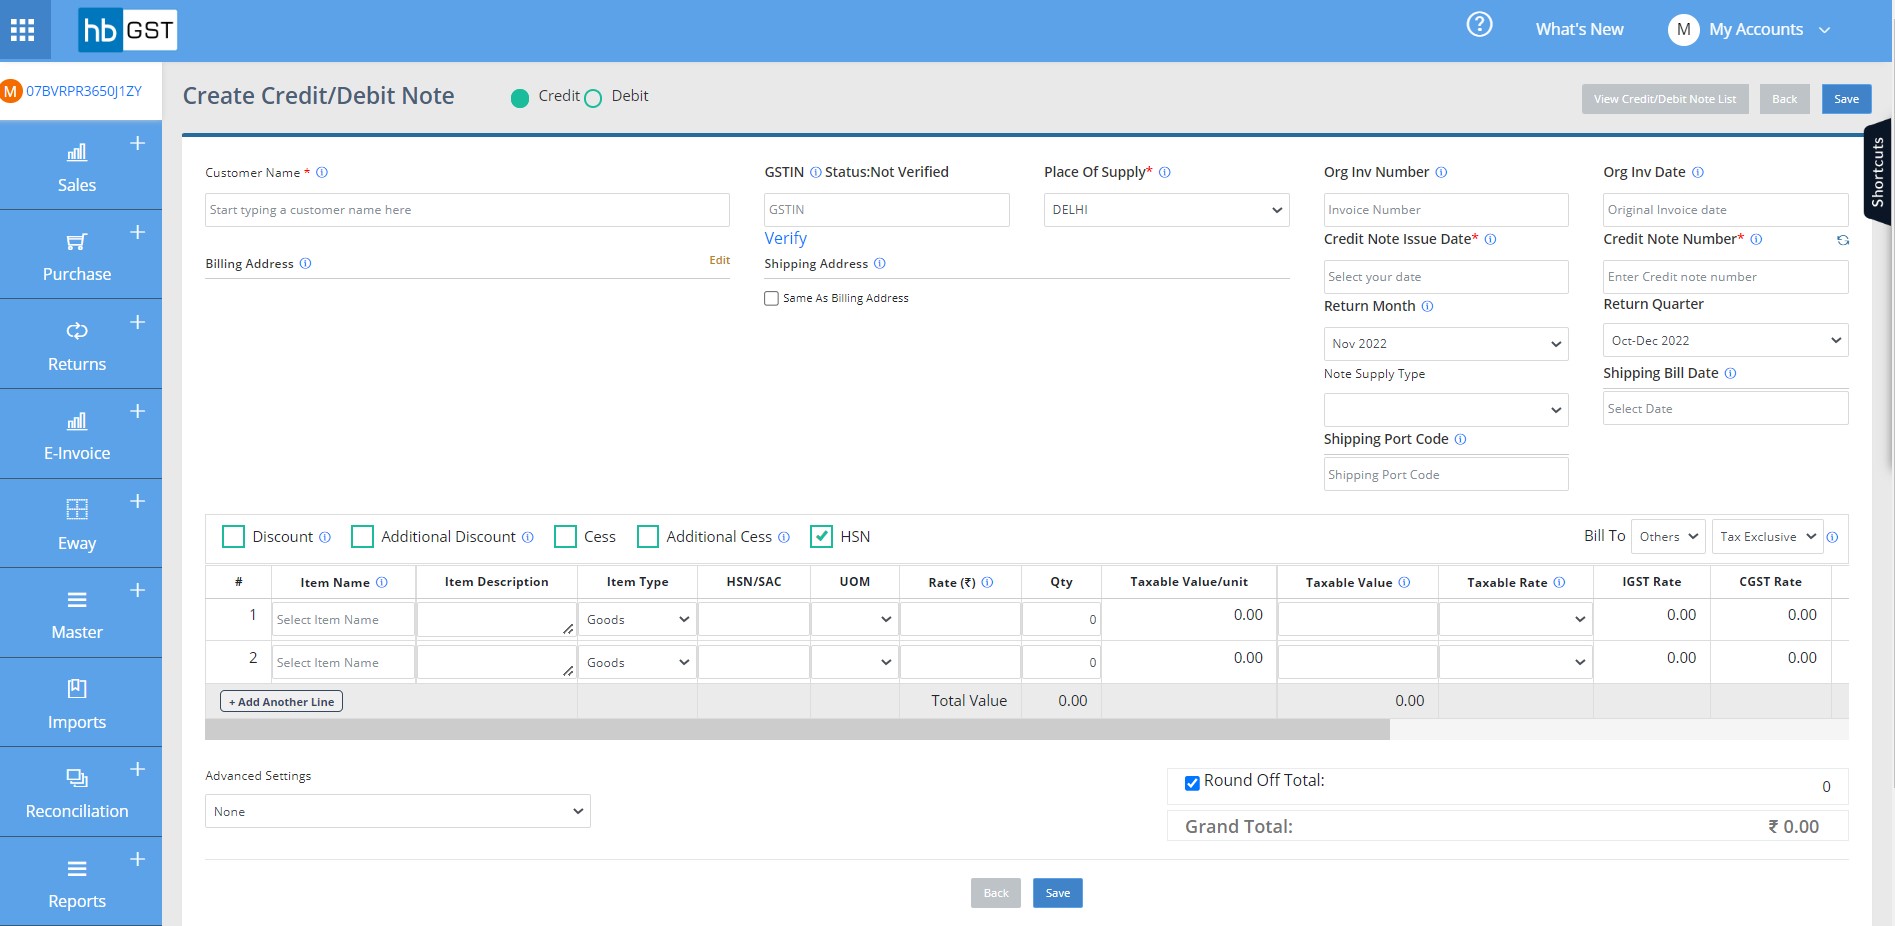
Step 3: Following details are required to be filled to create Credit/Debit Note
Step 3A: Select Note Type, Debit or Credit.
Step 3B: Note Level Details:
- Customer Name
- GSTIN (PAN based 15-character Goods & Services Tax Provider Identification Number)
- Place of supply (The place where the product or service is received)
- Customer Address Edit
- Billing Address Edit
- Shipping Address
- Same As Billing Address
- Warehouse Address Edit
- Invoice Sr. Number
- Invoice Date
- Return Month
- Due Date
- Return Quarter
- Invoice Type
- Round off Total
- Grand Total
- Advance setting
Step 3C: Item Details:
- Item Name
- Item Description
- Item Type (Goods / Service)
- HSN/SAC (HSN is an 8 digit code assigned to goods and SAC is a code assigned to services)
- UOM (Unit of measurements)
- Rate (₹)
- Discount %/ (₹)
- Additional Discount %/ (₹)
- Qty
- Taxable Value/unit
- Total Discount
- Taxable Value
- Taxable Rate
- Tax Rate (IGST or CGST/SGST)
- Tax Amount (IGST or CGST/SGST)
- Cess (%)
- Cess (Rs.)
- Cess
- Gross Amt
Step 3D: Enter Customer notes, it can be fetched if already updated in Client Master
- Customer Notes (Additional information other than the required fields)
Step 4: On click of 'Save' button, view page of Credit Note can be viewed where all the details entered can be reviewed
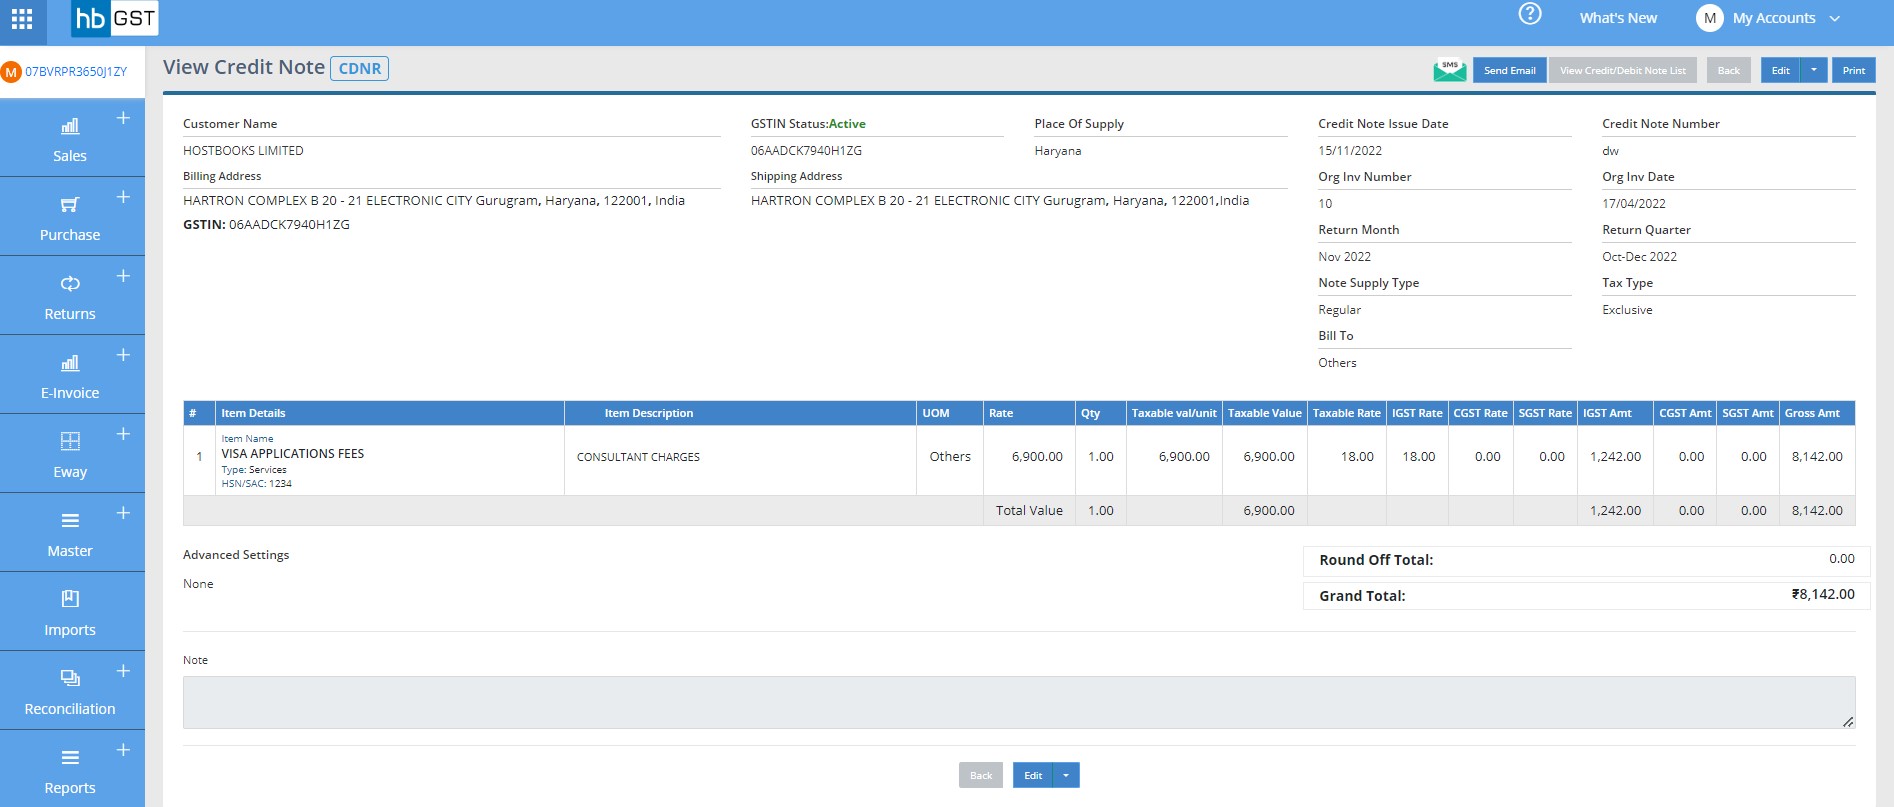
Or it can be accessed from Debit/Credit Note listing page just by clicking on the note.

How to create Amendment Credit/Debit Notes
Step 1: Click on "Credit/Debit Notes" button under sales module located at the top left of the window & further click on dropdown button besides "Create Cr/Dr Note" option and then click on "Create Amendment Cr/Dr Note" to add details of a new amendment note
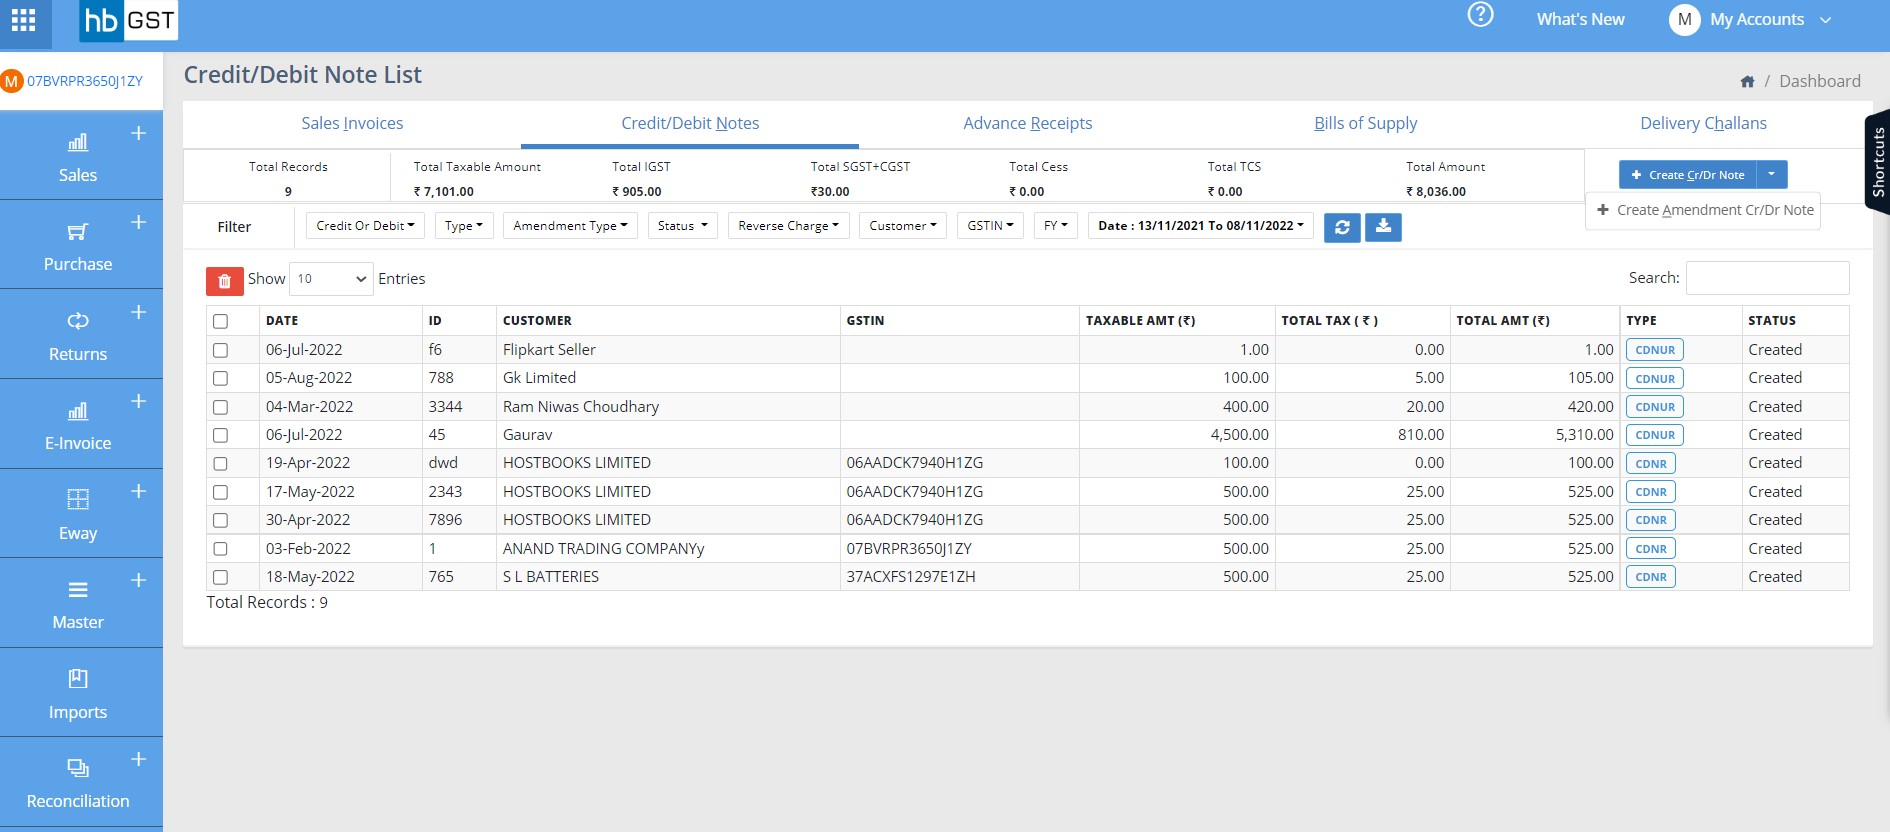
Step 2: You can create Debit Credit Note with unique identification number with the reference of Original Dr/Cr Note numbers for every sales. All the details of original Dr/Cr Note shall get auto-populated just by entering Original Dr/Cr Note number & user just need to make necessary correction.
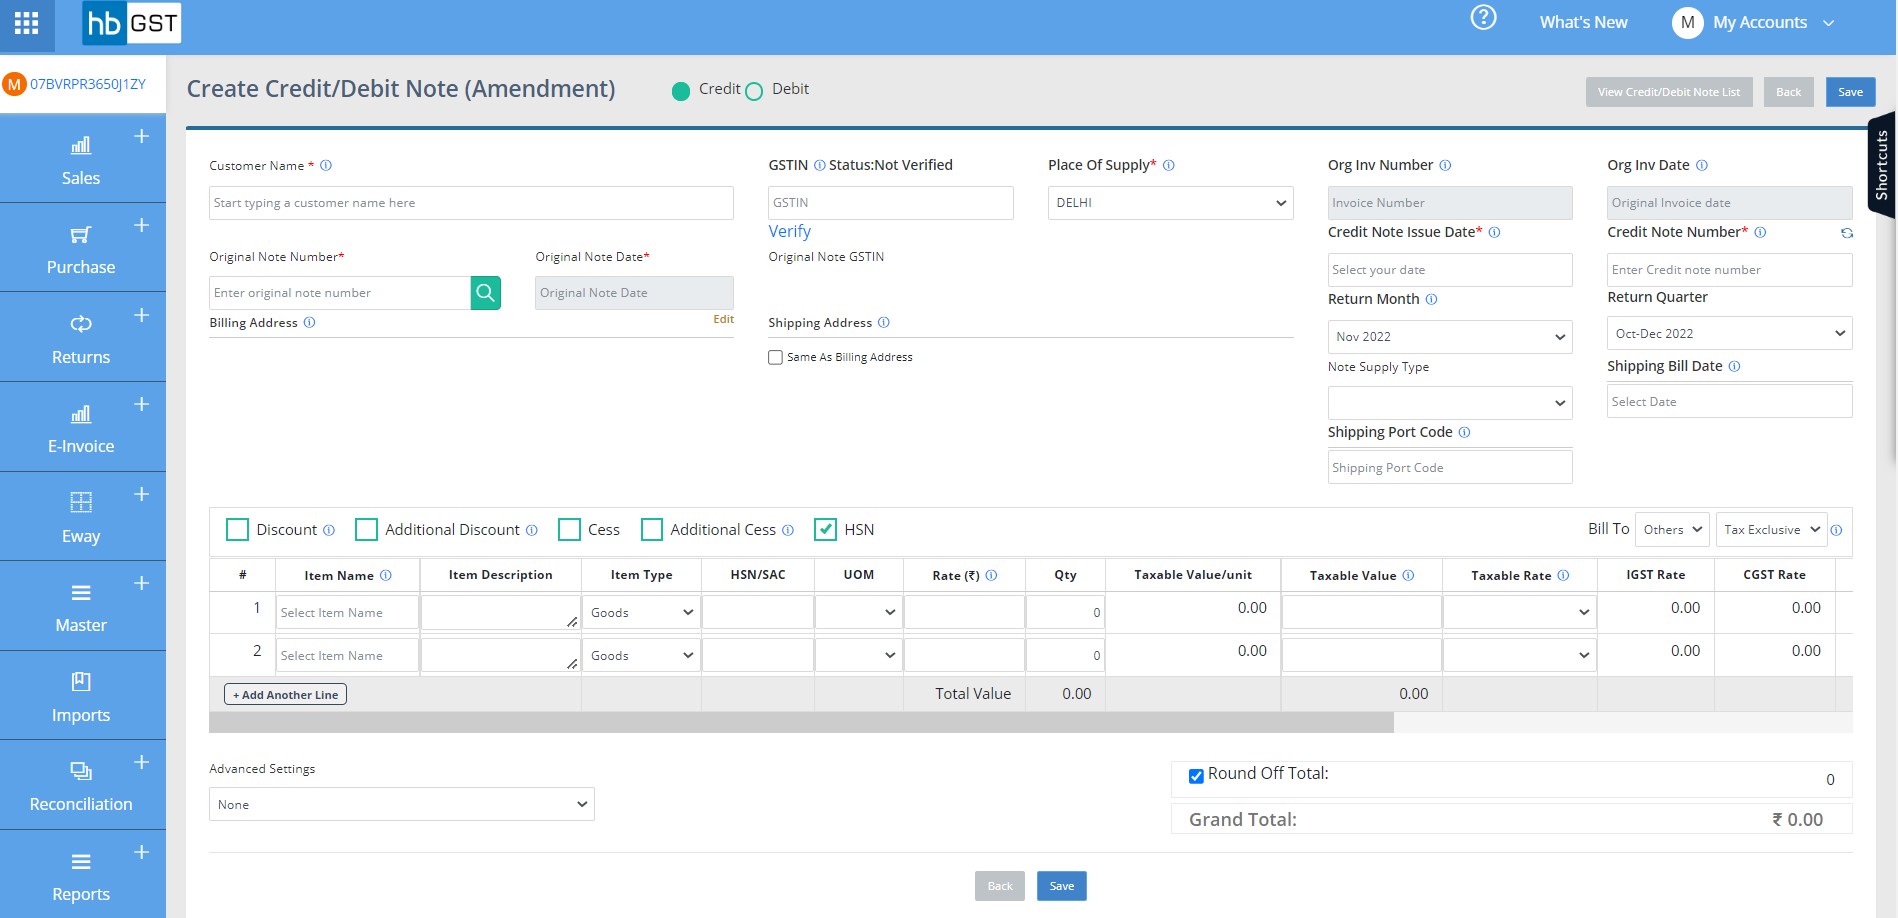
Step 3: Following details are required to be filled to create Amendment Credit/Debit Note
Step 3A: Select Note Type, Debit or Credit.
Step 3B: Note Level Details:
- Customer Name
- GSTIN (PAN based 15-character Goods & Services Tax Provider Identification Number)
- Place of supply (The place where the product or service is received)
- Customer Address Edit
- Billing Address Edit
- Shipping Address
- Same As Billing Address
- Warehouse Address Edit
- Invoice Sr. Number
- Invoice Date
- Return Month
- Due Date
- Return Quarter
- Invoice Type
- Round off Total
- Grand Total
- Advance setting
Step 3C: Item Details:
- Item Name
- Item Description
- Item Type (Goods / Service)
- HSN/SAC (HSN is an 8 digit code assigned to goods and SAC is a code assigned to services)
- UOM (Unit of measurements)
- Rate (₹)
- Discount %/ (₹)
- Additional Discount %/ (₹)
- Qty
- Taxable Value/unit
- Total Discount
- Taxable Value
- Taxable Rate
- Tax Rate (IGST or CGST/SGST)
- Tax Amount (IGST or CGST/SGST)
- Cess (%)
- Cess (Rs.)
- Cess
- Gross Amt
Step 3D: Enter Customer notes, it can be fetched if already updated in Client Master
- Customer Notes (Additional information other than the required fields)
Step 4: On click of 'Save' button, view page of Amendment Credit/Debit Note can be viewed where all the details entered can be reviewed
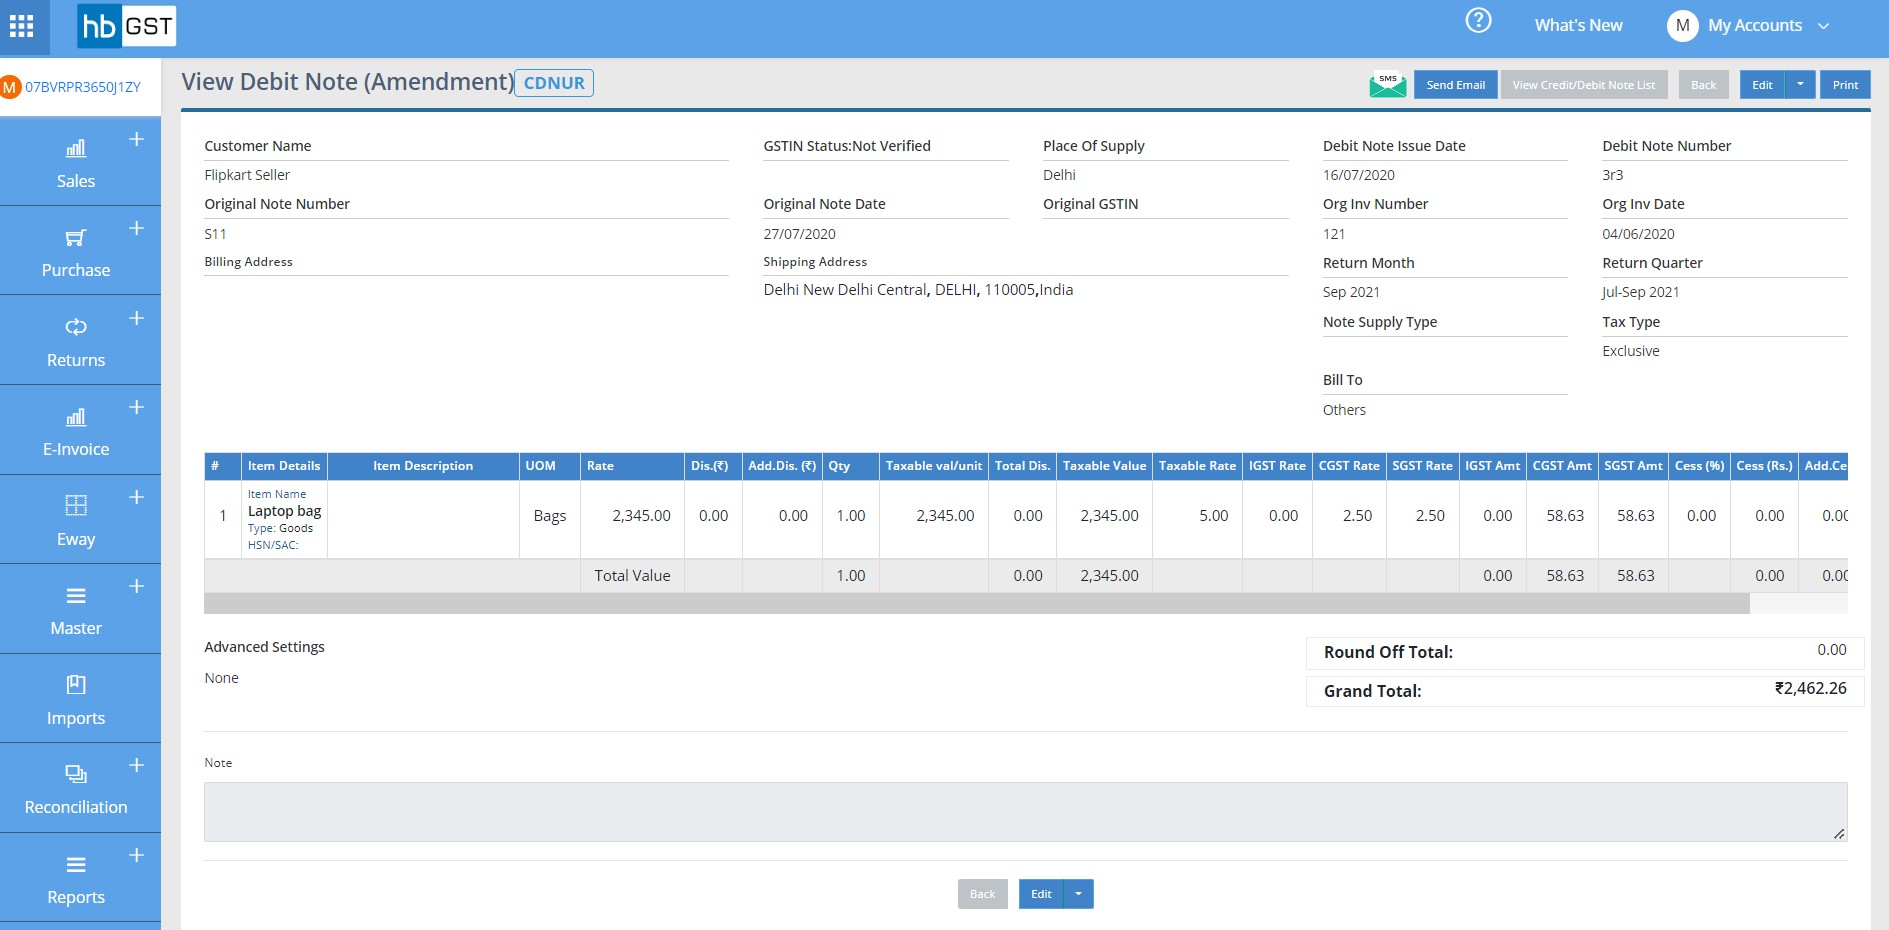
Or it can be accessed from Debit/Credit Note listing page just by clicking on the note.

How to create Advance Receipts
In case of any advance received for services, if the corresponding sales invoice is not raised in the same month, the dealer who has received the advance has to pay the GST on advance received. HB GST provides option to user to create Advance Receipt.
Step 1: Click on "Advance Receipts" button under sales module located at the top left of the window & further click on "Create Advance Rec" button to add details of a new Advance Receipt
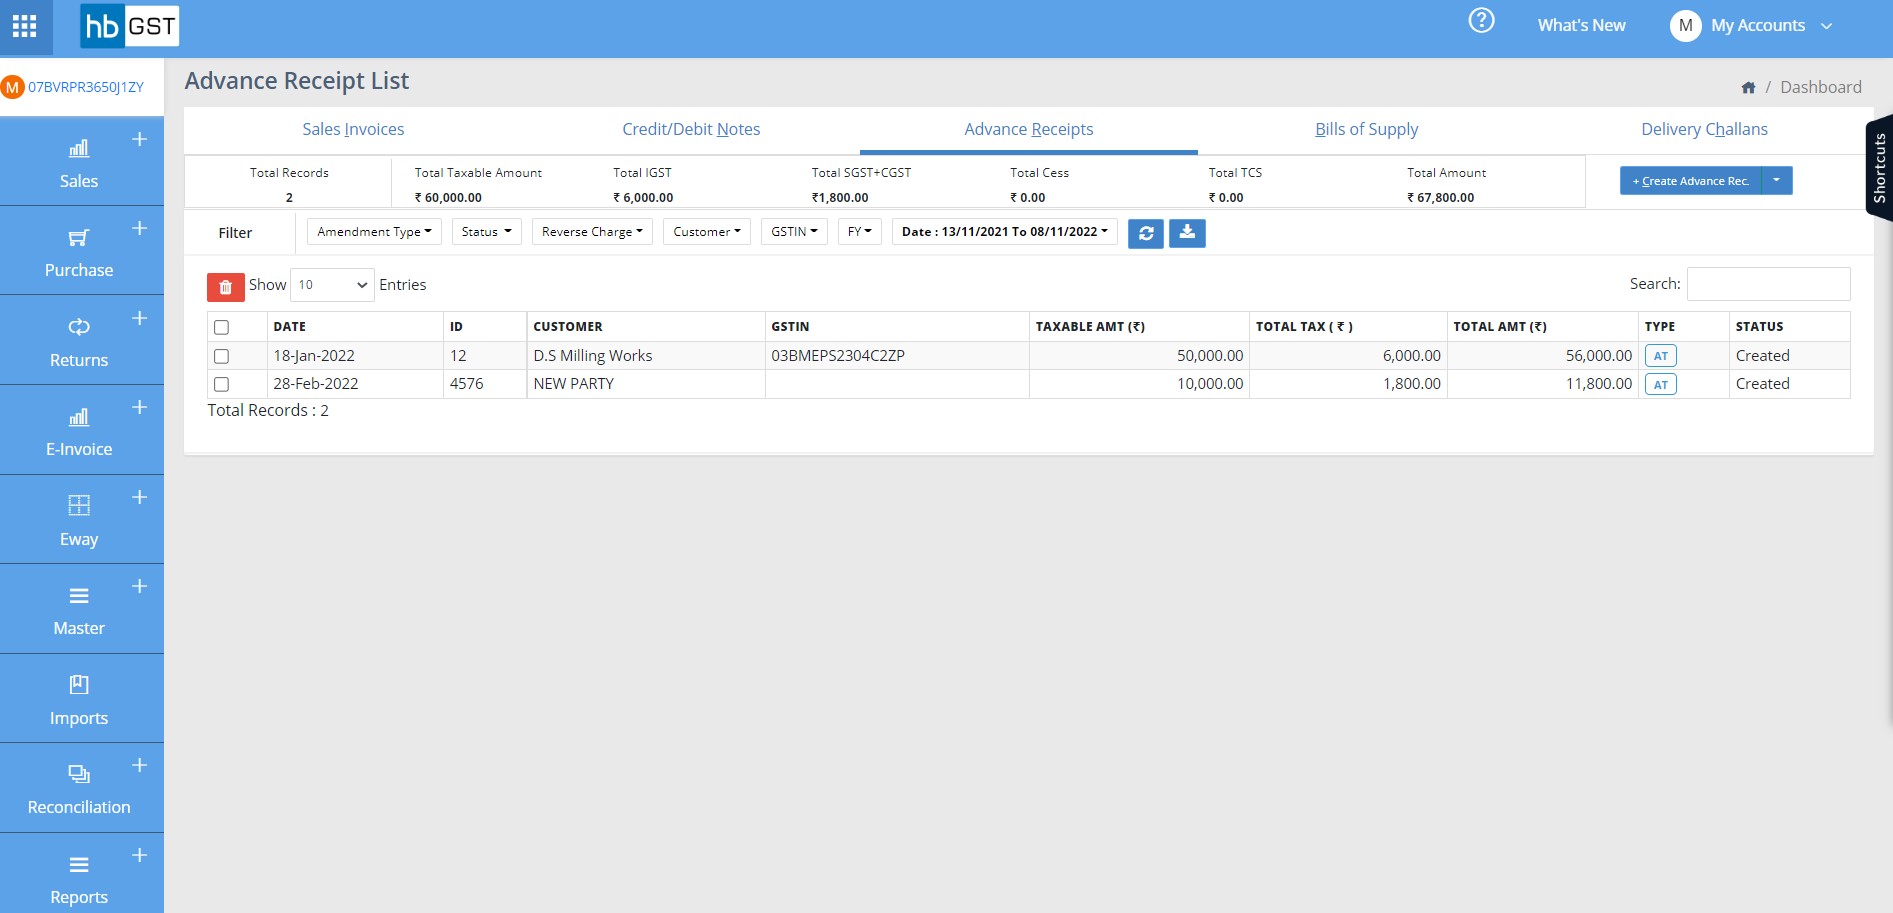
Step 2: At Advance Receipts creation page, add all the details of Advance Receipt and then click on "save" button to save the "Advance Receipt"
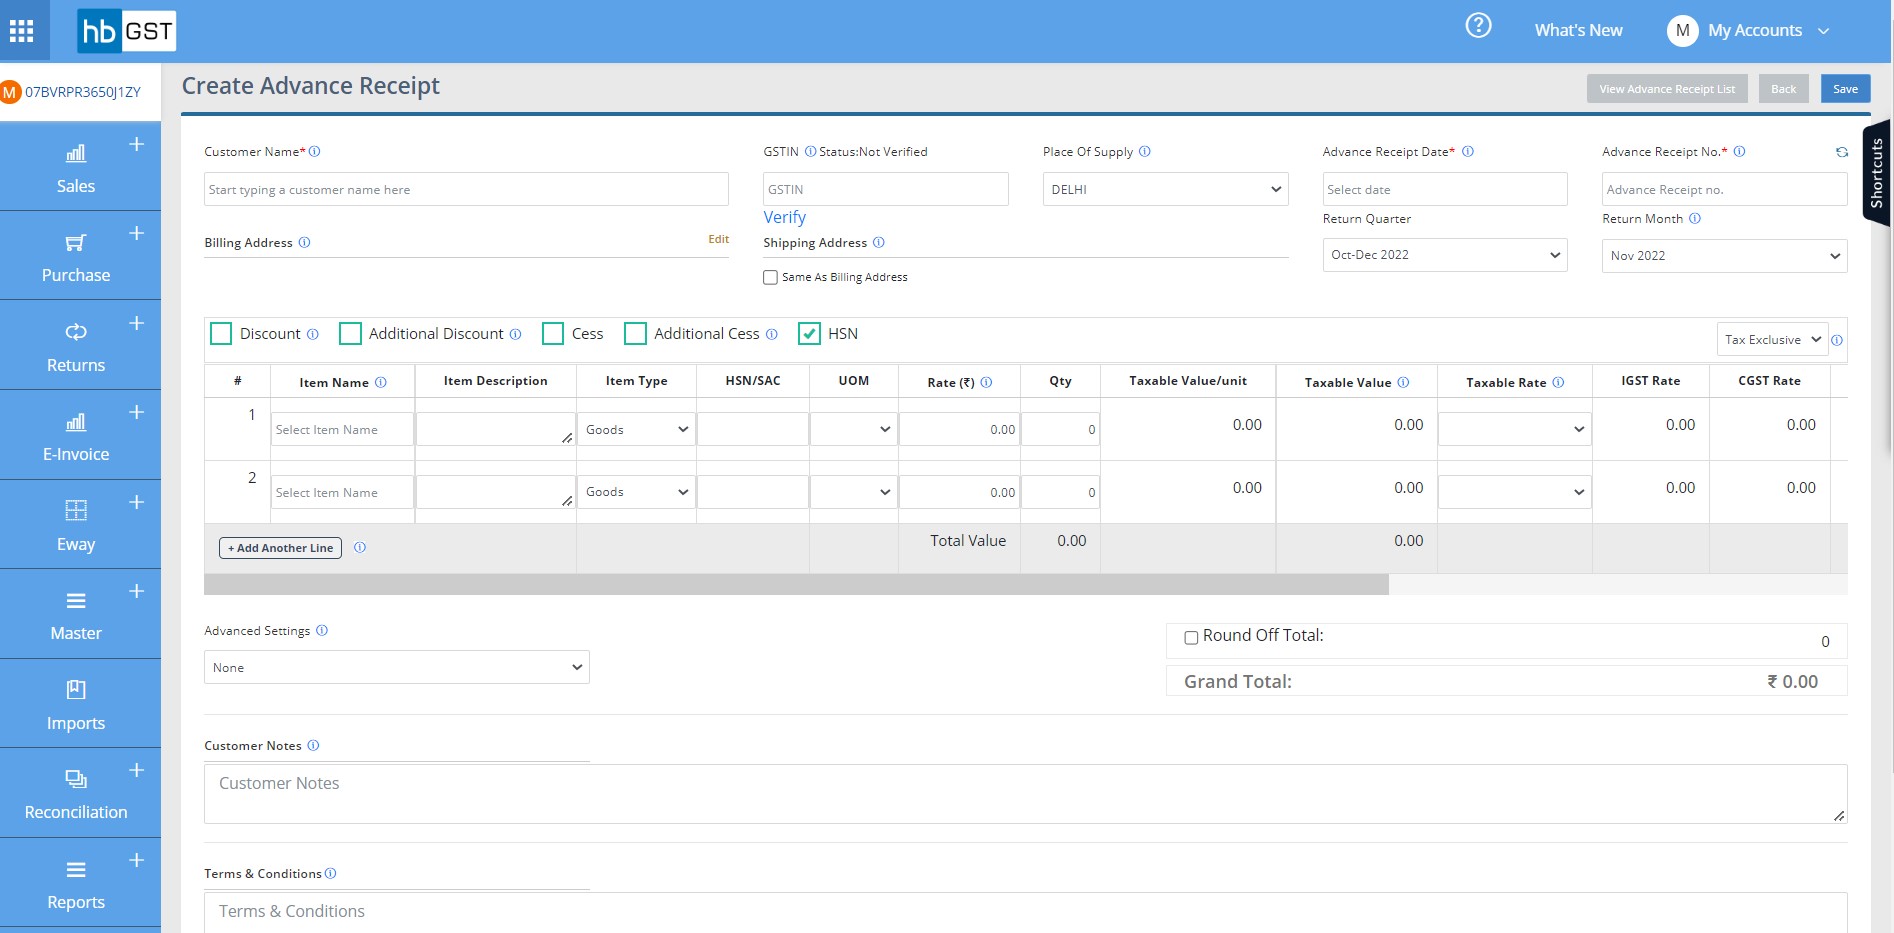
Step 3: Following details are required to create Advance receipt
Step 3A: Invoice Level Details:
- Customer Name
- GSTIN (PAN based 15-character Goods & Services Tax Provider Identification Number)
- Place of supply (The place where the product or service is received)
- Customer Address Edit
- Billing Address Edit
- Shipping Address
- Same As Billing Address
- Warehouse Address Edit
- Invoice Sr. Number
- Invoice Date
- Return Month
- Due Date
- Return Quarter
- Invoice Type
- Round off Total
- Grand Total
- Advance setting
Step 3B: Item Details:
- Item Name
- Item Description
- Item Type (Goods / Service)
- HSN/SAC (HSN is an 8 digit code assigned to goods and SAC is a code assigned to services)
- UOM (Unit of measurements)
- Rate (₹)
- Discount %/ (₹)
- Additional Discount %/ (₹)
- Qty
- Taxable Value/unit
- Total Discount
- Taxable Value
- Taxable Rate
- Tax Rate (IGST or CGST/SGST)
- Tax Amount (IGST or CGST/SGST)
- Cess (%)
- Cess (Rs.)
- Cess
- Gross Amt
Step 3D: Enter Customer notes and terms and conditions for the advance receipt. However customer notes can be fetched if already updated in Client Master and terms and conditions can be auto-fetched from Terms and conditions settings.
- Customer Notes (Additional information other than the required fields)
- Terms and Conditions (The terms and conditions laid down by the seller with respect to all the transactions)
Step 4: On click of 'Save' button, view page of Advance receipt can be viewed where all the details entered can be reviewed.
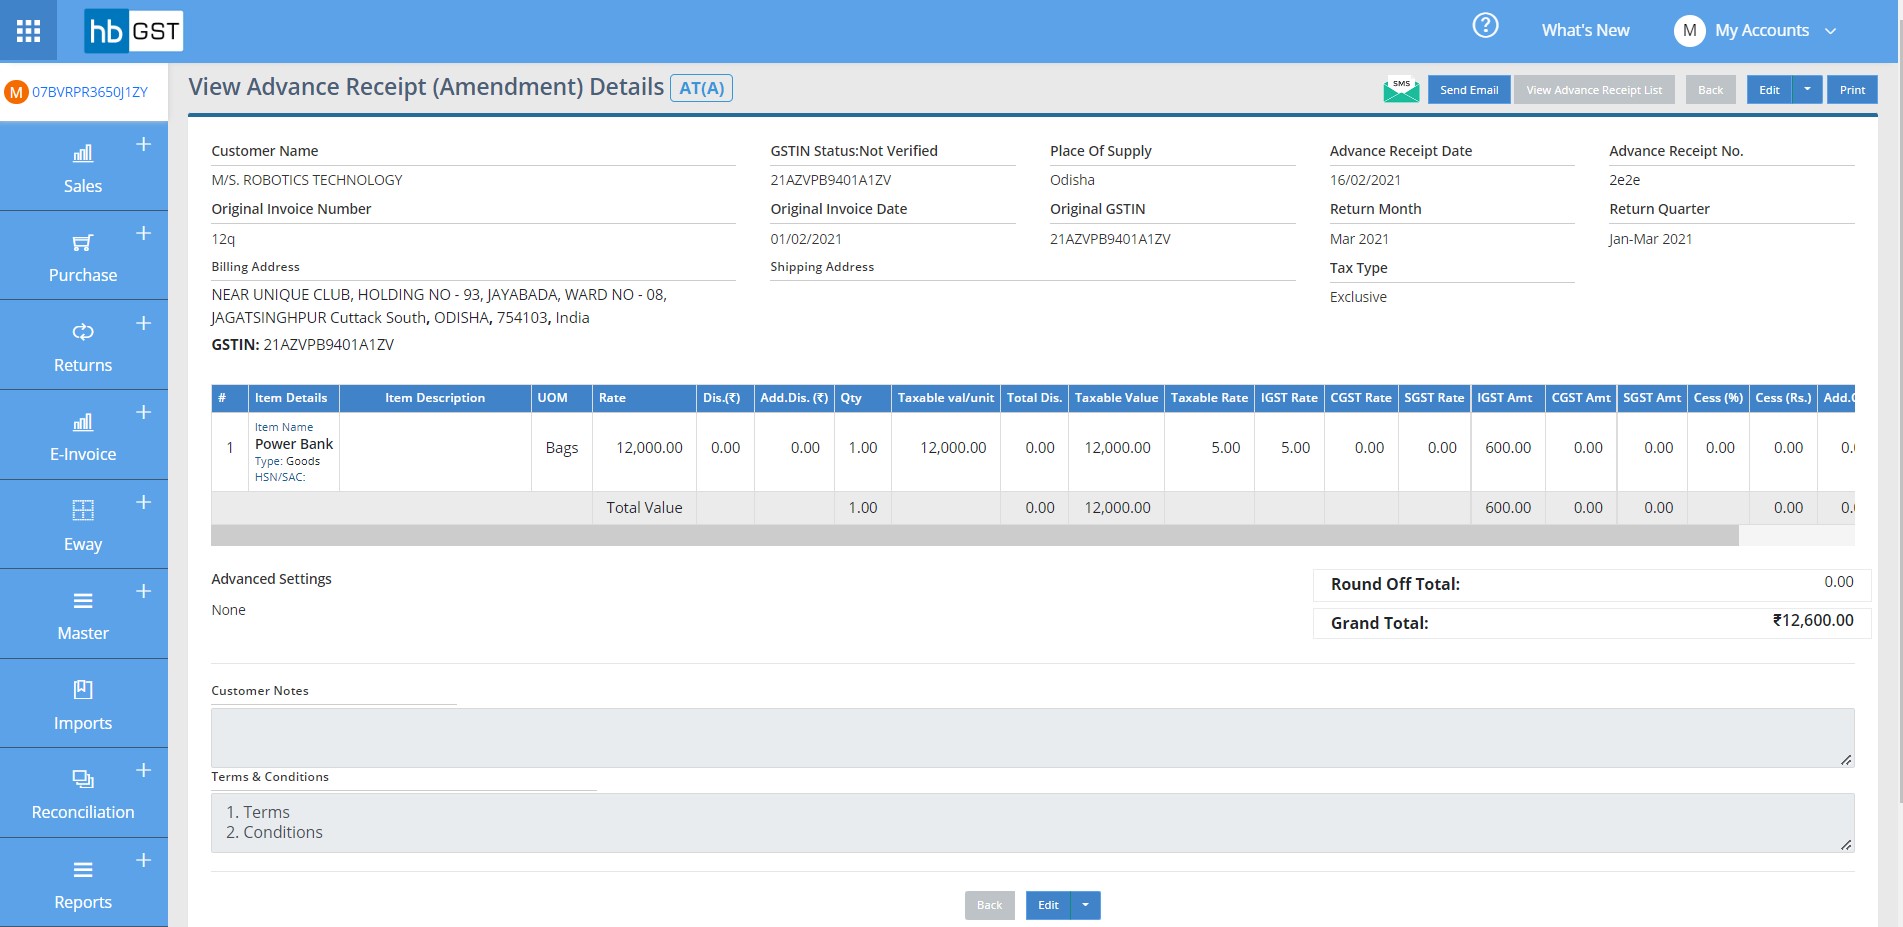
Or it can be accessed from Advance Receipts listing page just by clicking on the Advance Receipt.

How to create Amendment Advance Receipt
Step 1: Click on "Advance Receipts" button under sales module located at the top left of the window & further click on dropdown button besides "Create Advance Rec" button and then click on "Amendment Advance Receipt" button to add details of a new Amendment Advance Receipt.
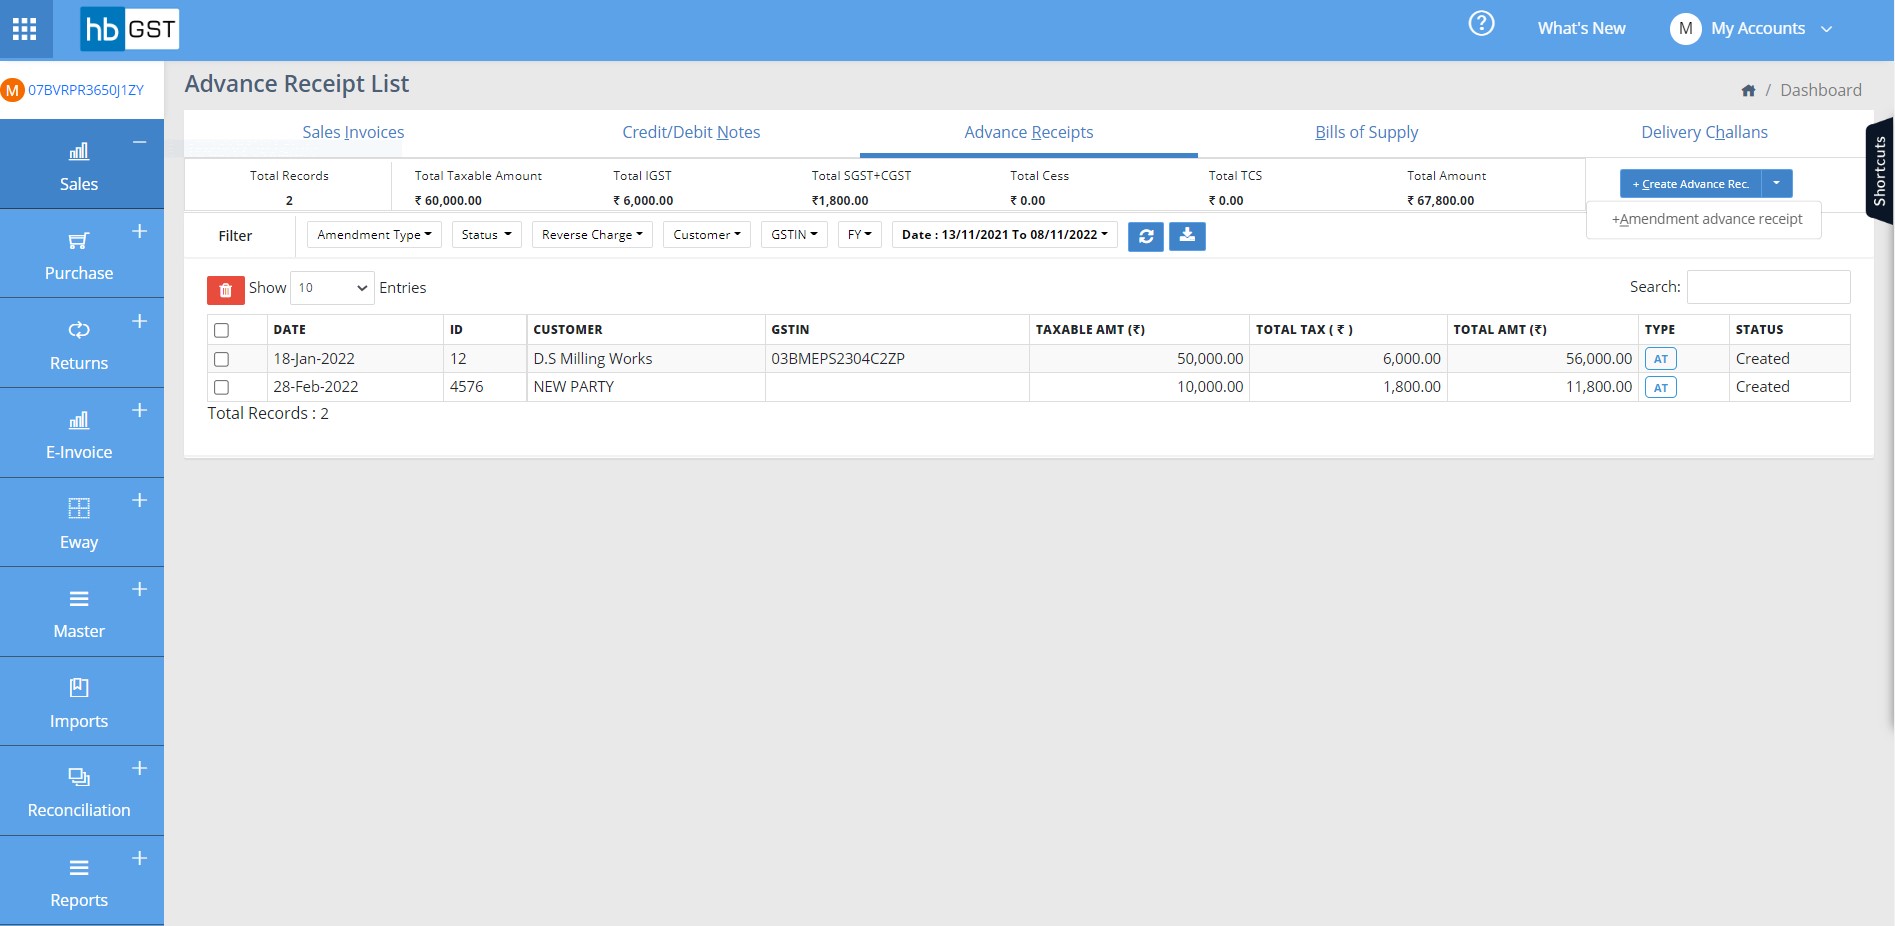
Step 2: You can createAmendment Advance Receiptwith unique identification number with the reference of Original Advance Receipt. All the details of original Advance Receipt shall get auto-populated just by entering Original Advance Receipt number & user just need to make necessary correction.
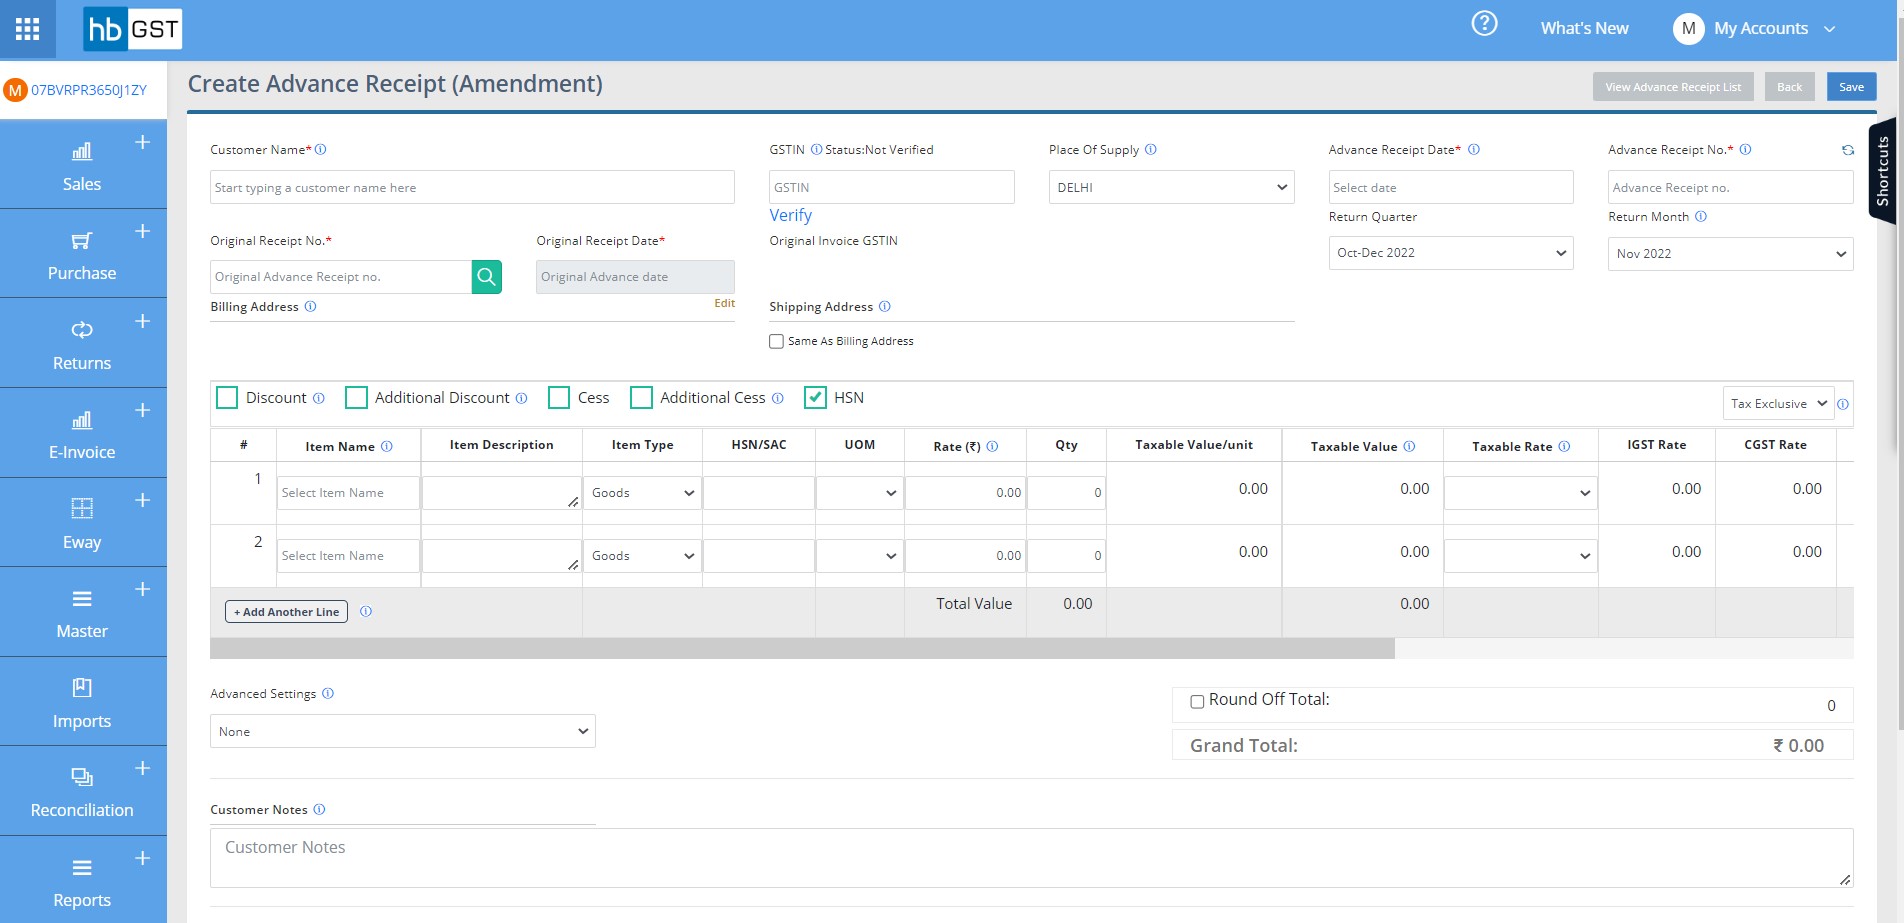
Step 3: Following details are required to create Amendment Advance receipt
Step 3A: Invoice Level Details:
- Customer Name
- GSTIN (PAN based 15-character Goods & Services Tax Provider Identification Number)
- Place of supply (The place where the product or service is received)
- Customer Address Edit
- Billing Address Edit
- Shipping Address
- Same As Billing Address
- Warehouse Address Edit
- Invoice Sr. Number
- Invoice Date
- Return Month
- Due Date
- Return Quarter
- Invoice Type
- Round off Total
- Grand Total
- Advance setting
Step 3B: Item Details:
- Item Name
- Item Description
- Item Type (Goods / Service)
- HSN/SAC (HSN is an 8 digit code assigned to goods and SAC is a code assigned to services)
- UOM (Unit of measurements)
- Rate (₹)
- Discount %/ (₹)
- Additional Discount %/ (₹)
- Qty
- Taxable Value/unit
- Total Discount
- Taxable Value
- Taxable Rate
- Tax Rate (IGST or CGST/SGST)
- Tax Amount (IGST or CGST/SGST)
- Cess (%)
- Cess (Rs.)
- Cess
- Gross Amt
Step 3D: Enter Customer notes and terms and conditions for the advance receipt. However customer notes can be fetched if already updated in Client Master and terms and conditions can be auto-fetched from Terms and conditions settings.
- Customer Notes (Additional information other than the required fields)
- Terms and Conditions (The terms and conditions laid down by the seller with respect to all the transactions)
Step 4: On click of 'Save' button, view page of Amendment Advance receipt can be viewed where all the details entered can be reviewed.

Or it can be accessed from Advance Receipts listing page just by clicking on the Advance Receipt.

How to create Bills of Supply
Bill of Supply to be issued if Registered Person is supplying:
- Exempted Goods
- Exempted Services
- Both or,
- Paying Tax Under Composition Scheme
In these four cases, supplier cannot charge tax from customer and then he raises bill of supply.
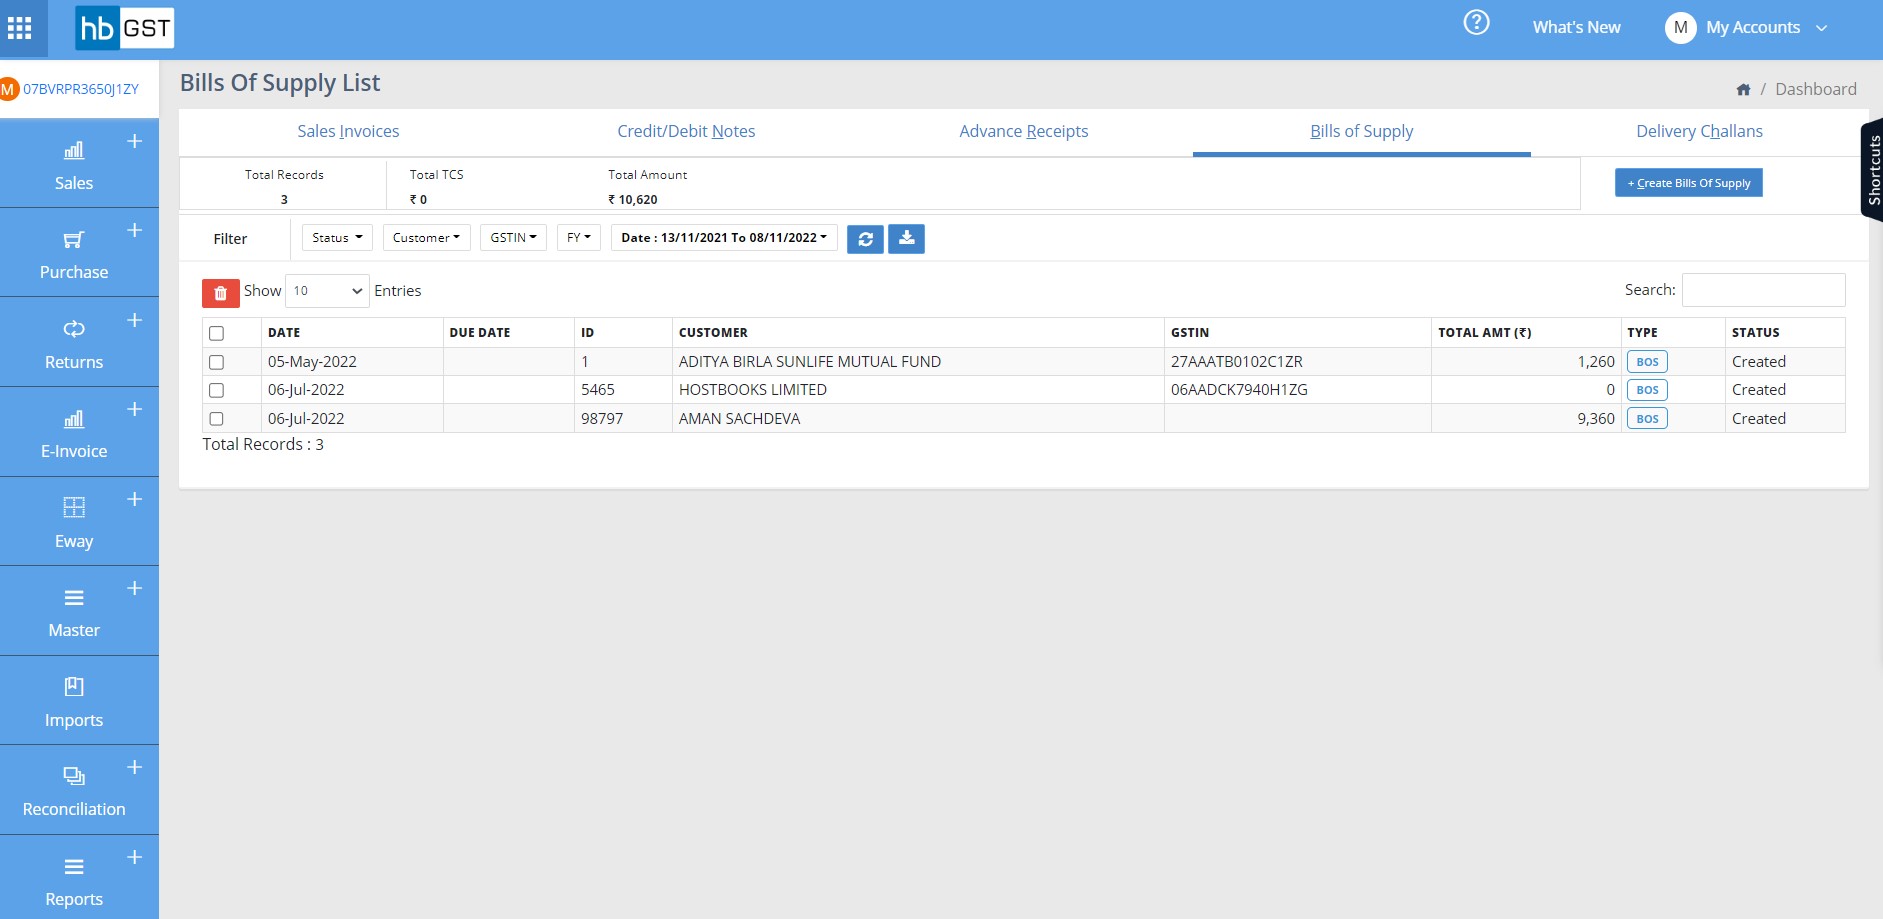
Step 1: Click on "Bills of Supply" button under sales module located at the top left of the window & further click on Create "Bills of Supply" button located at top right corner of window, to add details of a new "Bills of Supply".
At "Bills of Supply" creation page, add all the details of Bills of Supply and then click on "Save" button to save the new "Bills of Supply"
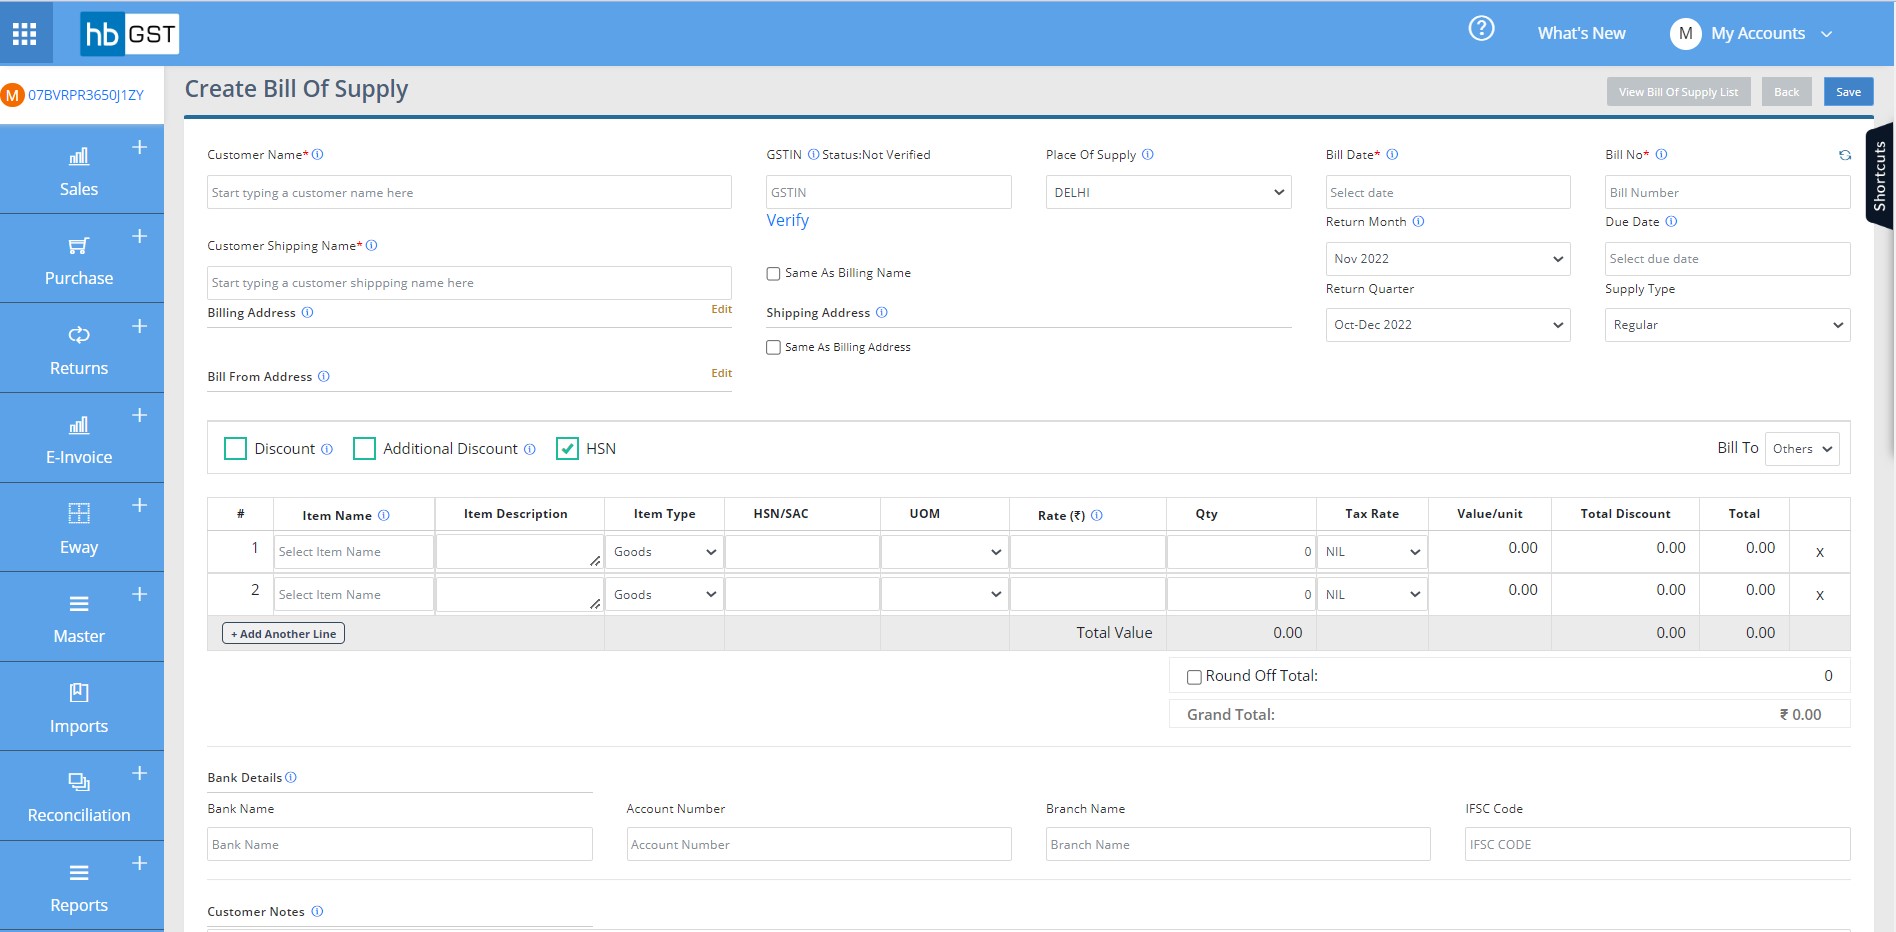
Step 3: Following details are required to be filled to create Bill of Supply:
Step 3A: Invoice Level Details:
- Customer Name
- GSTIN (PAN based 15-character Goods & Services Tax Provider Identification Number)
- Place of supply (The place where the product or service is received)
- Customer Address Edit
- Billing Address Edit
- Shipping Address
- Same As Billing Address
- Warehouse Address Edit
- Invoice Sr. Number
- Invoice Date
- Return Month
- Due Date
- Return Quarter
- Invoice Type
- Round off Total
- Grand Total
- Advance setting
Some fields are available for auto-fill functionality for reduce the time to create the invoice:
- For auto- fill invoice number, save the invoice series in setting. Please refer document series settings.
- For auto fill Client/Customer details & Customer Address Save the Client/vendors in Master=>Clients. Please refer Master client save.
- For auto fill Items details, Save the Items in Master=> Items. Please refer Master Items save.
- For auto fill Bank details, save the Bank details in Settings=> Bank setting. Please refer Setting bank details save.
- For auto fill Terms & Conditions, save the terms & Conditions in Settings=> Terms & Conditions settings. Please refer Setting Terms & Conditions.
- For auto fill Clients/vendors name with item mapped details, first save the Clients & Items mapping in Settings=> General settings => save clients & Items Mapping setting then Save in Master=> Clients. Please refer Master Client settings.
Step 3B: Item Details:
- Item Name
- Item Description
- Item Type (Goods / Service)
- HSN/SAC (HSN is an 8 digit code assigned to goods and SAC is a code assigned to services)
- UOM (Unit of measurements)
- Rate (₹)
- Discount %/ (₹)
- Additional Discount %/ (₹)
- Qty
- Taxable Value/unit
- Total Discount
- Taxable Value
- Taxable Rate
- Tax Rate (IGST or CGST/SGST)
- Tax Amount (IGST or CGST/SGST)
- Cess (%)
- Cess (Rs.)
- Cess
- Gross Amt
Step 3C: Bank Details
The details of the bank account in which payment to be received from customer. This can be auto-fetched if bank details already saved under settings. [Refer Bank Save setting]
Following details need to be filled under Bank Details
- Bank Name
- Account Number
- Branch Name
- IFSC Code
Step 3D: Enter Customer notes and terms and conditions for the Bill of Supply. However customer notes can be fetched if already updated in Client Master and terms and conditions can be auto-fetched from Terms and conditions settings.
- Customer Notes (Additional information other than the required fields)
- 35.Terms and Conditions (The terms and conditions laid down by the seller with respect to all the transactions)
Step 4: On click of 'Save' button, view page of Bill of Supply can be viewed where all the details entered can be reviewed.
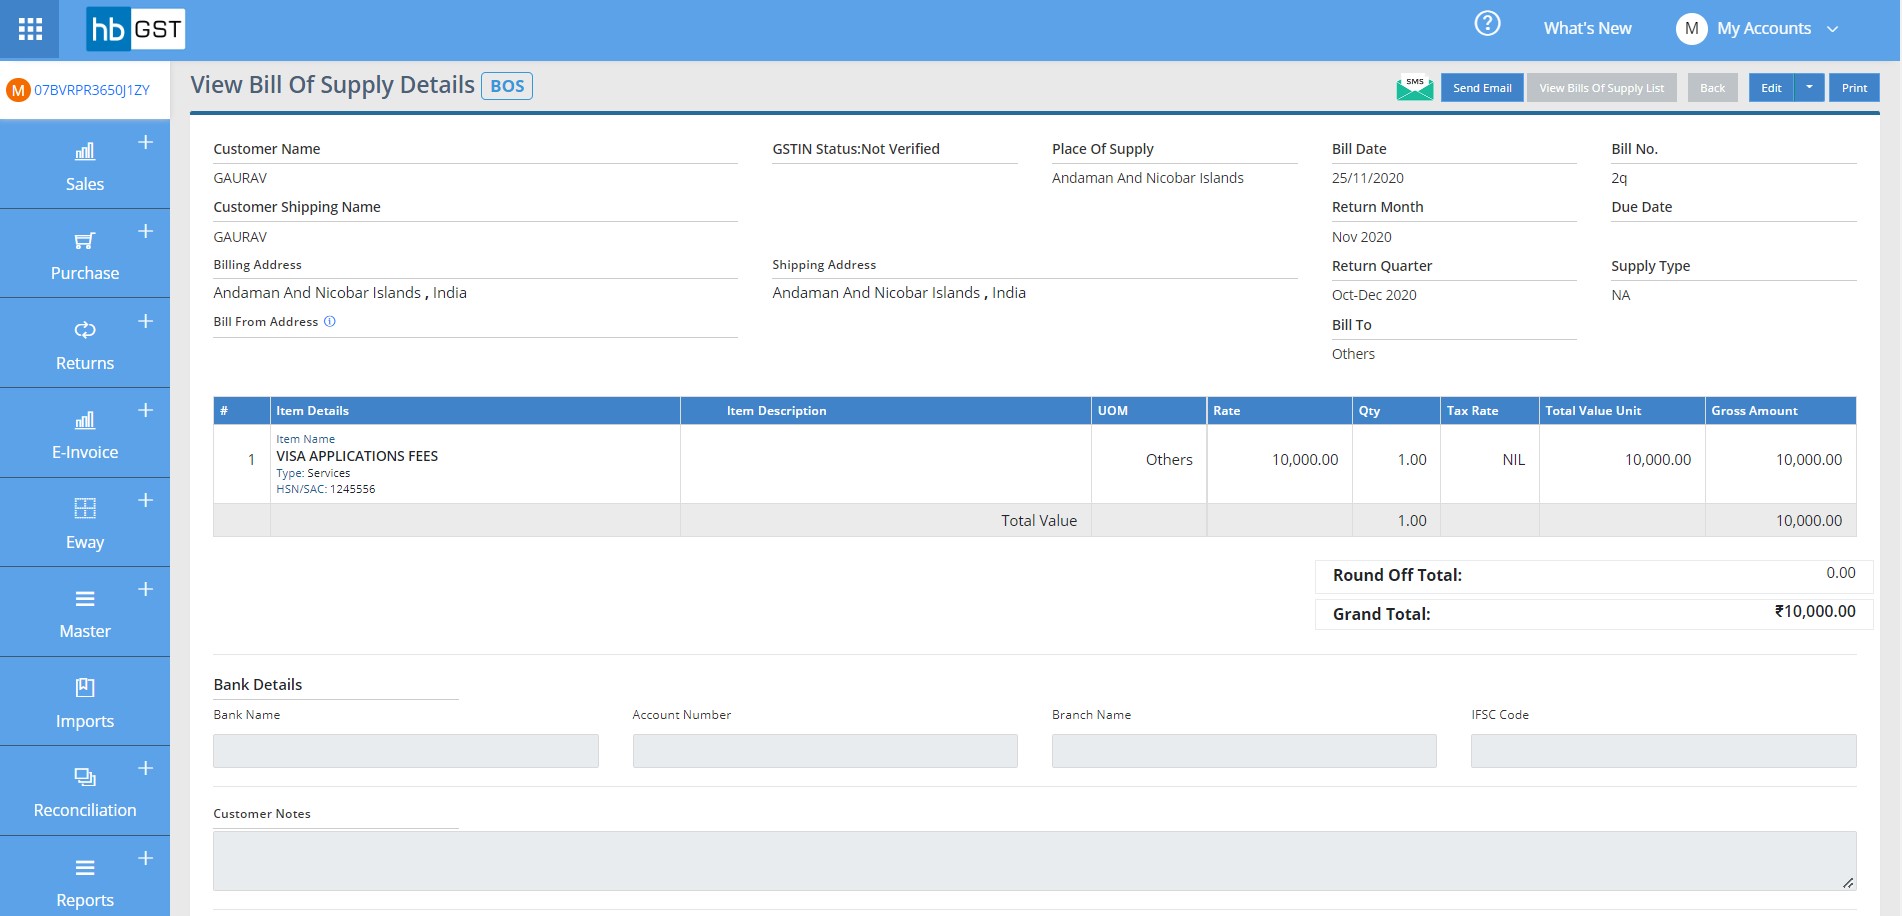
Or it can be accessed from Bill of Supply listing page just by clicking on the Bill of Supply.

How to create Delivery Challans
Step 1: Click on "Delivery Challans" button under sales module located at the top left of the window & further click on Create "Create Delivery Challans" button located at top right corner of window, to add details of a new "Delivery Challans".
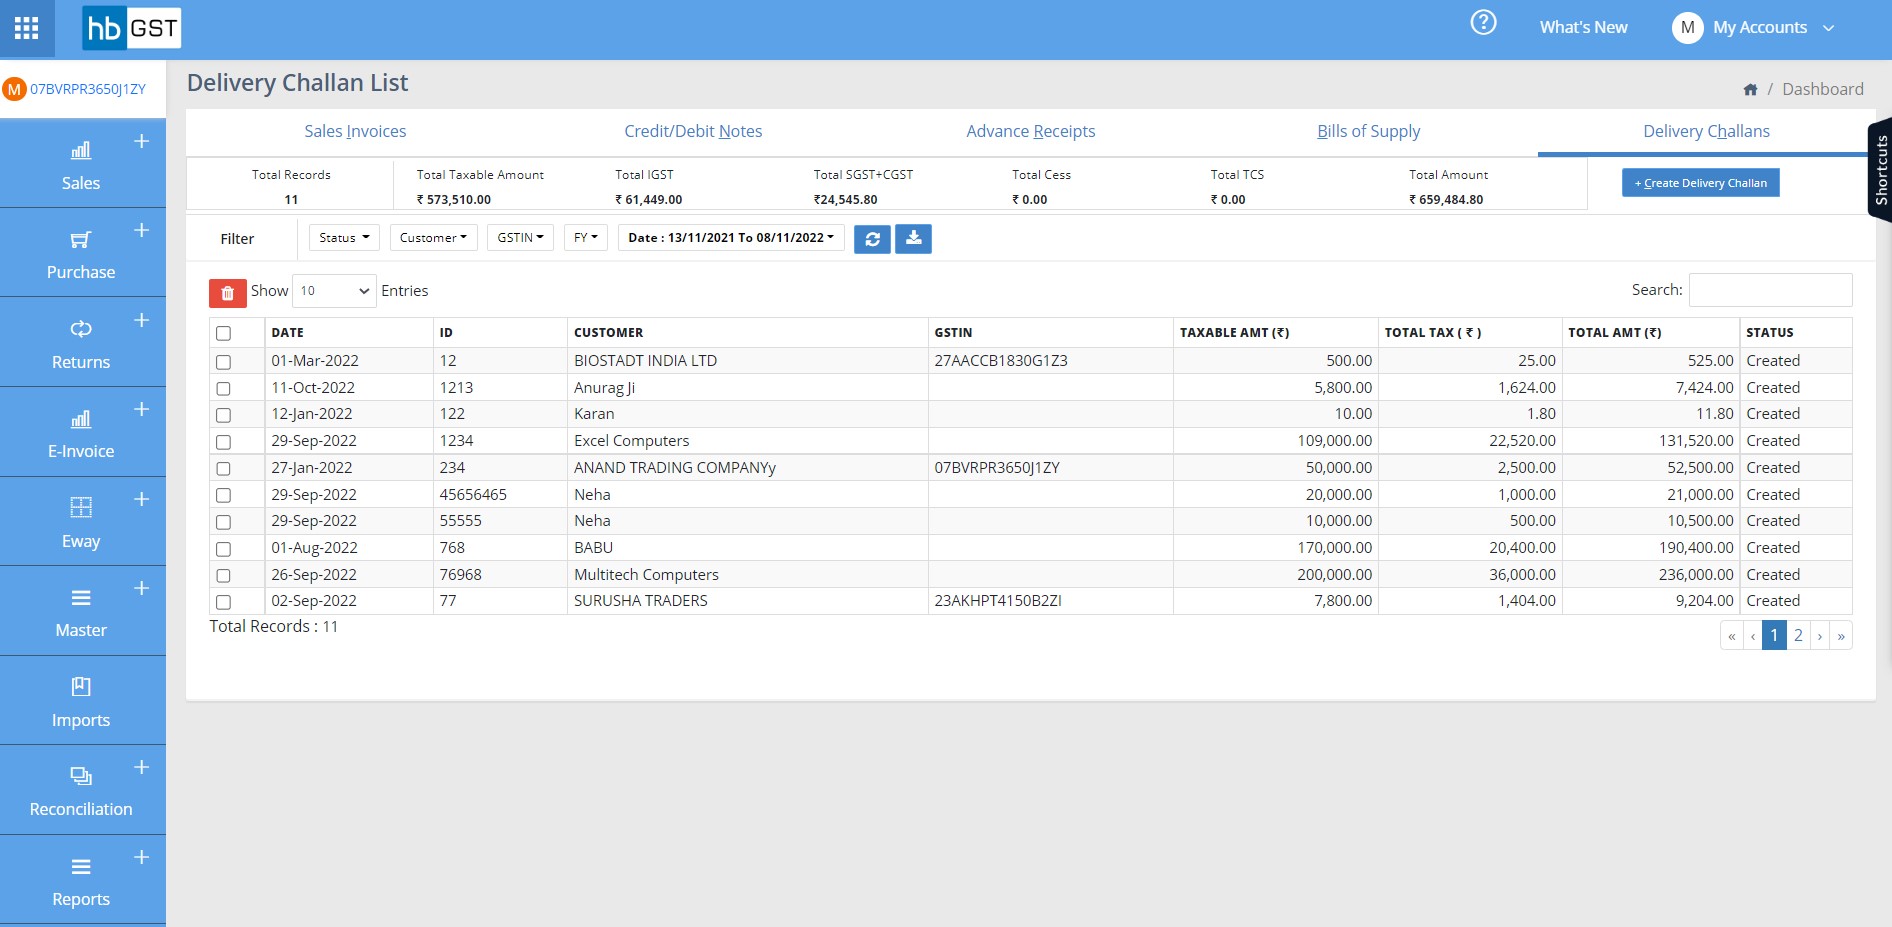
Step 2: For creating a Delivery Challan, go to Delivery Challan tab and click on 'Create Delivery Challan' button. Or it can be accessed Delivery challans sub menu from Sales menu in Dashboard.
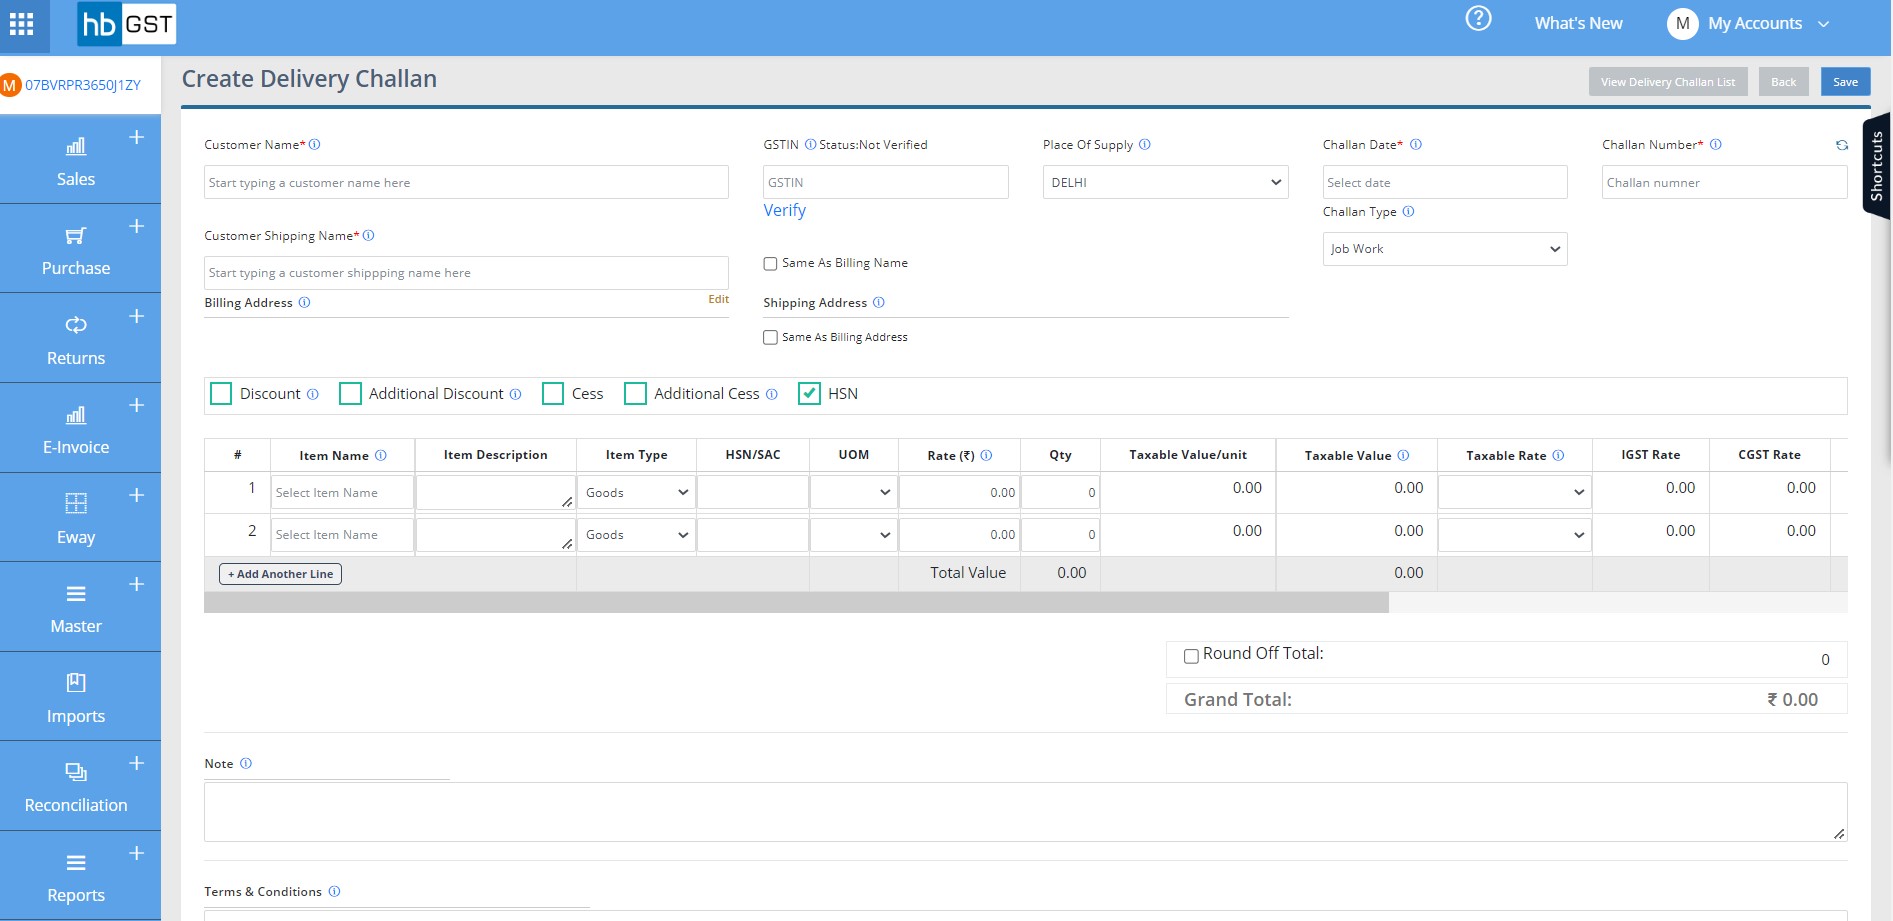
Step 3: Following details are required to be filled to create Delivery Challan:
Step 3A: Challan Level Details:
- Customer Name
- GSTIN (PAN based 15-character Goods & Services Tax Provider Identification Number)
- Place of supply (The place where the product or service is received)
- Customer Address Edit
- Billing Address Edit
- Shipping Address
- Same As Billing Address
- Challan Number
- Challan Date
- Challan Type
- Round off Total
- Grand Total
Some fields are available for auto-fill functionality for reduce the time to create the invoice:
- For auto- fill invoice number, save the invoice series in setting. Please refer document series settings.
- For auto fill Client/Customer details & Customer Address Save the Client/vendors in Master=>Clients. Please refer Master client save.
- For auto fill Items details, Save the Items in Master=> Items. Please refer Master Items save.
- For auto fill Bank details, save the Bank details in Settings=> Bank setting. Please refer Setting bank details save.
- For auto fill Terms & Conditions, save the terms & Conditions in Settings=> Terms & Conditions settings. Please refer Setting Terms & Conditions.
- For auto fill Clients/vendors name with item mapped details, first save the Clients & Items mapping in Settings=> General settings => save clients & Items Mapping setting then Save in Master=> Clients. Please refer Master Client settings.
Step 3B: Item Details:
- Item Name
- Item Description
- Item Type (Goods / Service)
- HSN/SAC (HSN is an 8 digit code assigned to goods and SAC is a code assigned to services)
- UOM (Unit of measurements)
- Rate (₹)
- Discount %/ (₹)
- Additional Discount %/ (₹)
- Cess
- Additional Cess
- Qty
- Tax Rate
- Taxable Value/unit
- Taxable Value
- Taxable Rate
- IGST Rate
- CGST Rate
- SGST Rate
- IGST Amount
- CGST Amount
- SGST Amount
- Gross Amt
Step 3C: Enter Customer notes and terms and conditions for the Delivery Challan. However customer notes can be fetched if already updated in Client Master and terms and conditions can be auto-fetched from Terms and conditions settings.
- Customer Notes (Additional information other than the required fields)
- 35.Terms and Conditions (The terms and conditions laid down by the seller with respect to all the transactions)
Step 4: On click of 'Save' button, view page of Delivery Challan can be viewed where all the details entered can be reviewed
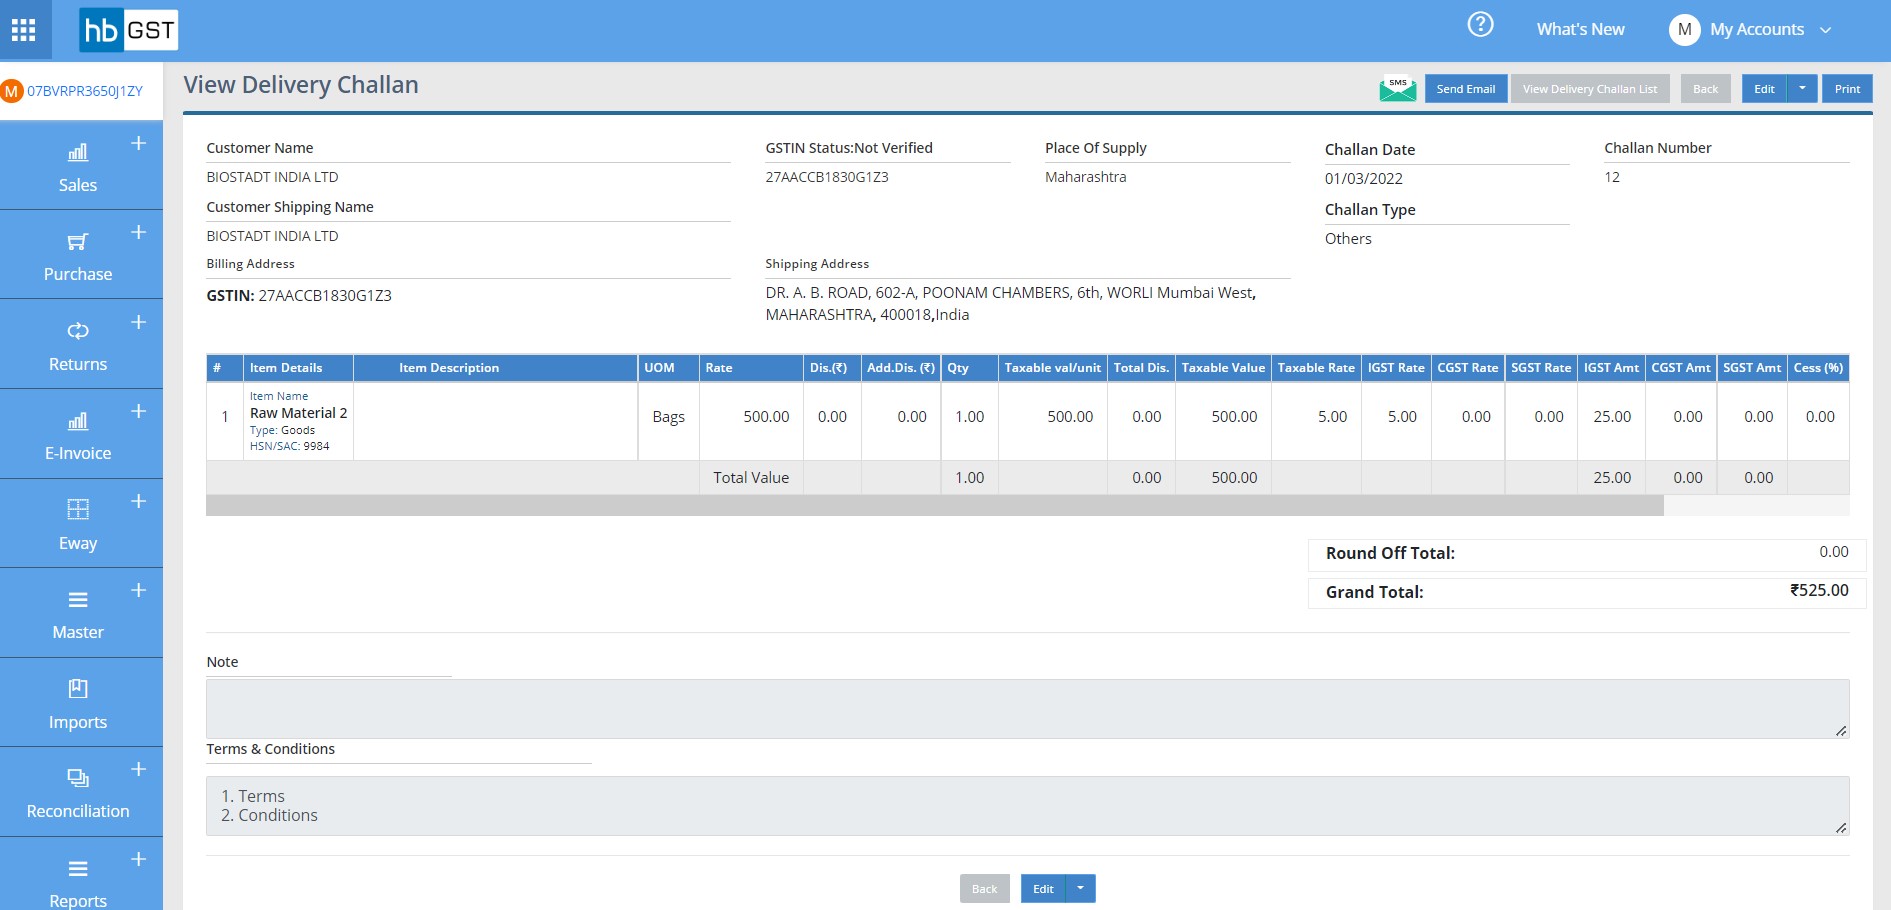
Or it can be accessed from Delivery Challan listing page just by clicking on the Delivery Challan.

How to Delete/Cancel the Document in HB GST?
This functionality is same on all types of document created in the HB GST.
Following steps are necessary to cancel/delete any document:
Step 1: Click on the "transactions" button after entering into the business
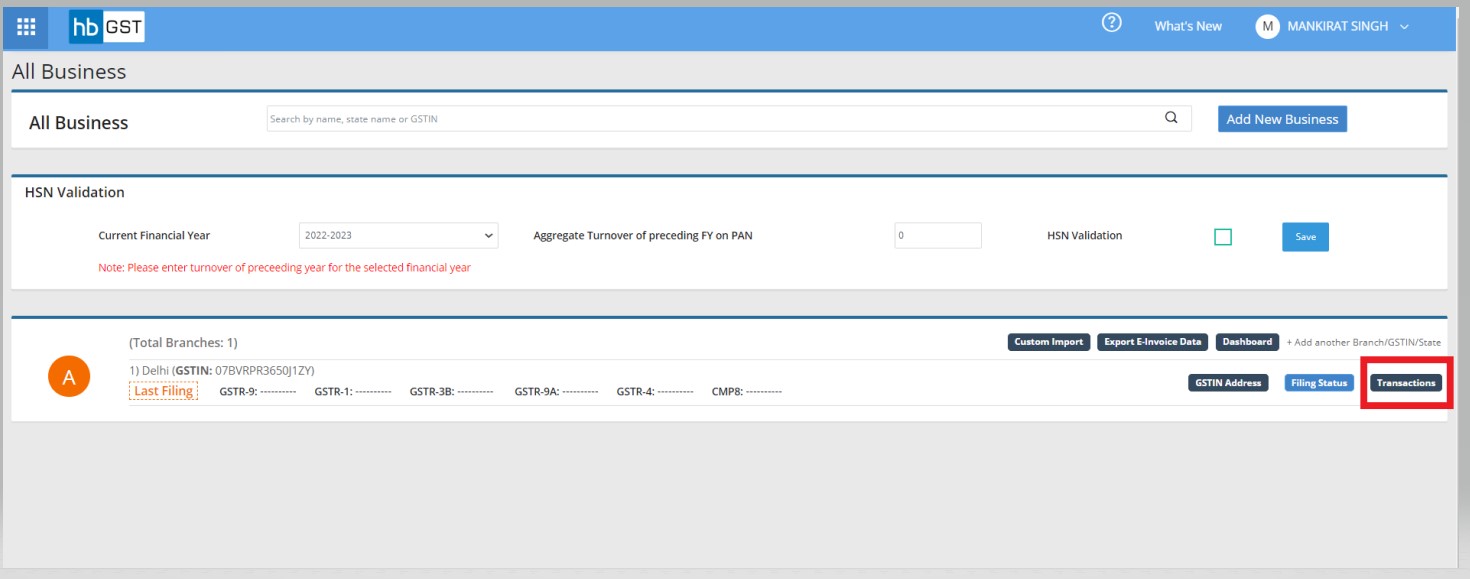
Step 2: Access to the Invoice/Purchase Invoice listing page or listing page of any document. For example listing page of Invoice
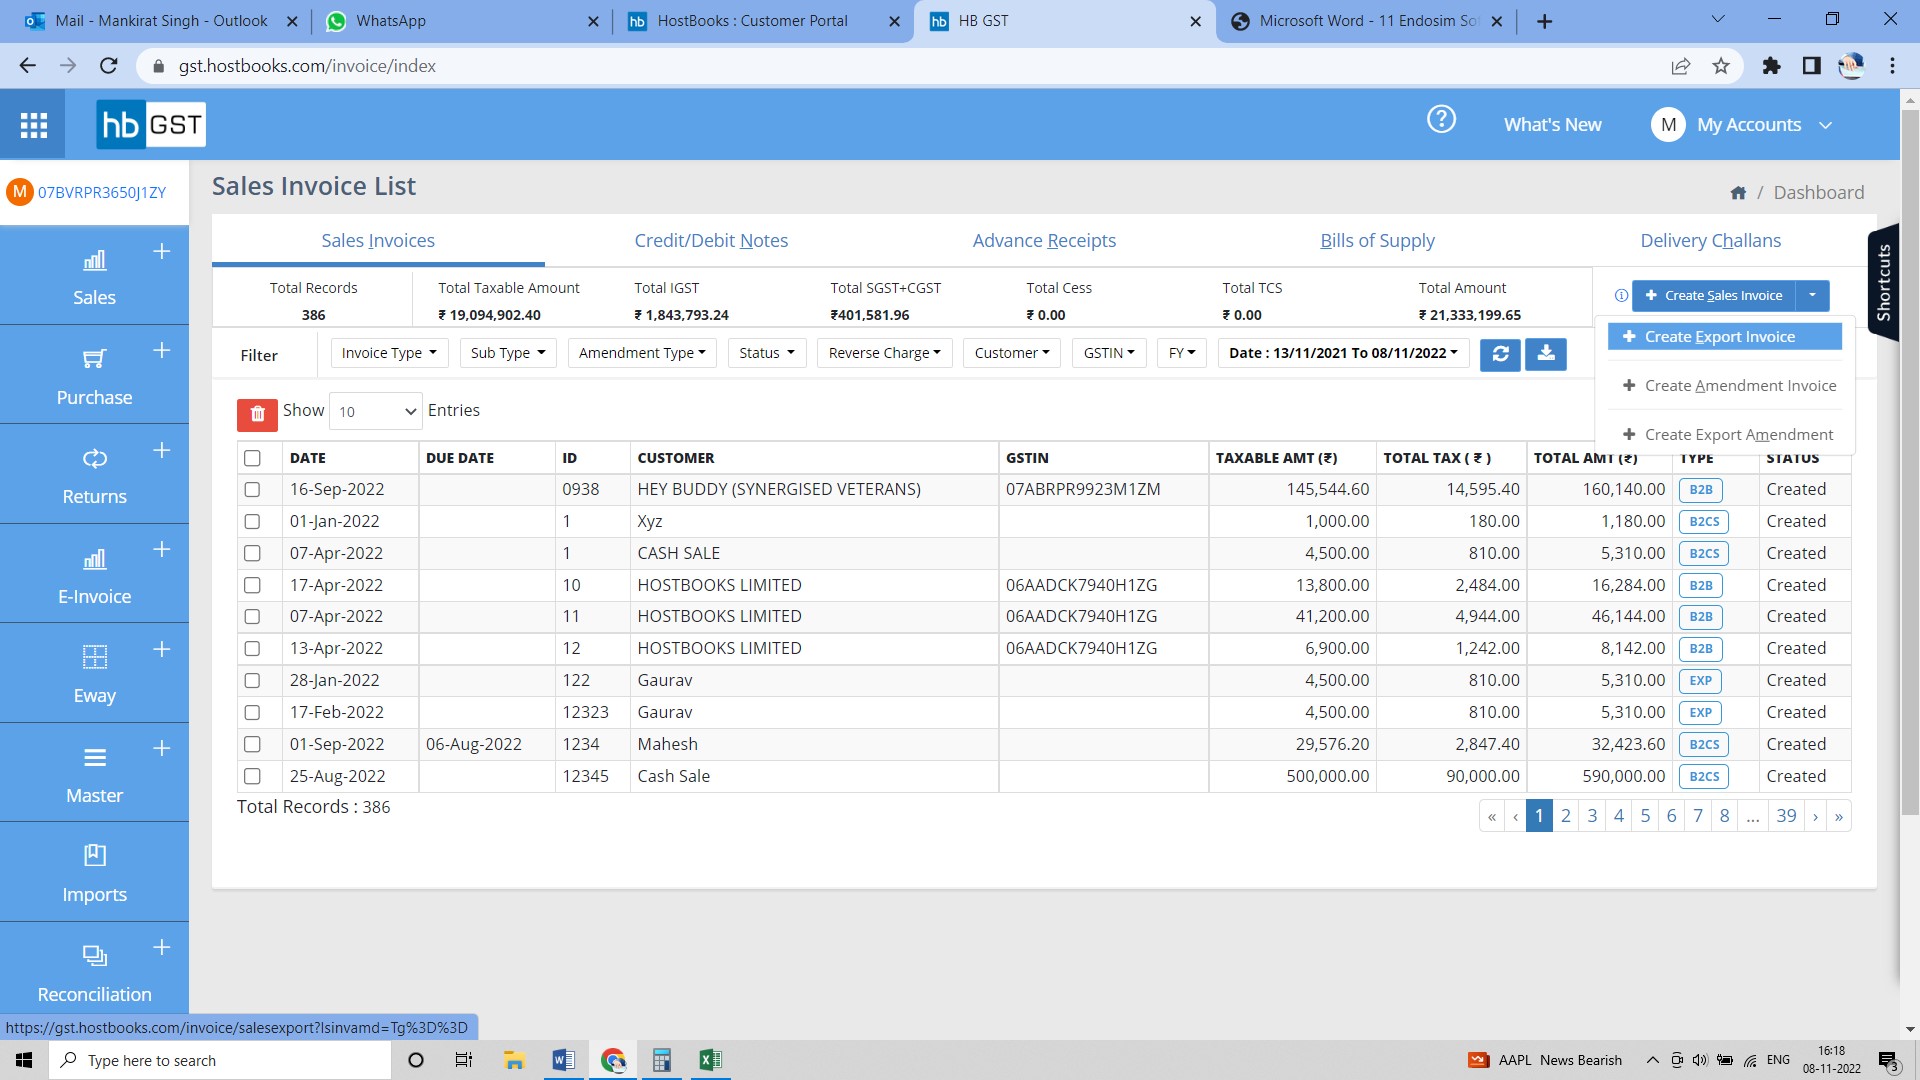
Step 3: Click on Invoice from the list & that invoice will open
Step 4: Select option Cancel or Delete as per the requirement.
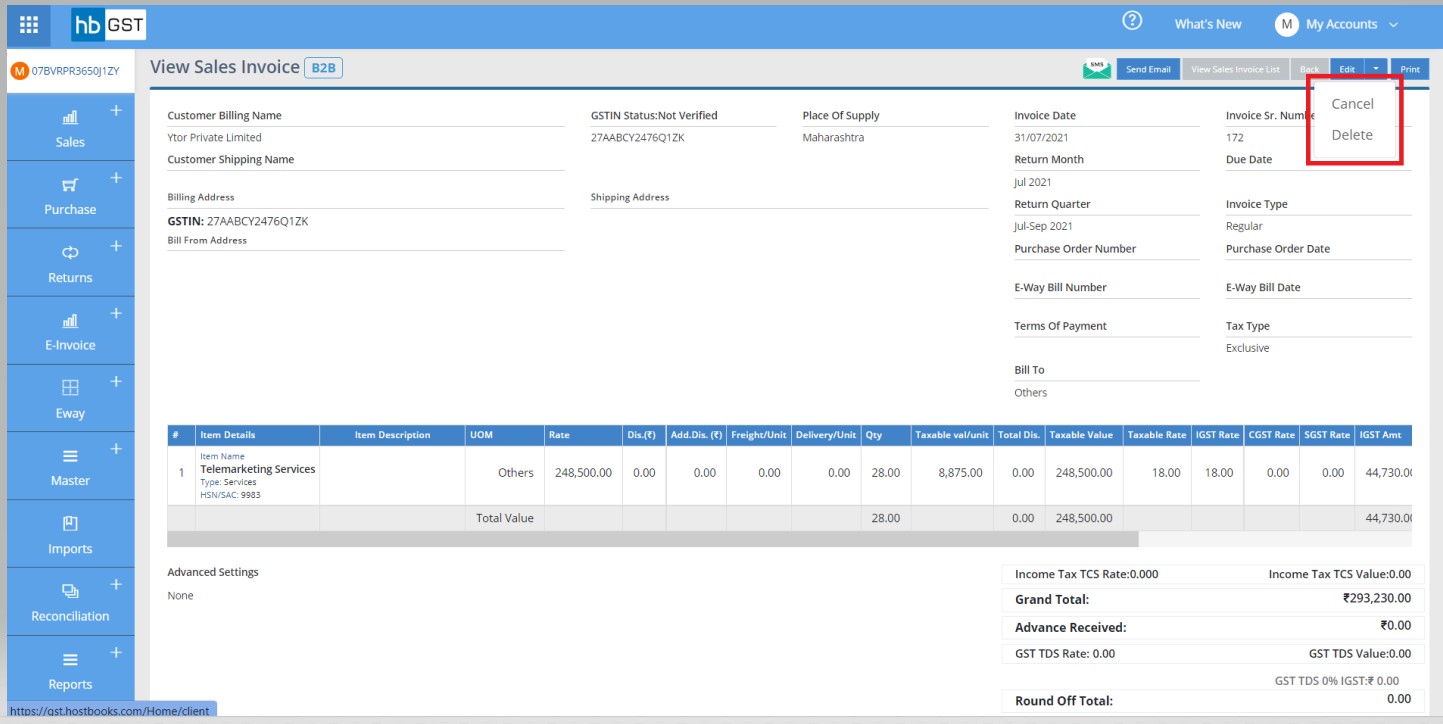
A: Cancel Invoice
If user cancel invoice then same cannot be recover again.

View Cancelled Invoice:
Once cancelled document will be marked as cancelled it can accessed from the listing page.
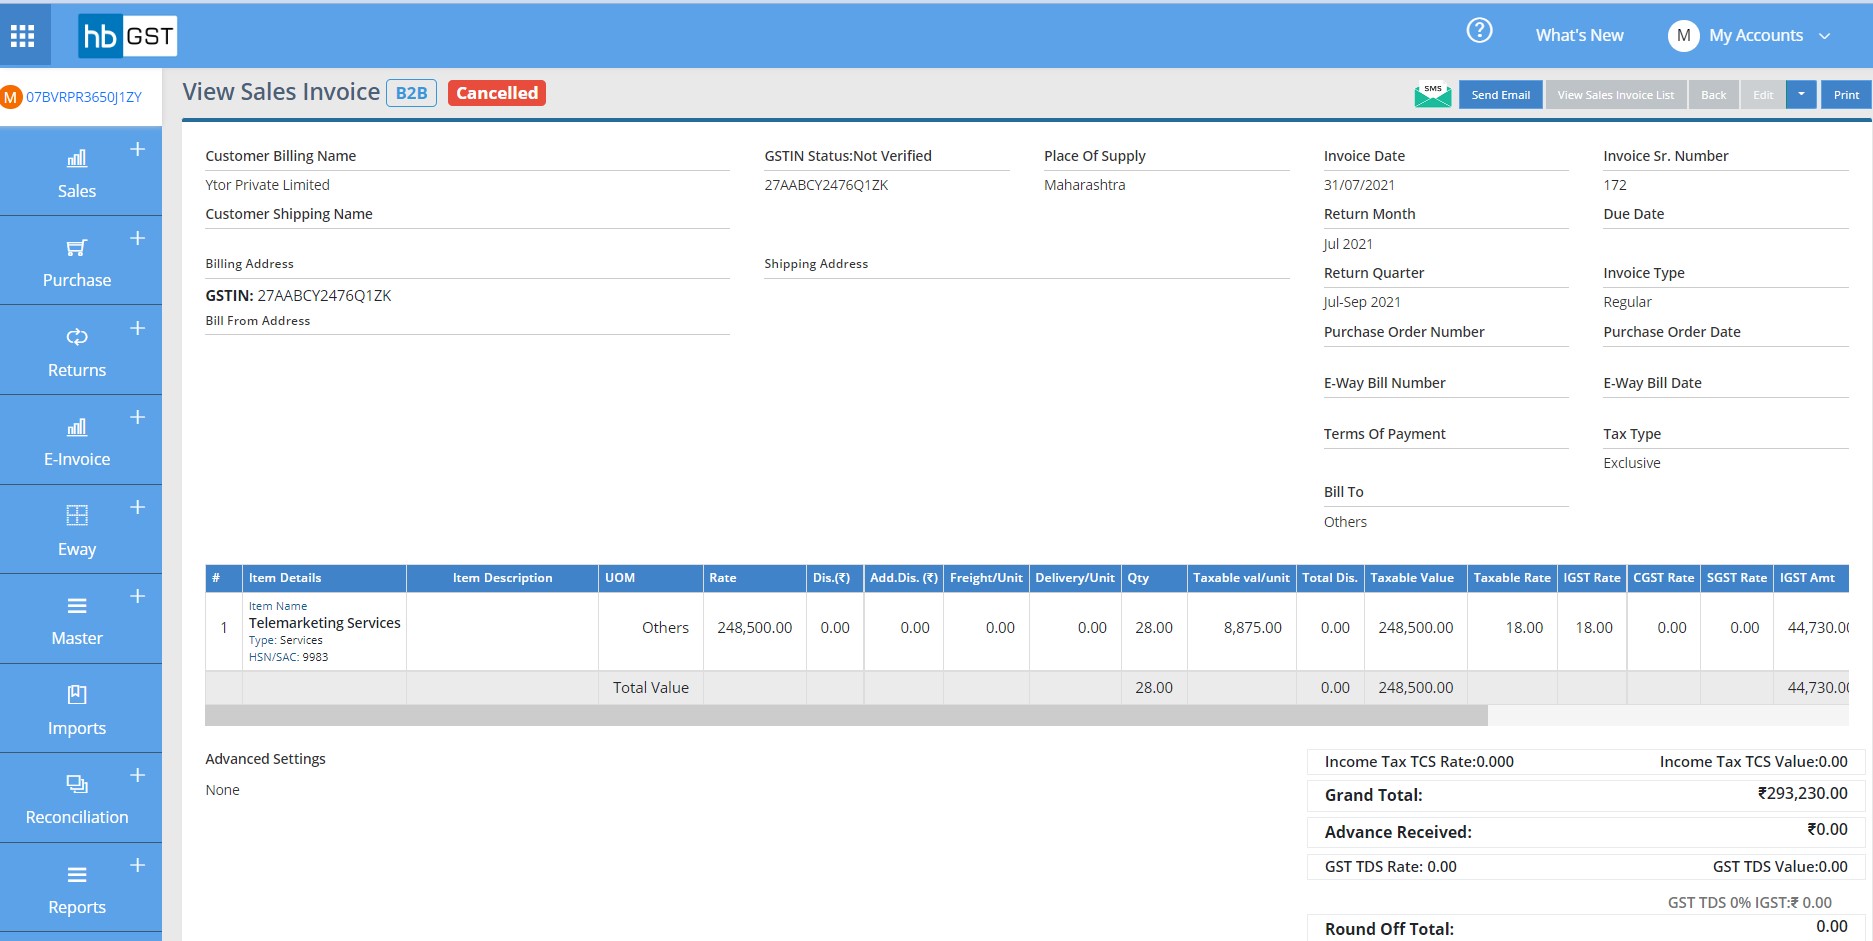
B: Delete Invoice:
If user once delete invoice then not able to recover again.

HB-GST Application have Bulk delete option available;
Bulk Delete Invoices:
- Go to the invoice listing page.
- Select the invoice.
- Click on Delete Icons and then click on Delete invoice button.
How to send Invoice on SMS or E-mail?
HB GST provides option to send Invoice/Purchase Invoice/documents to the customer or vendor on SMS and Email.
Following steps are necessary to send a document to the customer/vendor
Step 1: Click on the 'Sales Invoice/Purchase Invoice' button after entering into the business.
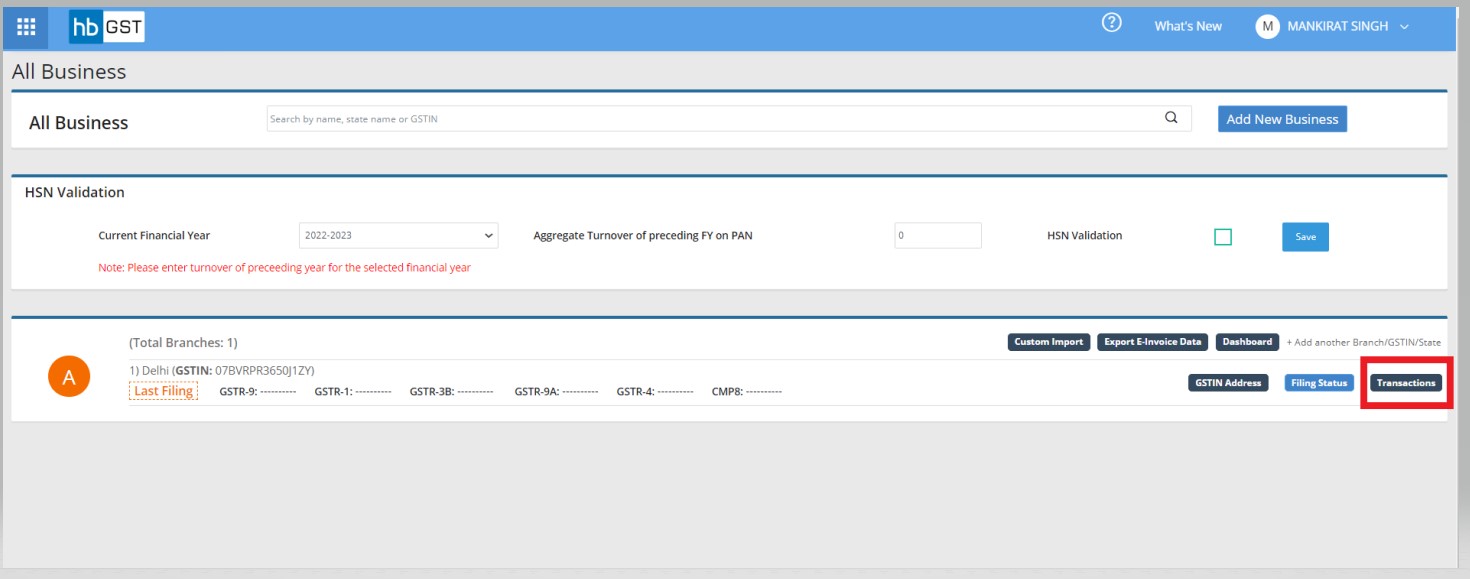
Step 2: Access to the Invoice/Purchase Invoice listing page or listing page of any document. For example listing page of Invoice

Step 3: Click on the 'SMS' icon or "Send Email" icon in the view page of Invoice.
Step 4A: Fill the following details in case of SMS:
- Select Template.
- Select Customer/Transporter/Supplier.
- Enter Phone number
- Enter Message
- Click on send.
Customer will get a Tiny URL on given number as SMS. After click on that URL, invoice will be downloaded.

Step 4B: Fill the following details in case of Email:
- Select Template.
- Select Customer/Transporter/Supplier.
- Enter the to mail ID.
- Enter the CC mail id.
- Enter the subject.
- Enter Message.
- Click on send.
Customer will get invoice on email id


