How to Create Export Invoice
How to open Sales?
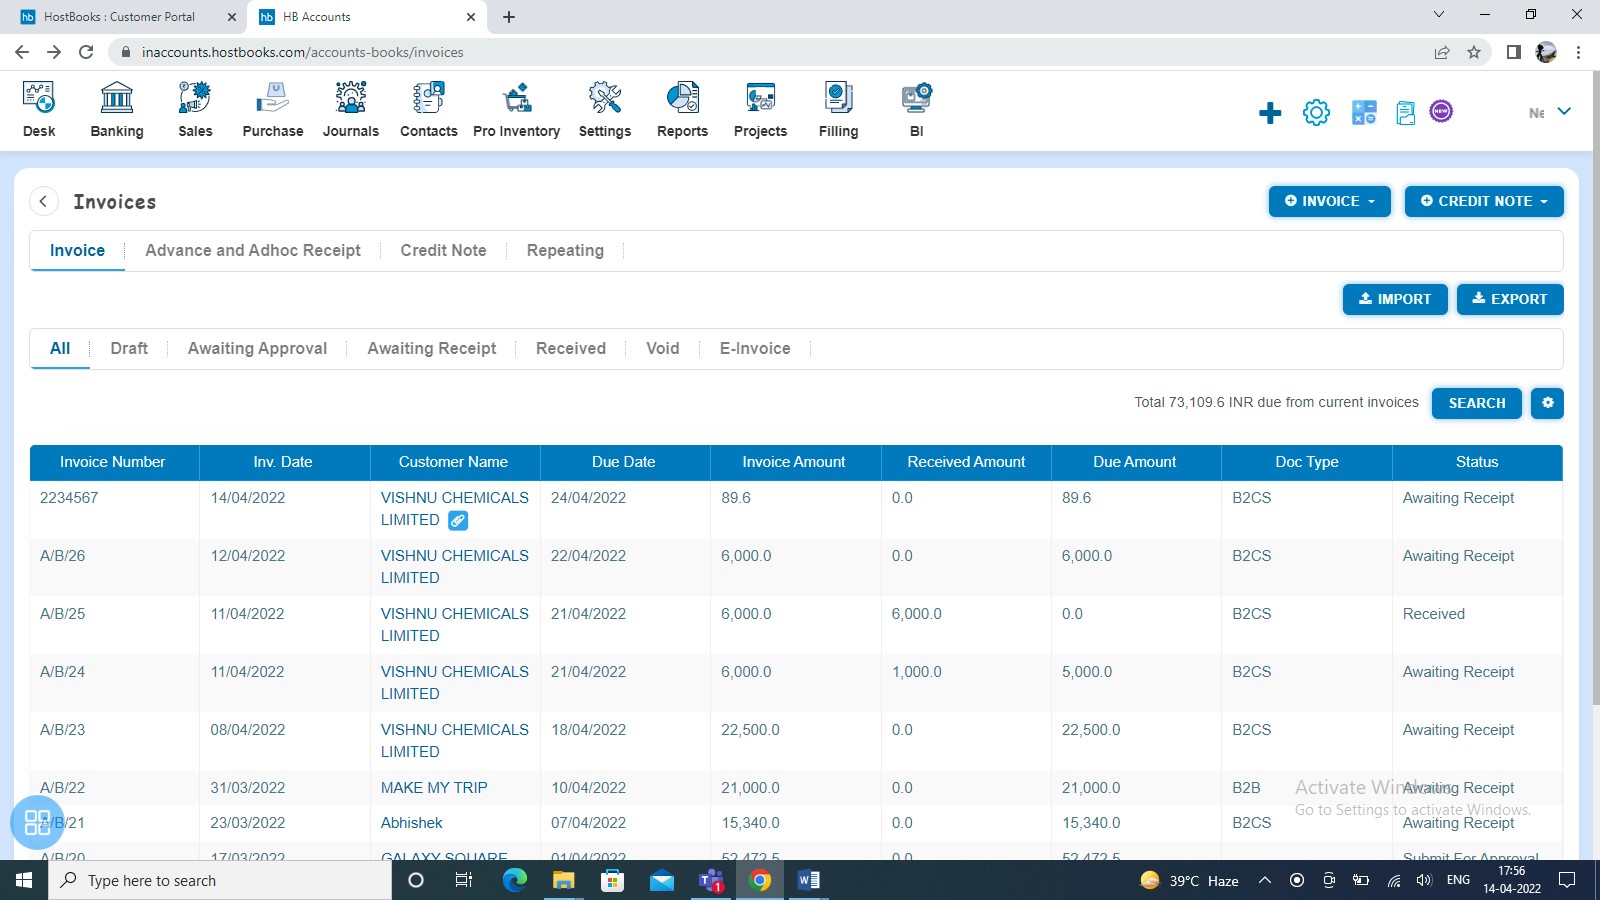
Sales-> Invoice
In this page, you will be able to see list of all Invoices that you have already added into the software and you can also create Sale Invoice, Export Invoice, Bill of Supply, Repeating Invoice, Credit Note, Amendment Invoice, Export Amendment, and Amendment Credit Note.
By default after clicking on sales, Invoice listing page will appear.
You can also navigate to the other listing pages to view:
- Advance and Adhoc Receipt
- Credit Note and
- Repeating Invoice.
You can view Invoices which are:
- Draft
- Awaiting Approval
- Awaiting Receipt
- Received and
- Void
From the listing page you can check the following information about each invoice that have been entered into the software:
- Customer Name
- Invoice Number
- Invoice Date
- Due Date
- Amount
- Received
- Due
- Doc Type
- Status of Invoice i.e. Draft, Submit for Approval, Awaiting Receipt etc.
How to Create Export Invoice?
You can create Export Invoice one by one by clicking “Export Invoice”.
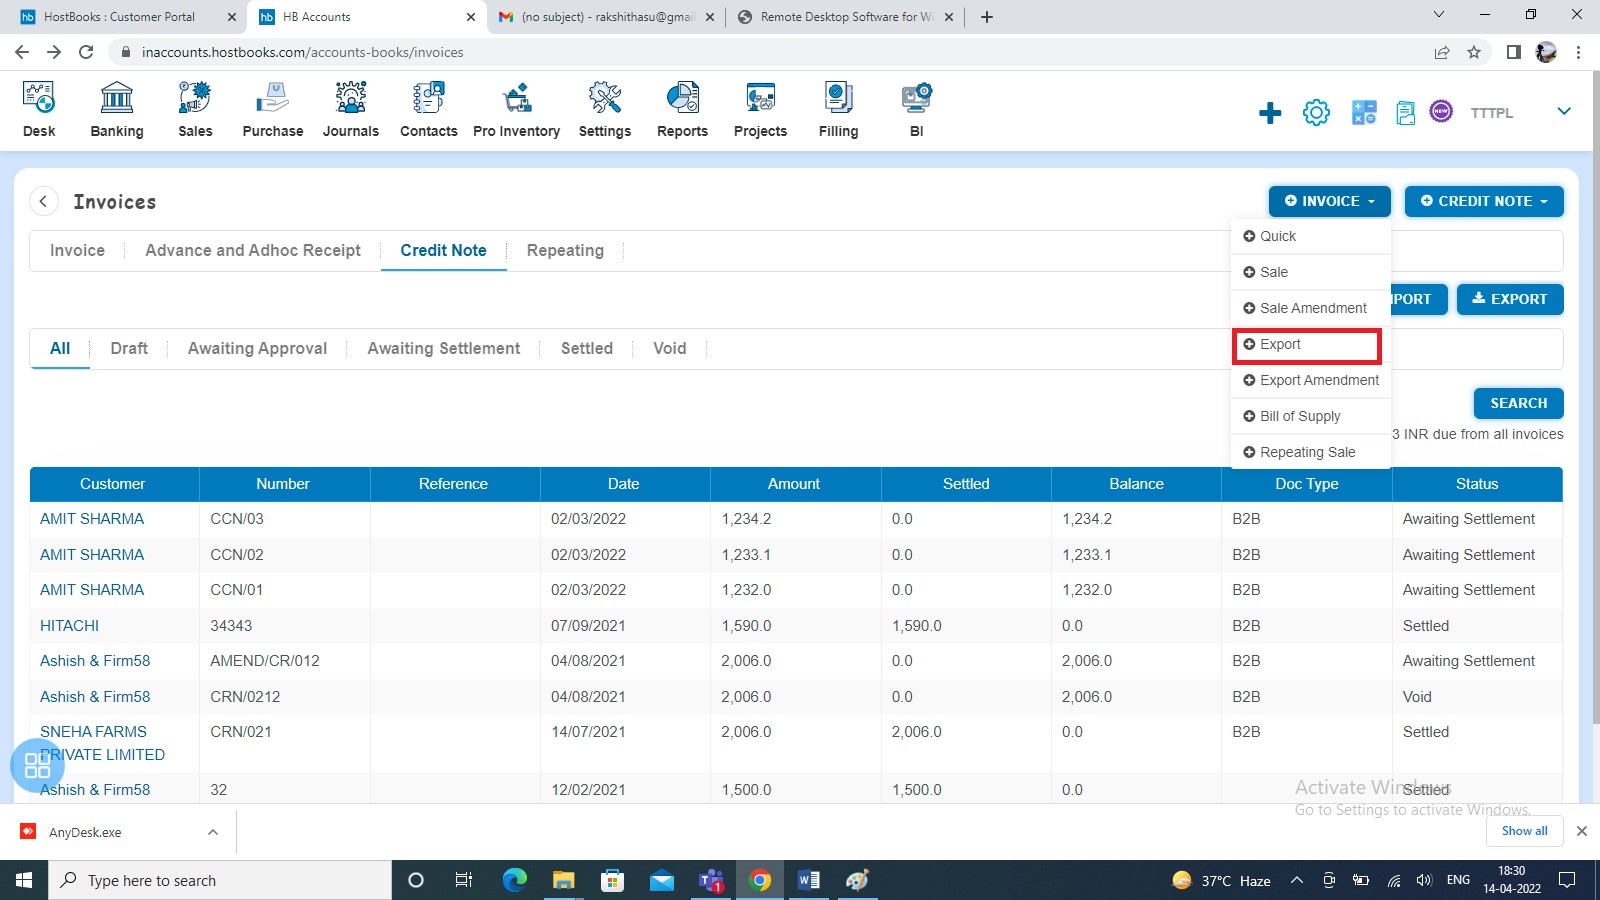
After clicking on “Export Invoice” - New Export Invoice form will be generated on the screen.
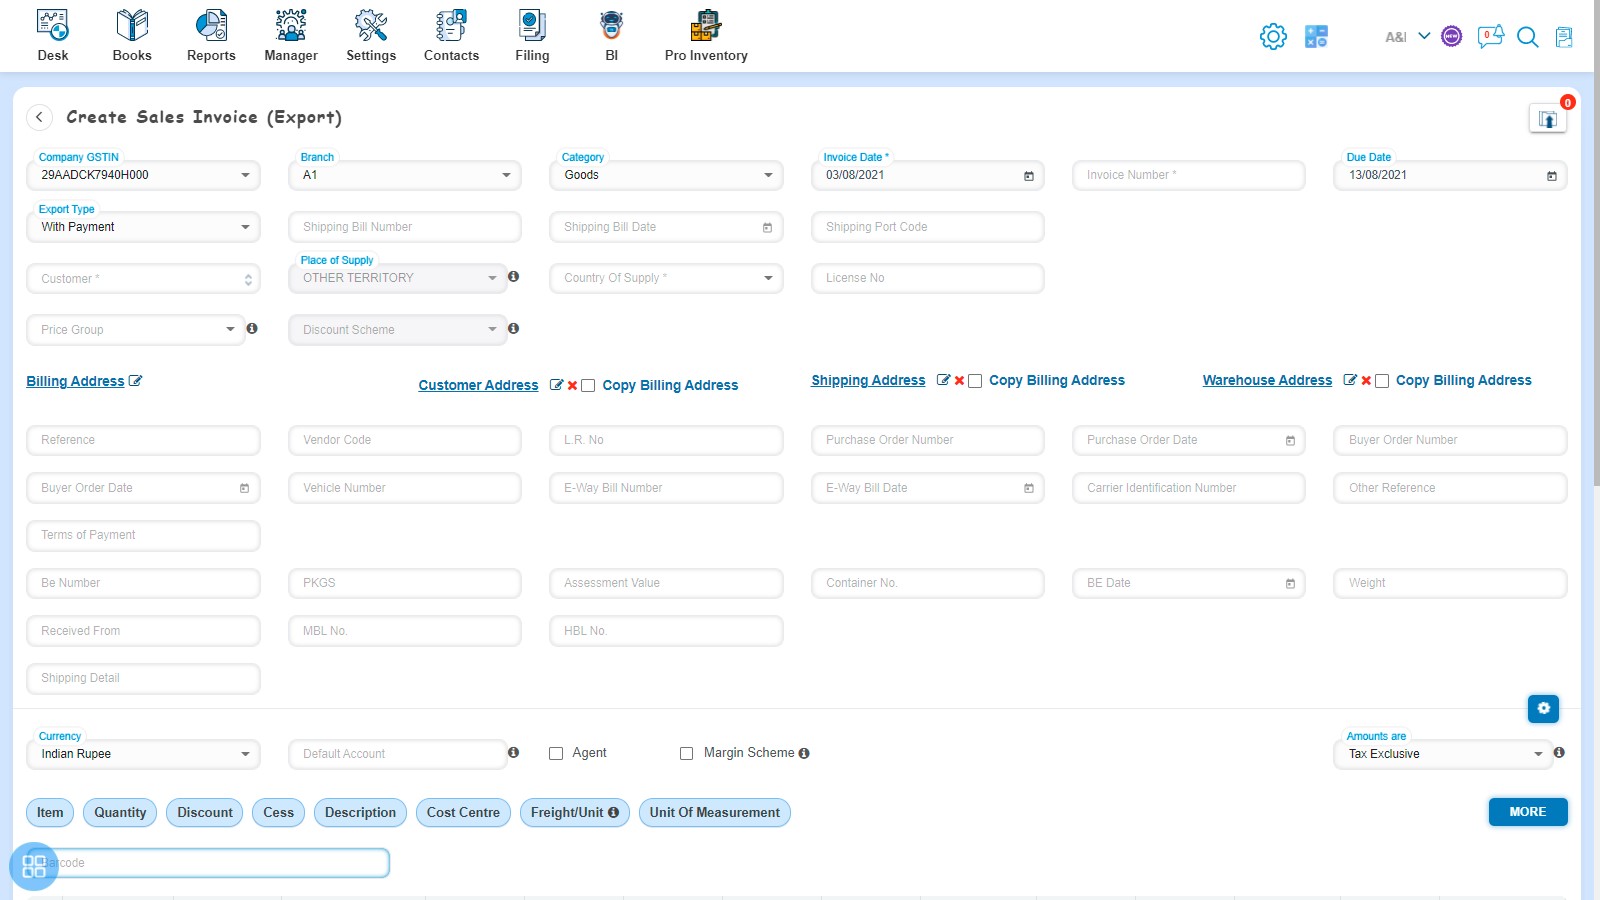
You are required to fill following fields:-
- Company GSTIN
- Branch
- Category
- Invoice Date
- Invoice Number
- Due Date
- Export Type
- Shipping Bill Number
- Shipping Bill Date
- Shipping Port Code
- Customer
- Place of Supply
- Country of Supply
- License No
- Price Group
- Discount Scheme
- Billing Address
- Customer Address
- Shipping Address
- Warehouse Address
- Reference
- Vendor Code
- L.R. No
- Purchase Order Number
- Purchase Order Date
- Buyer Order Number
- Buyer Order Date
- Vehicle Number
- E-way Bill Number
- E-way Bill Date
- Carrier Identification Number
- Other Reference
- Other Reference
- Terms of Payment
- BE Number
- Packages
- Assessment Value
- Container No
- Bill of Entry Date
- Weight
- Received From
- Master Bill of Lading (MBL)
- House Bill of Lading (HBL)
- Invoice Custom Fields
- Currency
- Default Account
- Agent
- Margin Scheme
- Amounts Are
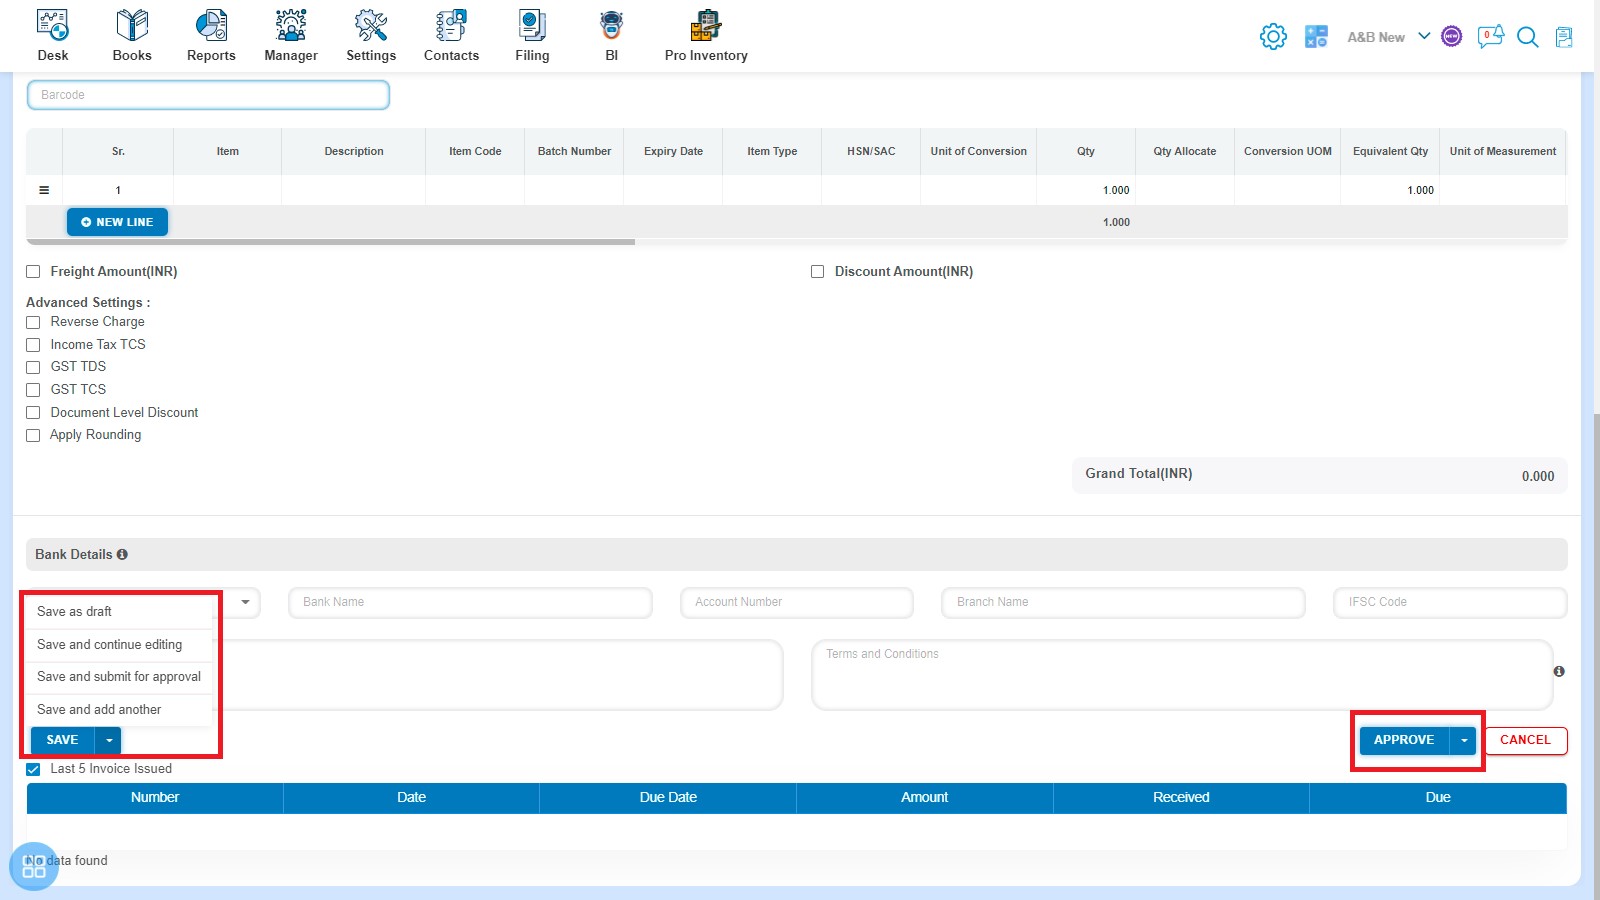
Fill the Item details such as:-
- Item
- Description
- Item Code
- Batch Number
- Expiry Date
- Item Type
- HSN/SAC
- Quantity
- Quantity Allocate
- Conversion UOM
- Equivalent Qty
- Unit of Measurement
- Unit of Conversion
- Sale Type
- MRP
- Unit Price
- Discount (%, Flat)
- PTR/Unit
- Add. Discount (%, Flat)
- PTS/Unit
- Subsidy
- Freight/Unit
- Delivery/Unit
- Item Custom Fields
- Accounts
- Cost Centre
- Taxable Amount
- Tax Rate
- Tax Amount
- GST Rate
- IGST
- CGST
- SGST/UGST
- Cess (%, Flat)
- Add. Cess
- Nil/Exempt Rate
Advanced Settings Details such as:-
- Reverse Charge
- Income Tax TCS
- GST TDS
- GST TCS
- Document Level Discount
- Apply Rounding
Fill Bank Details such as:-
- Bank Name
- Account Number
- Branch Name
- IFSC Code
Other Information such as:-
- Customer Notes
- Terms and Conditions
What Mandatory fields are required?
For creating the Export Invoice you are required to fill some mandatory fields such as:-
- Customer
- Invoice Number
- Country of Supply
- Billing Address
- Billing Zip Code
- Date
- Due Date
- Quantity
- Unit Price
- Account
- Tax Rate
- GST Rate
How to set Auto-fields?
You can set some auto-fill functionalities for creating the Export Invoice. Such Auto-Fields are:-
- Invoice date: By default current date will be the Invoice Date. You can also change the same.
- Invoice Due Date: By default Invoice due date is also given by the software. However, you can change the same.
- Branch (Auto): You are required to Add Branch in Management Tracking. Those added Branch list will appear at the time of creation of Export Invoice.
For adding Branch - Navigate to Settings -> Organization Settings -> Location -> Add Branch.
- Category (Auto): You are required to Add Category in Management Tracking. Those added Category list will appear at the time of creation of Export Invoice.
For adding Category - Navigate to Settings -> Organization Settings -> Location -> Add Category.
- Invoice Number (Auto): Invoice Number will auto populate from series as set by you in Document Series Settings. However, you can change the same.
For Setting series - Navigate to Settings -> Custom Configuration -> Document Series -> Select Sales Invoice (Export).
- Price Group (Auto): You are required select price group while creating Price Group. All those price group which has been added will auto appear in list while creating Export Invoice
For adding Price Group – Navigate to Settings -> Price, Discount and Commission Management -> Price and Discount Management
How to Hide/Unhide fields?
You can Hide/Unhide some fields from the Custom Configurations. By default, fields are unchecked in Document Customization. You can check those fields which you want to show in Invoice.
Navigate to Settings -> Custom Configurations -> Document Customization -> Select Sales Invoice (Export).
How to Save Export Invoice?
You can save the Export Invoice into following three types:
- Save as Draft
- Save and continue editing
- Save and Submit for Approval
- Save and add another
- Finally click on approve to save the credit note.
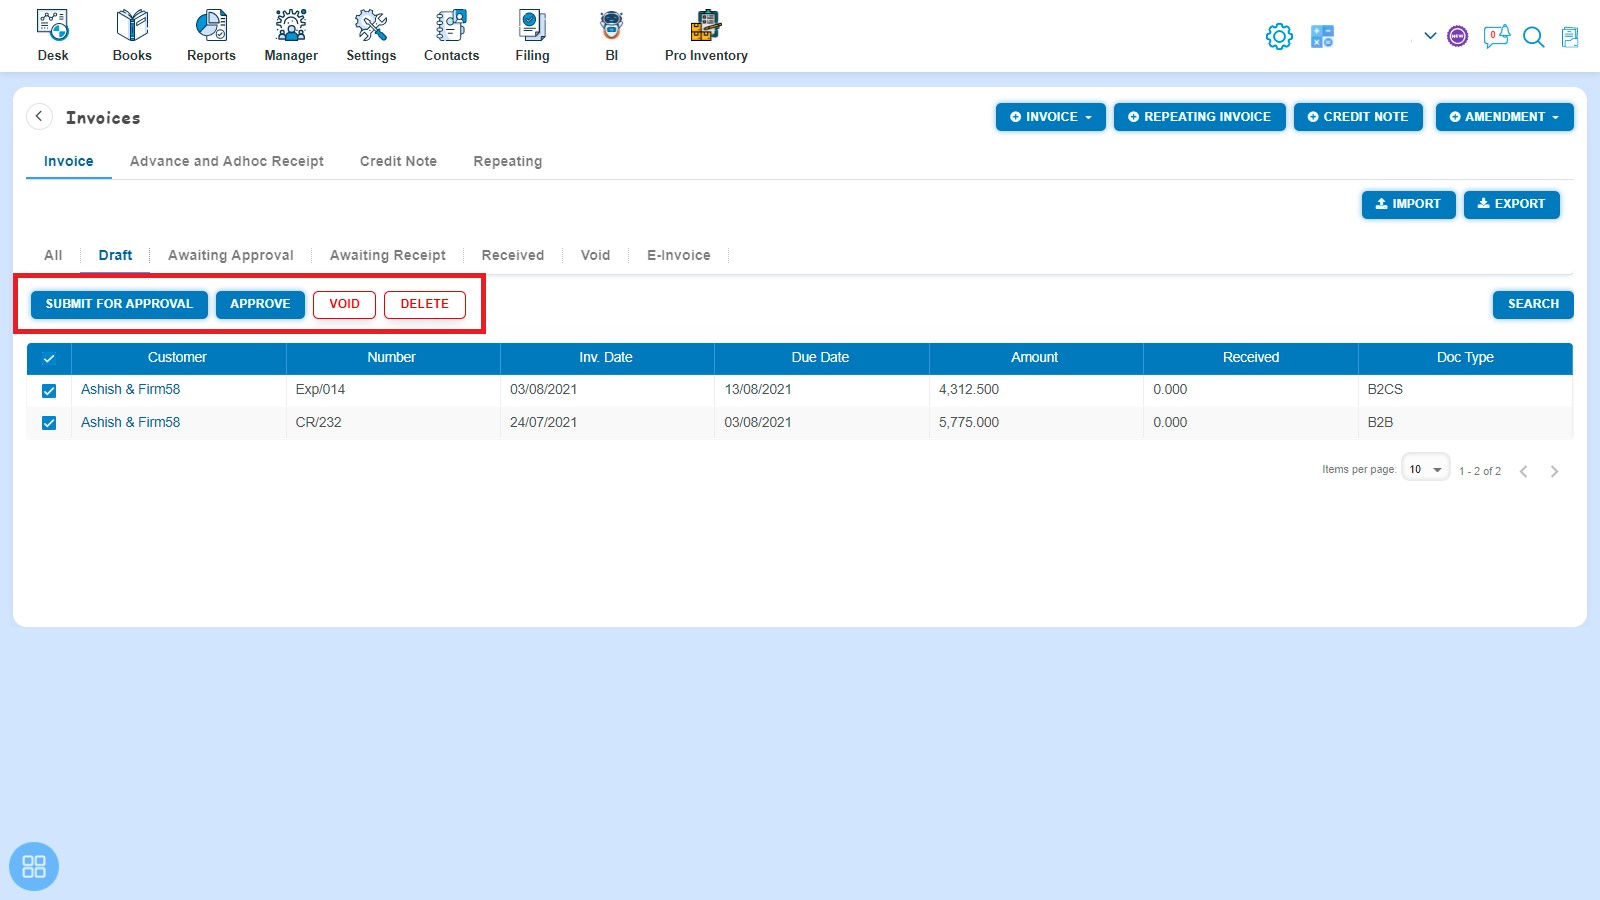
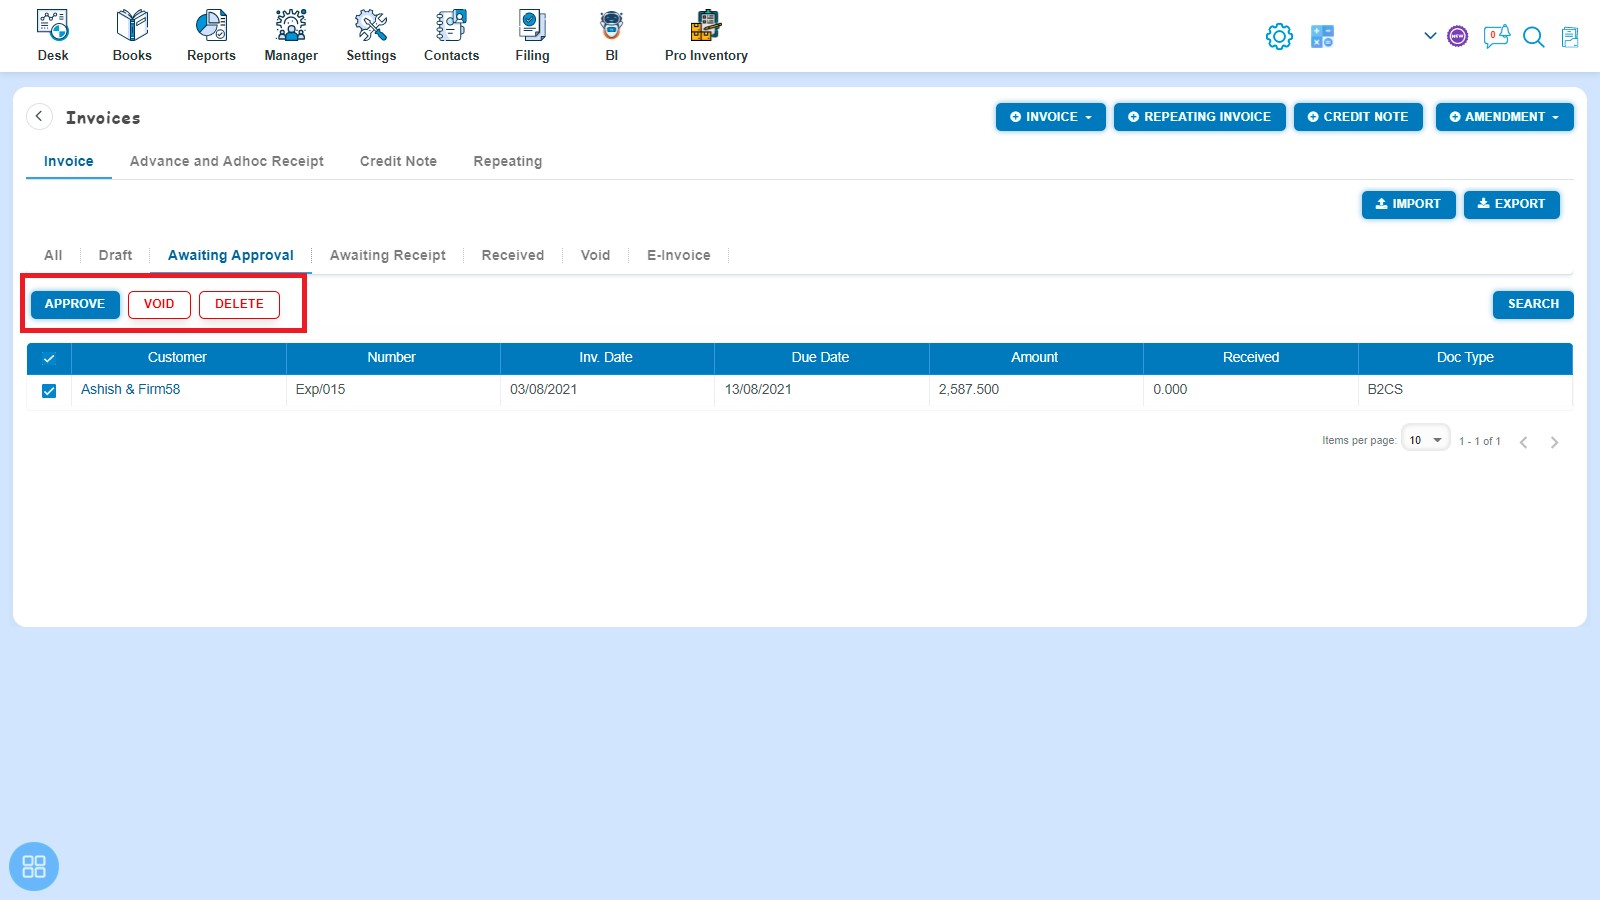
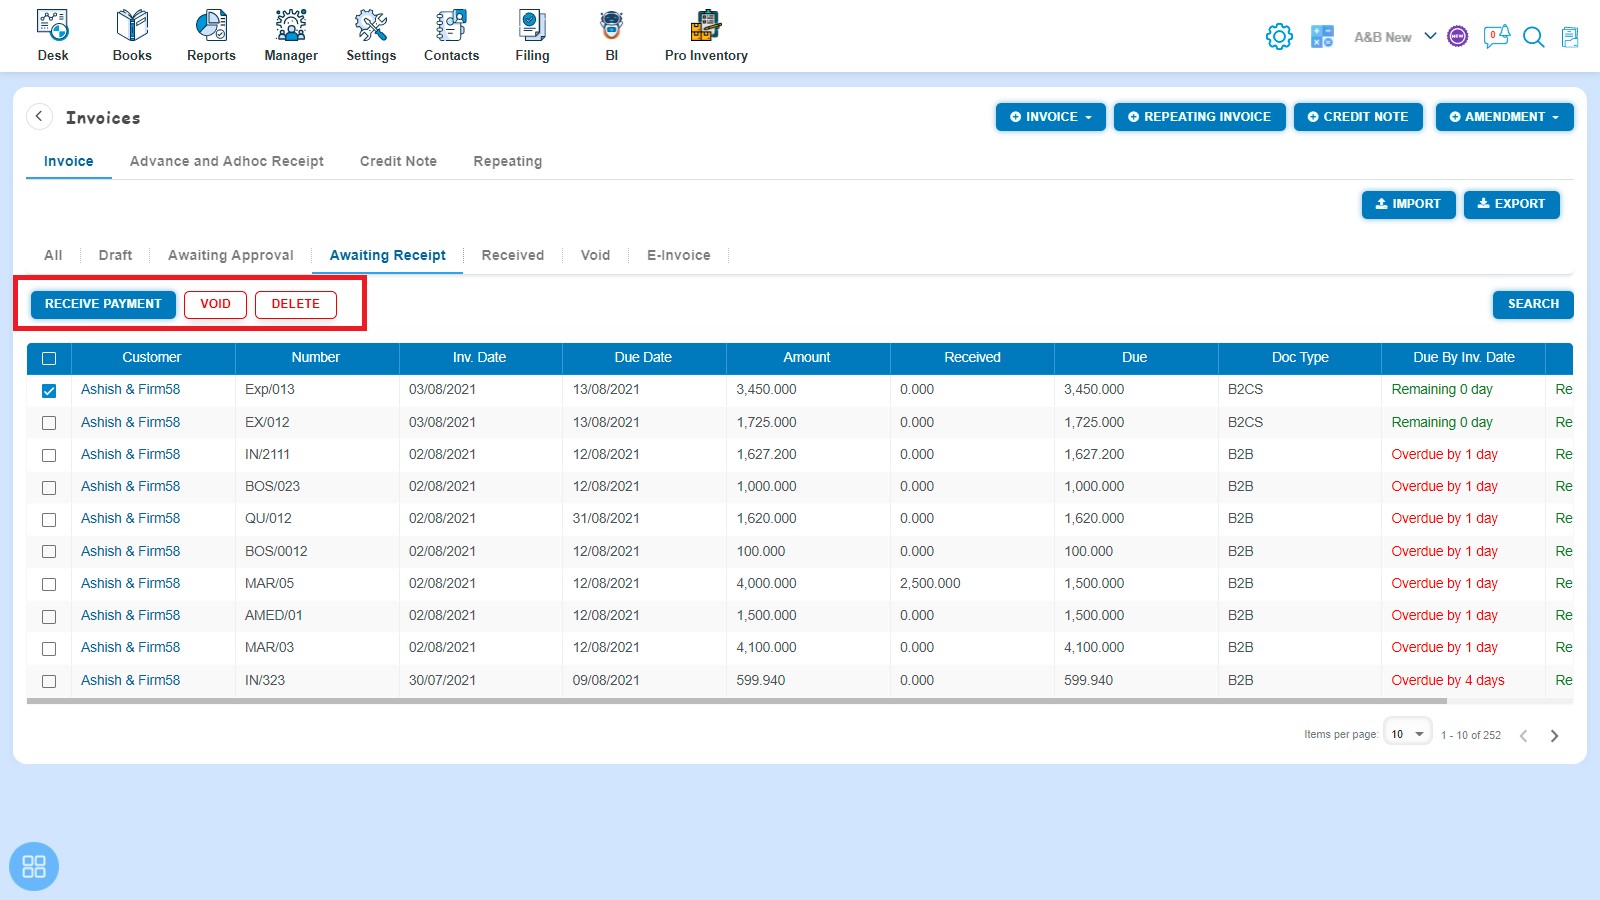
How to change the status of Export Invoice from Listing?
- Navigate to Draft listing from All Invoice listing and select the Invoice which you want to move in "Submit for Approval", "Approve", "Void" or "Delete".
- Navigate to Awaiting Approval listing from All Invoice listing and select the Invoice which you want to move in "Approve", "Void" or "Delete".
- Navigate to Awaiting Receipt listing from All Invoice listing and select the Invoice which you want to move in "Receive Payment", "Void" or "Delete".
- Navigate to Void listing from All Invoice listing and select the Invoice which you want to "Delete".

How to receive payment of Export Invoice?
There are four ways to receive payment.
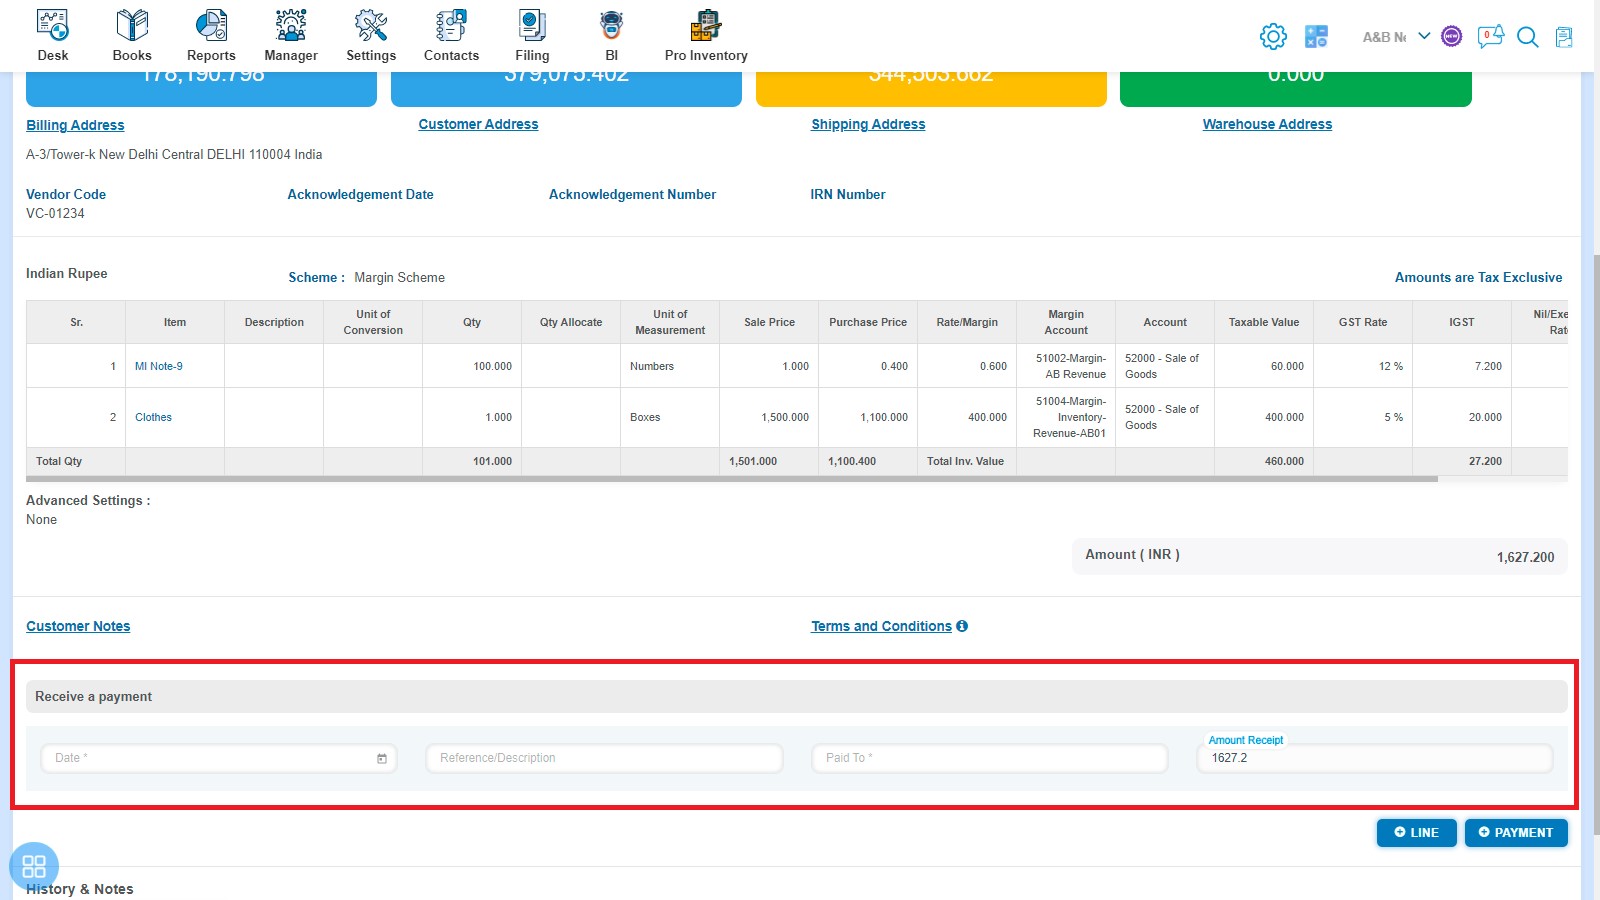
- Create an Export Invoice and click on Approve button then it will navigate to Invoice Listing Page. In the Invoice listing page, open the Export Invoice for which status is Awaiting Receipt in View Mode. Enter the following fields and click on Add Payment:
- Amount Receipt
- Date Paid
- Paid To
- Reference/Description
- Navigate to Awaiting Receipt listing page from All Invoice listing page and select the single or multiple Export Invoices against which you want to "Receive Payment"
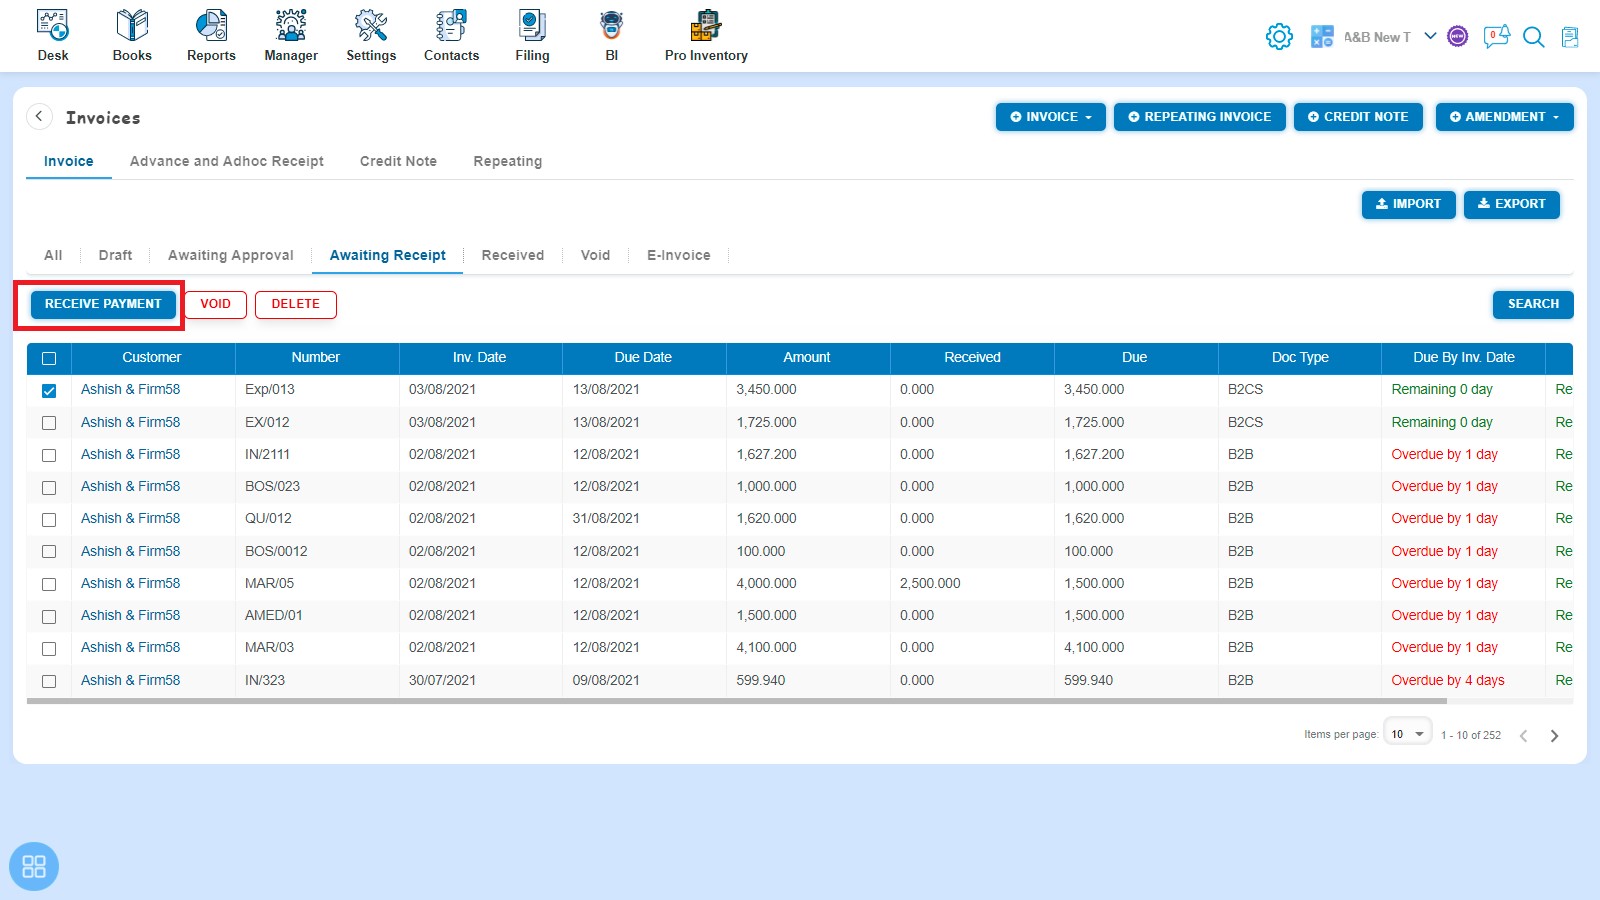
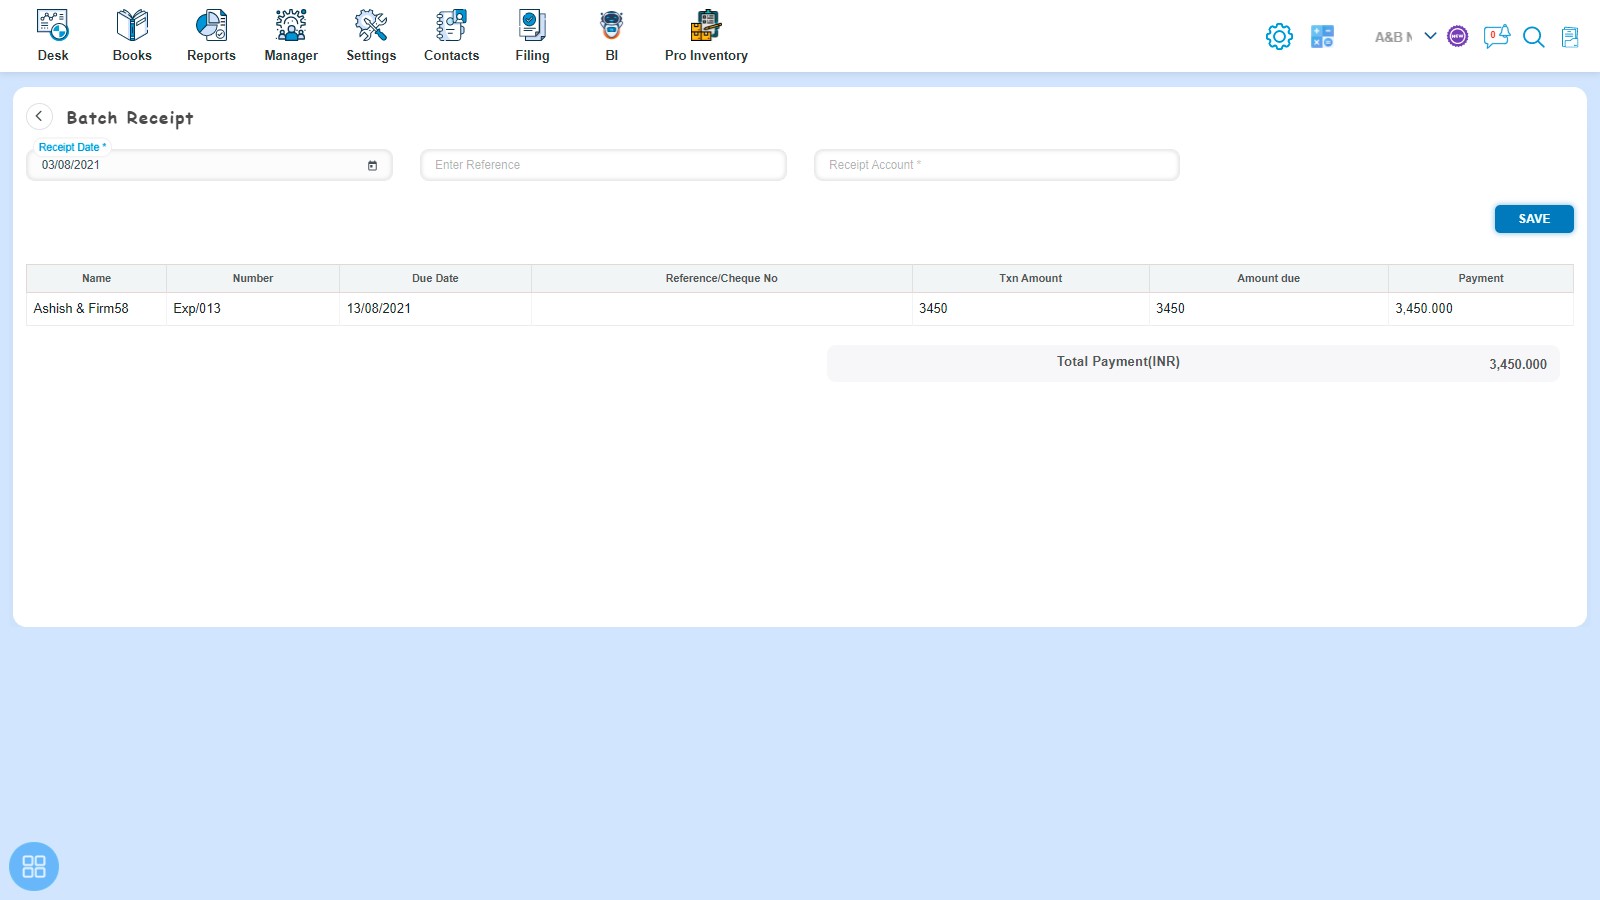
- Click on Receive Payment then it will redirect to Batch Receipt. Enter following fields and click on Save.
- Receipt Date
- Reference
- Receipt Account
- Payment
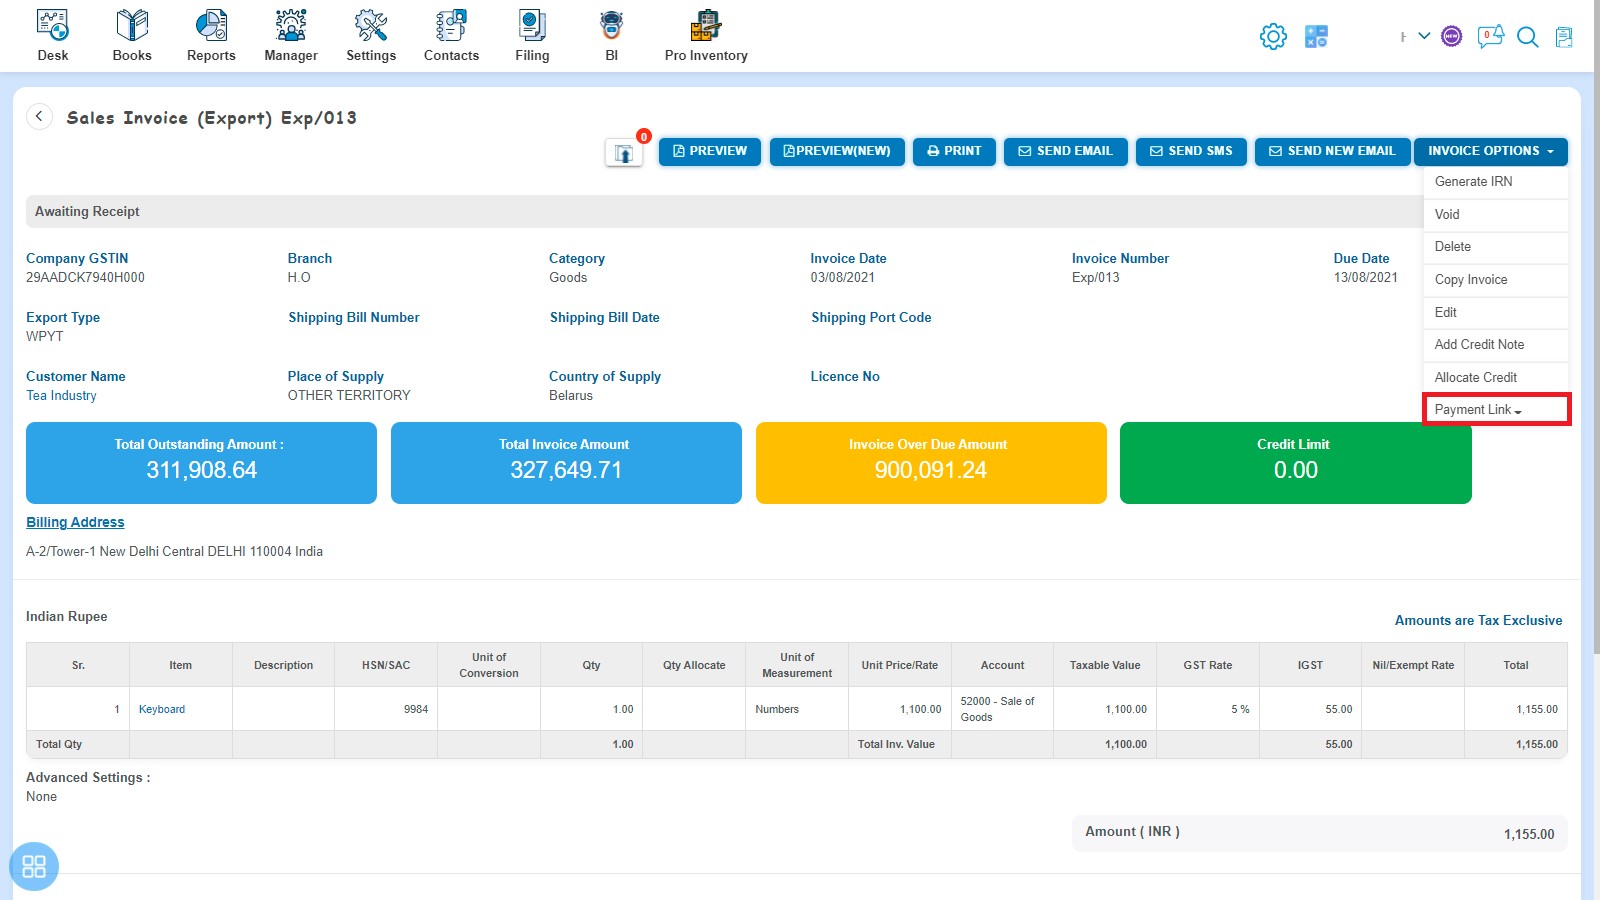
- Create an Export Invoice and click on Approve button then it will navigate to Invoice Listing Page. In the Invoice listing page, open the Invoice for which status is Awaiting Receipt in View Mode and click on Invoice Option -> Payment Link -> HB Elite.
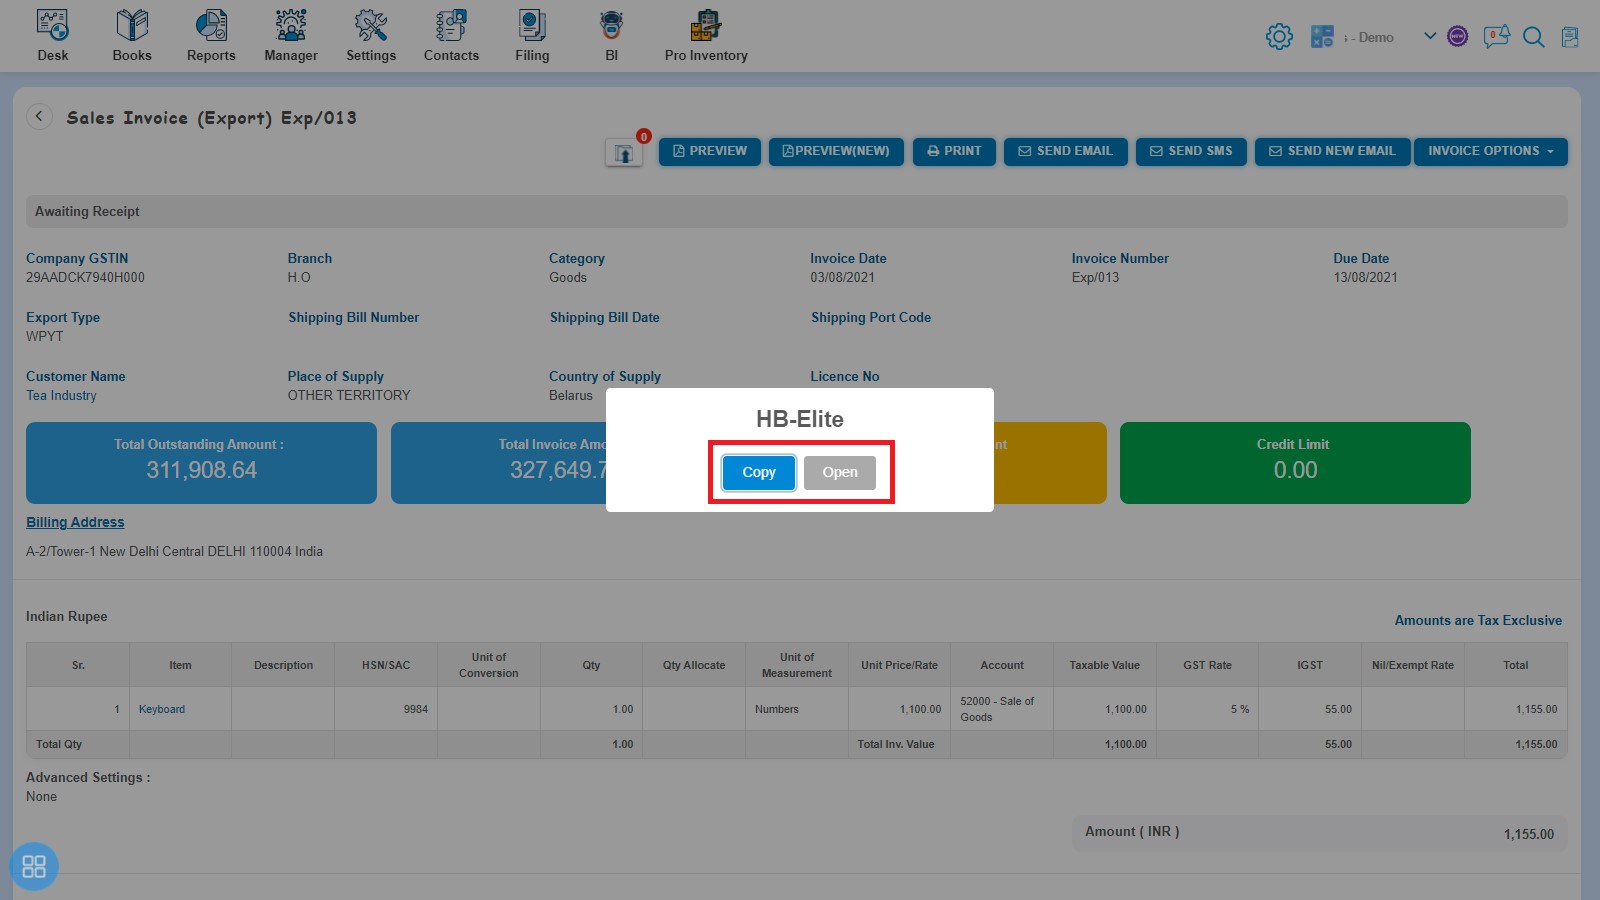
Click on Open in HB-Elite window.
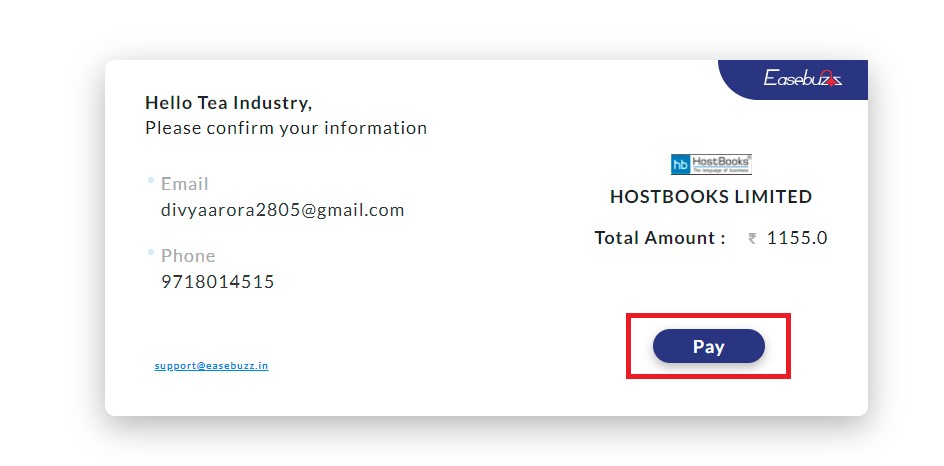
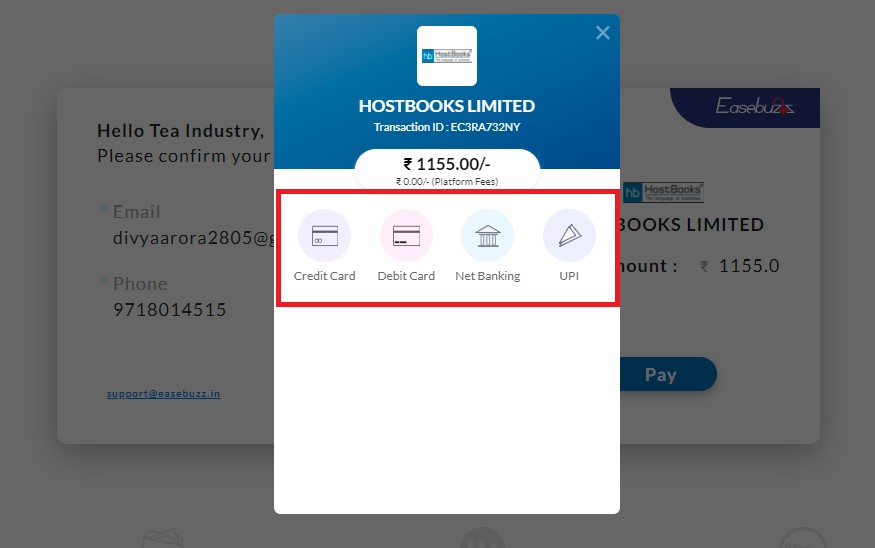
After that click on Pay and receive the payment through Credit Card, Debit Card, Net Banking or UPI.
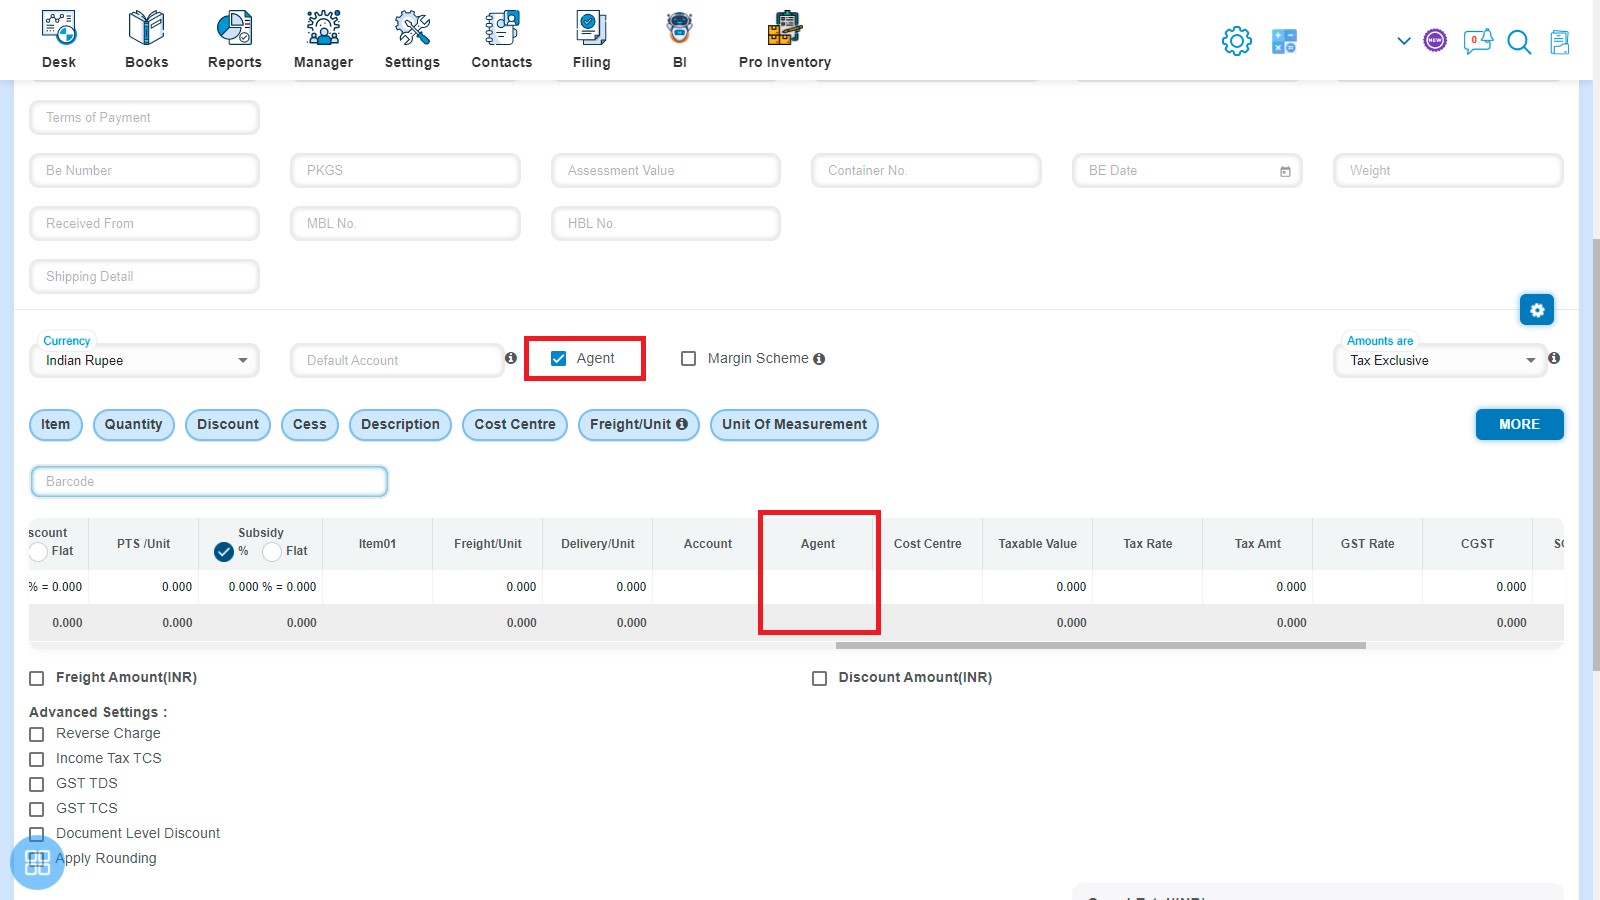
How to add Agent?
Create an Invoice and select the Agent check box to enable Agent column in Item table. You can select the Agent from drop-down list menu.
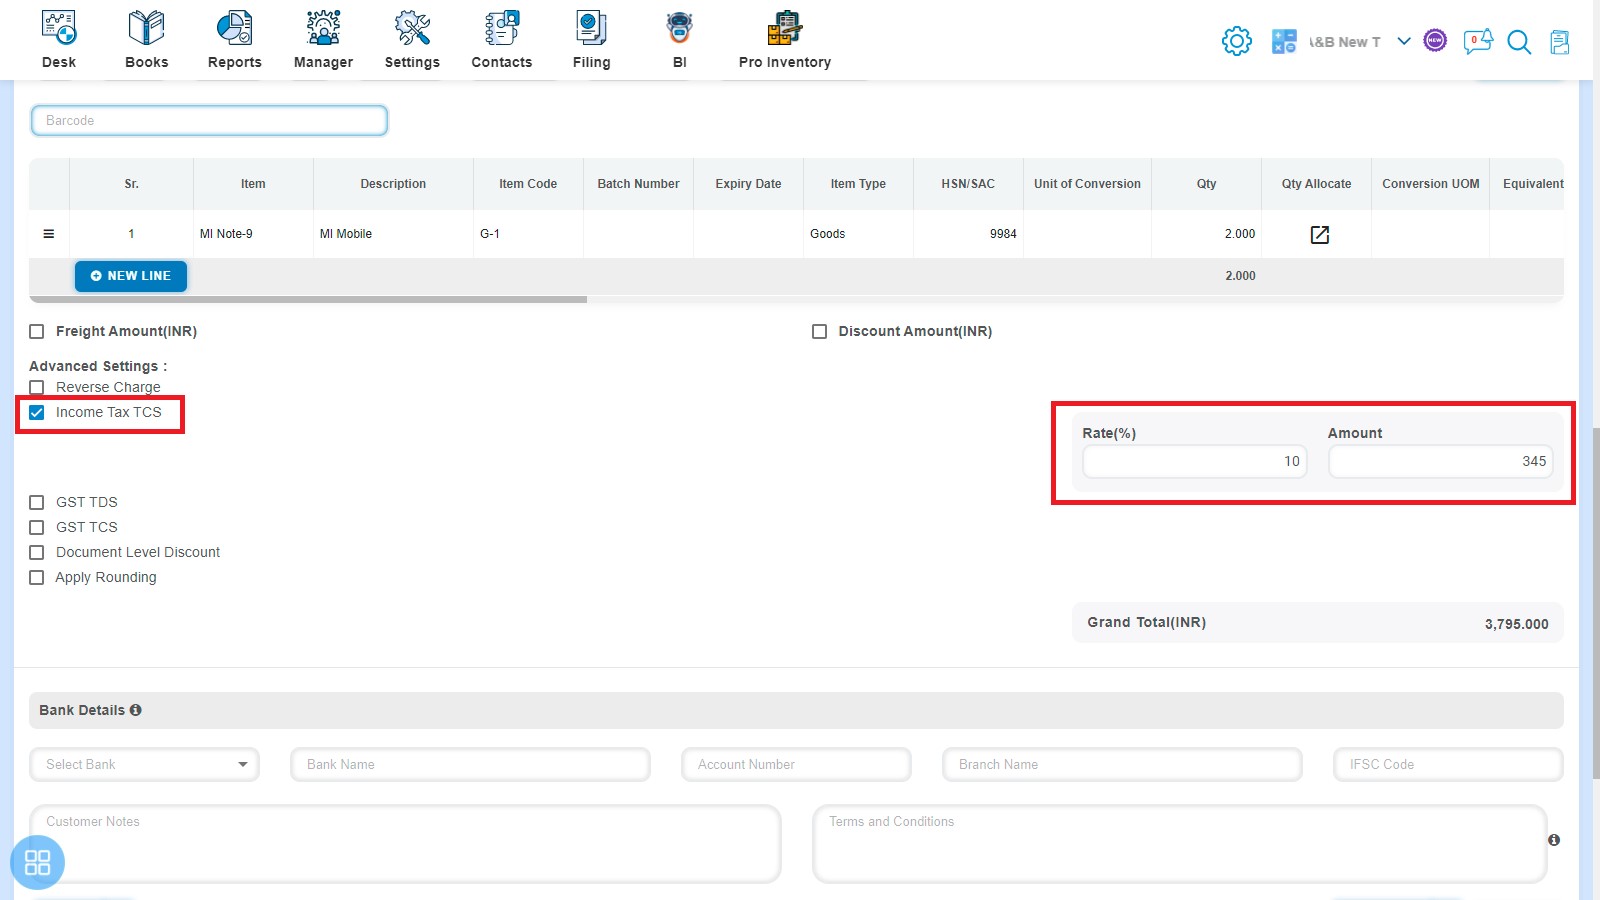
How to manage Advanced Settings?
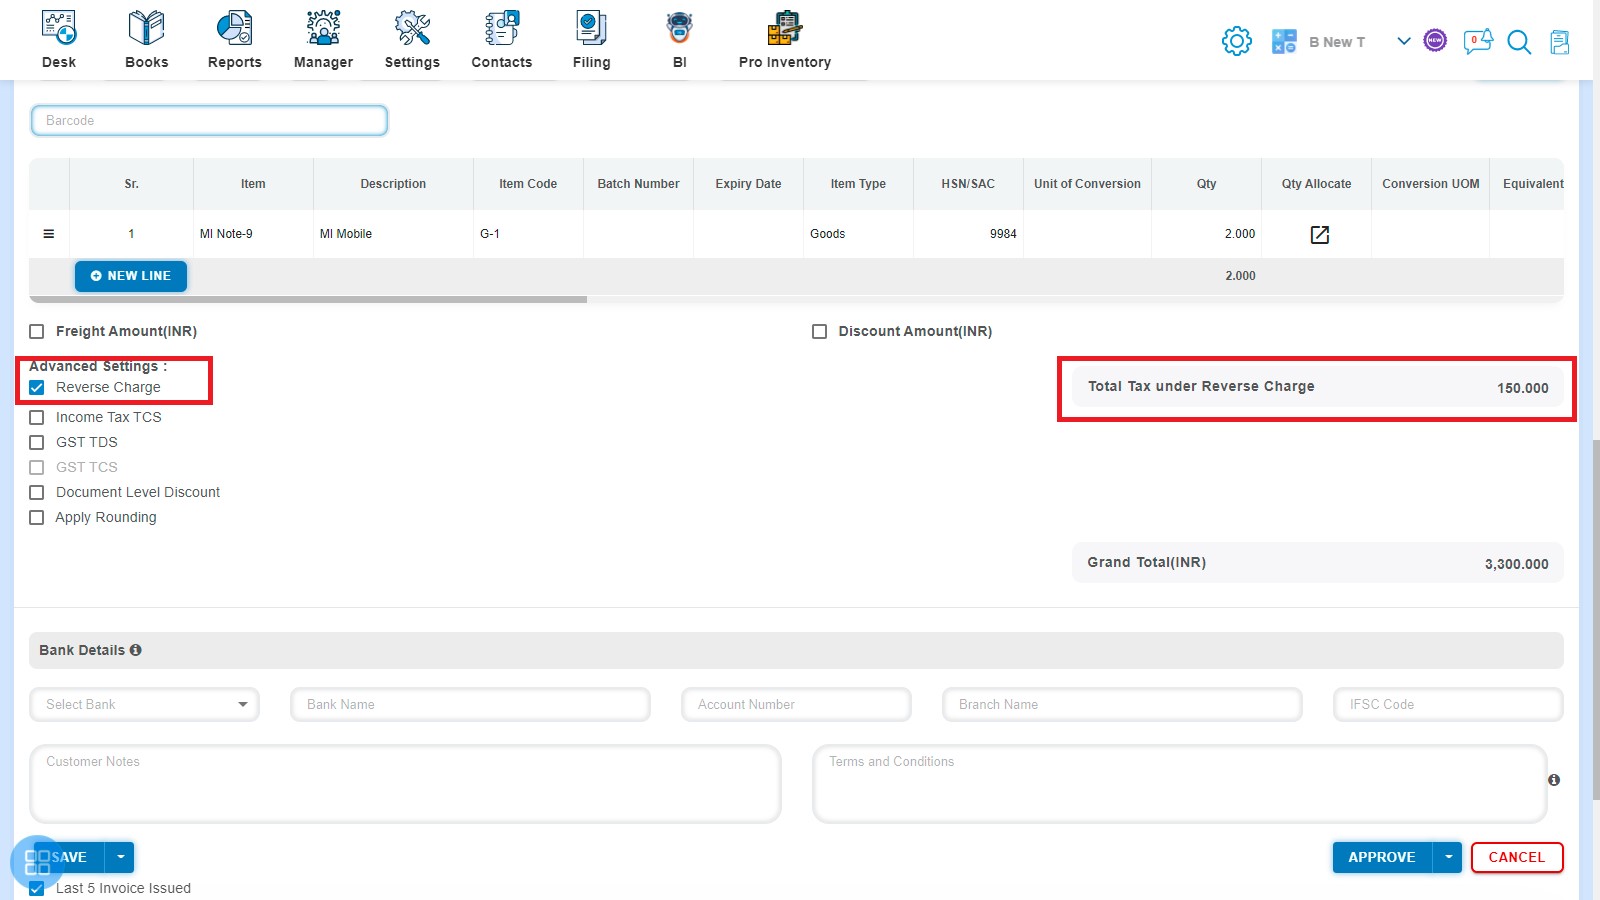
There are 6 types of Advanced settings, out of which two of them namely, Reverse charge and Document Level Discount will auto appear while creating invoice and rest of four, i.e. Income Tax TCS, GST TDS, GST TCS, apply Rounding will appear after checking the same in Customization Settings.
- Create an Export Invoice and click on Reverse Charge to auto calculate the total tax under reverse charge.
- Create an Export Invoice and click on Income Tax TCS then Rate & Amount input fields are auto filled. You can enter the Income Tax rate in order to calculate the amount automatically.
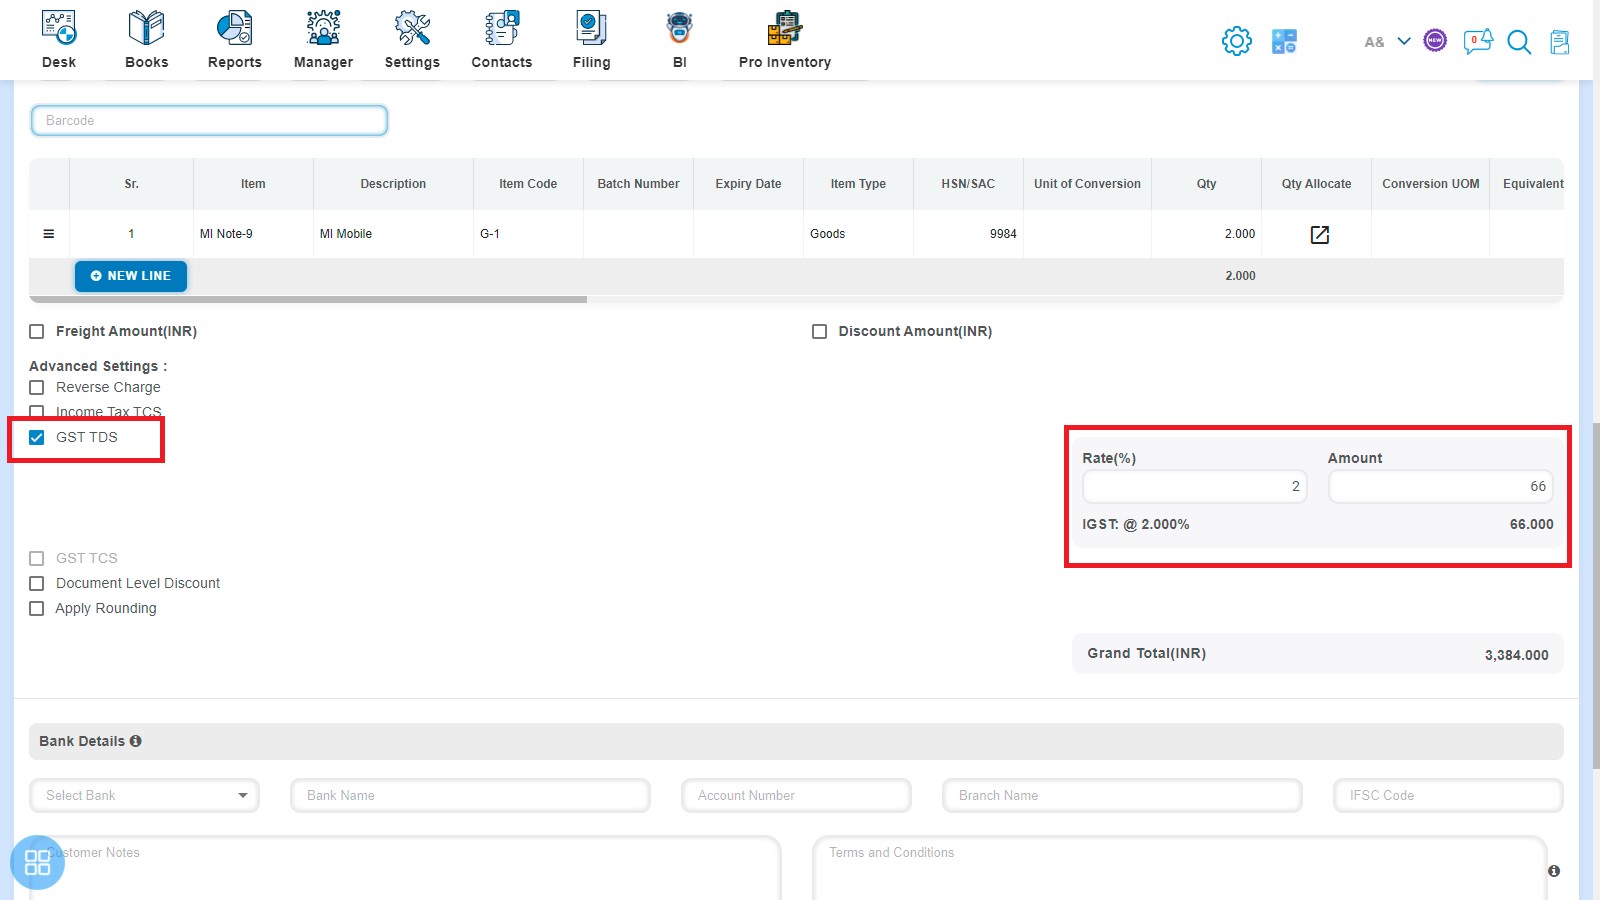
- Create an Export Invoice and click on GST TDS to autofill Rate & Amount input fields. You can enter the GST Rate and it will calculate the amount automatically.
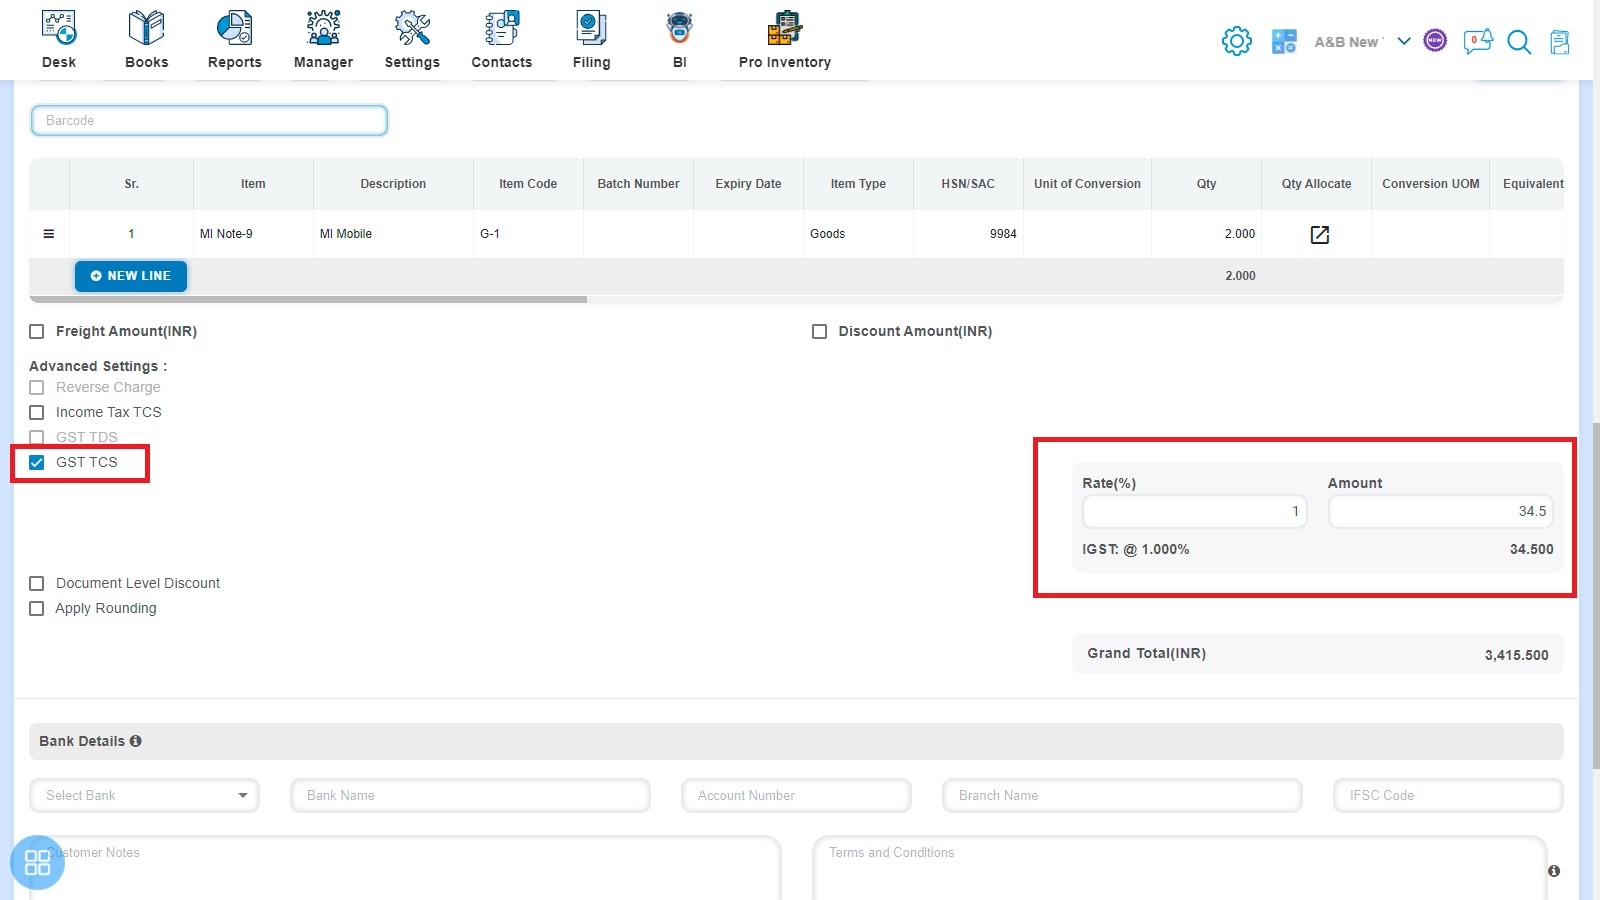
- Create an Export Invoice and click on GST TCS to automatically enable the Rate & Amount input field. You can enter the GST TCS and it will calculate the amount automatically.
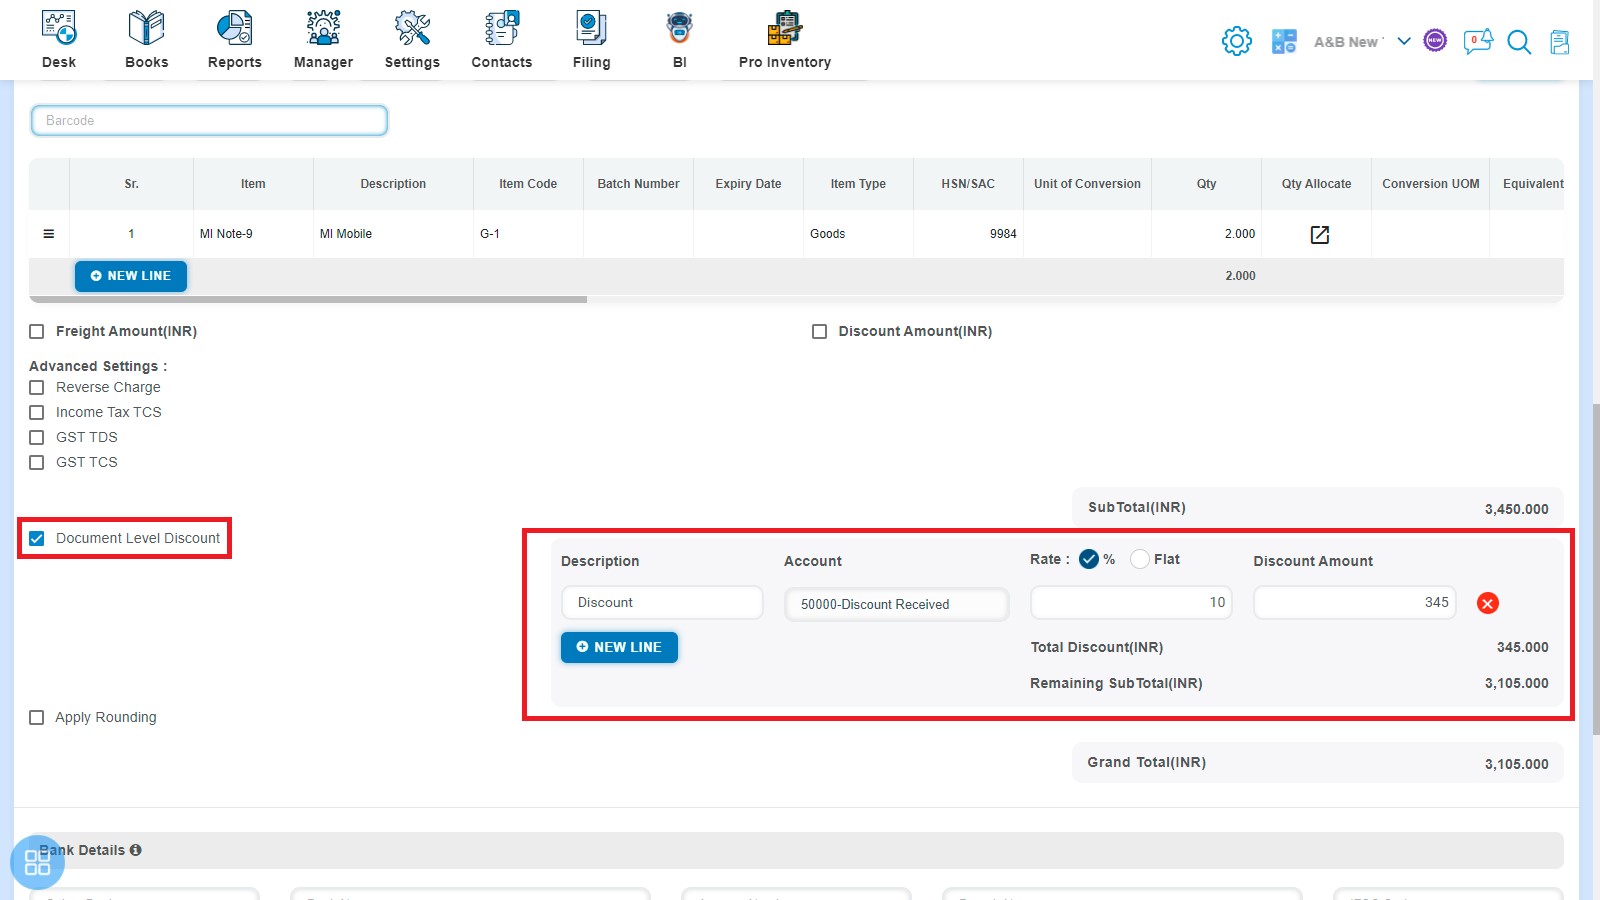
- Create an Export Invoice and click on Document Level Discount to find out the Description, Account, Rate & Discount Amount input fields.
- Create an Export Invoice and click on Apply rounding then it will round off the Total amount.