A Quick Guide on E Way Bill Registration Procedure Under GST
Under GST, E Way Bill has become mandatory for the transportation of goods with a value of more than ₹ 50,000. On the other hand, it becomes helpful for the purpose of tracking the exact location of transport and goods across India. It is compulsory to get registered on the E Way Bill portal first to generate the GST E-Way Bill.
As a quick guide on E-Way Bill Registration procedure under GST, this blog post will be quite helpful.
Requisites for E Way Bill Registration
- GST Registration Certificate (GSTIN) either of the Taxpayer or of the transporter.
- Registered Mobile Number.
Taxpayer Types for e Way Bill Registration
Under the GST Regime, with reference to e-Way Bill, mainly three kinds of taxpayers/ users are involved –
- Registered Suppliers
- Registered Transporters
- Unregistered Transporters
Procedure for e Way Bill Registration
Now, we will know step-by step how e-Way Bill Registration is done by the above mentioned users / taxpayers.
Registered Suppliers
Step 1: Visit the E-Way Bill Portal (www.ewaybill.nic.in)
Step 2: Click on E Way Bill Registration on the right side of the web page

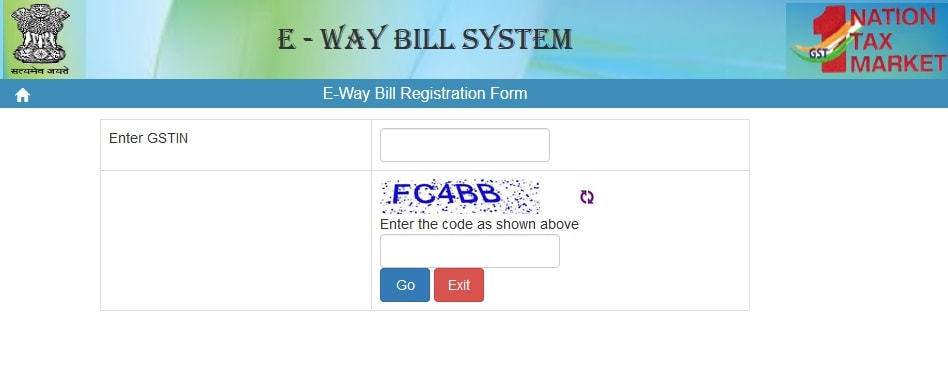
Step 3: Enter the GSTIN and the Captcha Code and click on GO
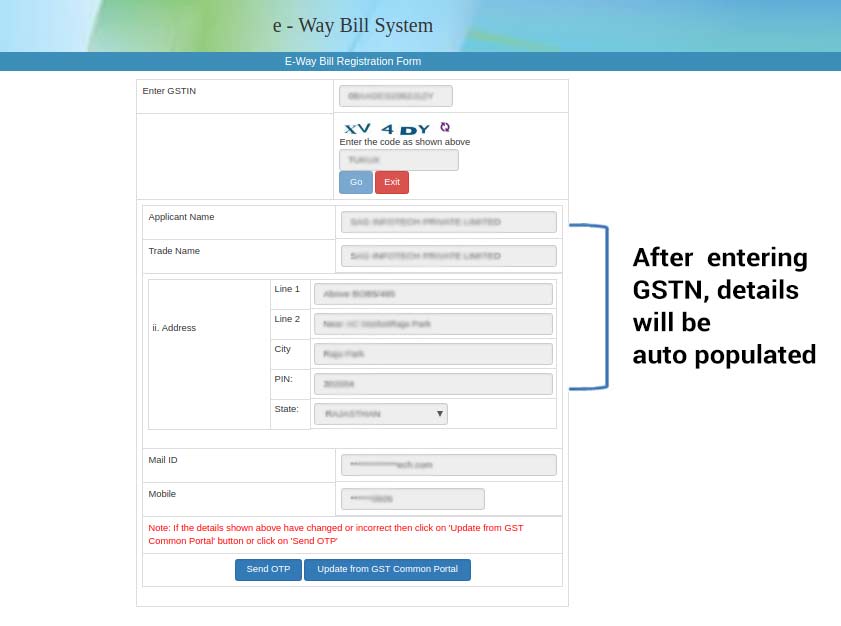
[After entering the GSTIN, rest all the fields will be auto-populated]
And now, after checking all the auto filled details
Step 4: Click on Send OTP (a unique OTP is send on the registered mobile number).
Step 5: Enter the OTP and now click on Verify OTP
Step 6: Enter the new User ID and Password of your personal choice.
Step 7: During the registration process, it is essential to generate E-Way Bill login ID and password to access the portal.
Once all the details are correctly filled, User ID and password will be created automatically.
Registered Taxpayers / Transporters
Step 1: Visit e-Way Bill Portal (i.e. www.ewaybill.nic.in)
Step 2: Go to the ‘Registration’ tab and click on the ‘E Way Bill Registration’
Step 3: Generate the unique OTP by Clicking on ‘Send OTP’
Step 4: ‘Enter the OTP’ (send on the registered Mobile Number) and the ‘Captcha Code’.
Step 5: Create the user ID and password of your personal choice
If all the details are correctly filled, User ID and Password will be created automatically.
Unregistered Transporters
Step 1: Visit Indian Government official E-Way Bill Portal (i.e. www.ewaybill.nic.in )
Step 2: Click on ‘Enrolment for transporters’ anchor link on the right side of the dash board

Step 3: Enter all the following details accurately
Name of the state, Name (as per the PAN Card), Trade name (if any), PAN Number, Type of Enrolment, etc.

N.B. – After PAN validation is done, if the system finds any error or mismatch and it will proceed after correction.
Fill up all details at point 1 and 2.
Choose the relevant type (e.g. – cold storage/warehouse/godown/ transport service/cold storage).
Step 4: In the column ‘Constitution of businesses’ –
Select the relevant business form from the drop down –

Foreign company/Partnership firm/ proprietorship/ Private limited company/ public limited company/Unlimited company/ others (If HUF, AOP, BOI and so on)
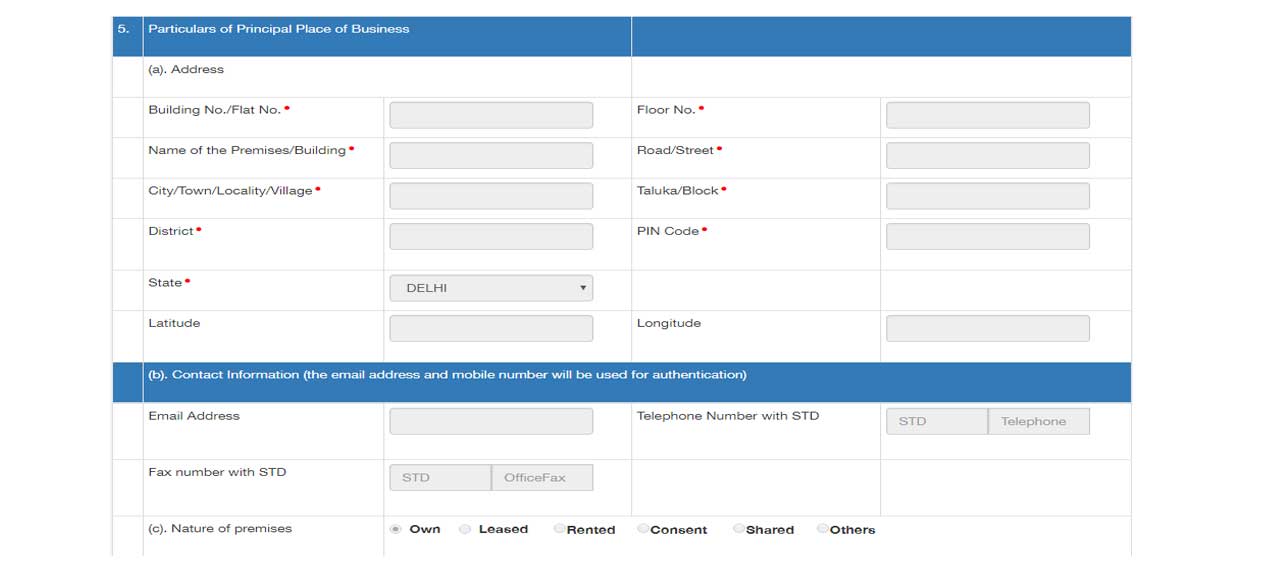
Step 5: In the column ‘Principal Place of Business’
- Type the Complete Address entering all the important red marked fields.
- Contact information – Type the e-mail address, Landline number and Fax number (if any) B. – e-mail is required for authentication purpose only.
- Do mention the Nature of premises (any of these options) – The Building of operation is Own /leased /rented/ consent/ shared/ any other case.
Step 6: (i) Tick out the Declaration, (ii) Enter the Aadhar Number and Name of the personnel and (iii) The Aadhar linked Mobile Number.

Step 7: Click now on ‘Verify Detail and Send OTP’
Step 8: Enter OTP and click now on ‘Verify OTP’
Automatic message will appear on the screen ‘Your Aadhar has been successfully verified’.
Step 9: Upload the Address Proof and ID Proof

(If correctly uploaded, the file name appears on the right side of each field)
Step 10: Now Create the ‘Login Details’
(i) Set up a new username or user ID and unique ‘Password’
(Enter the same Password for ‘Confirm Password’)
(ii) Do not forget to Tick out the Declaration.
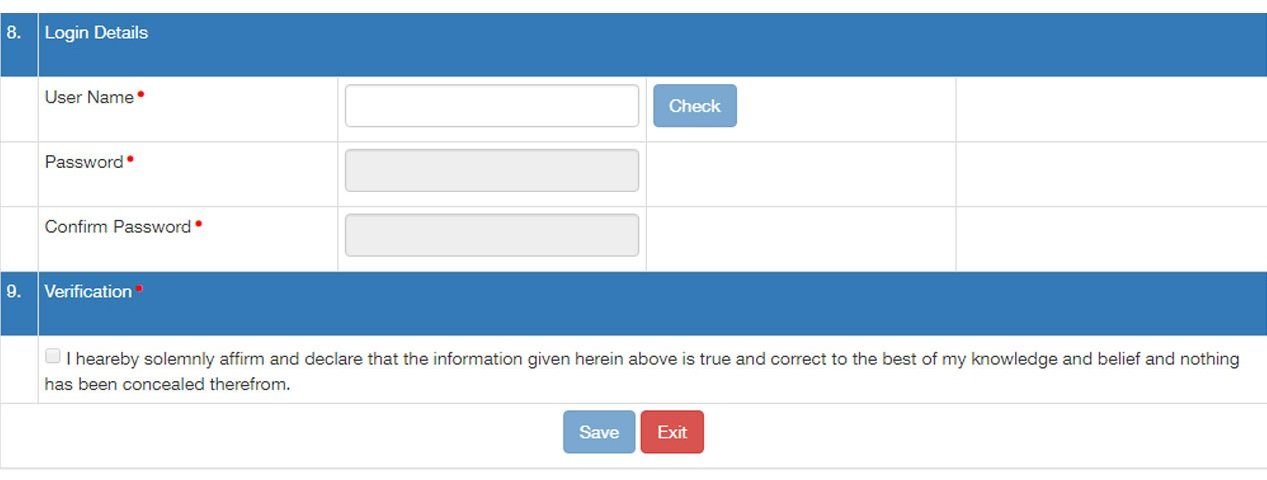
Step 11: Click on the Save button.
A 15 digit transporter ID will be displayed automatically on the dash board. The unique number should be given to the clients for entering it on GST e Way Bill and enabling vehicle number to be added for the smooth movement of goods.
Conclusion:
Obtaining an E-Way Bill through the right procedure under GST will facilitate a smoother movement of goods. So, this guide will help you know about the essential things pertaining to the subject.
Try HostBooks
SuperApp Today
Create a free account to get access and start
creating something amazing right now!






1 Comment
Very Helpful article on How to eway bill registration.